Archive for the Category ◊ Tools and Shop ◊

Author:
• Sunday, September 04th, 2022
Preppin' Weapon sanding blocks

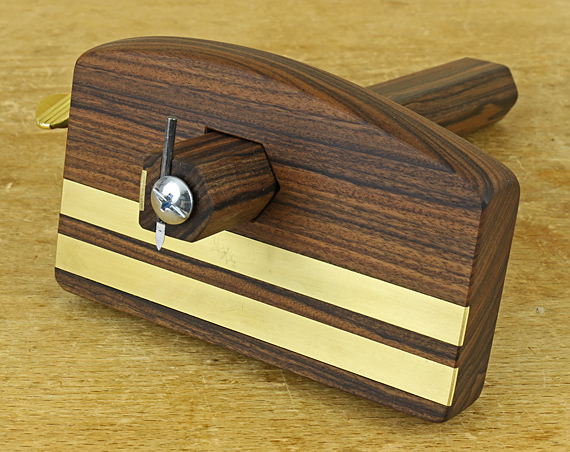
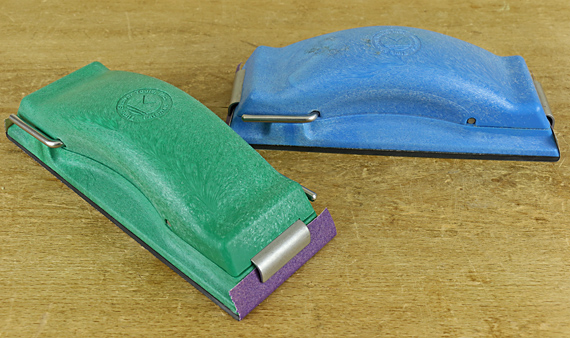
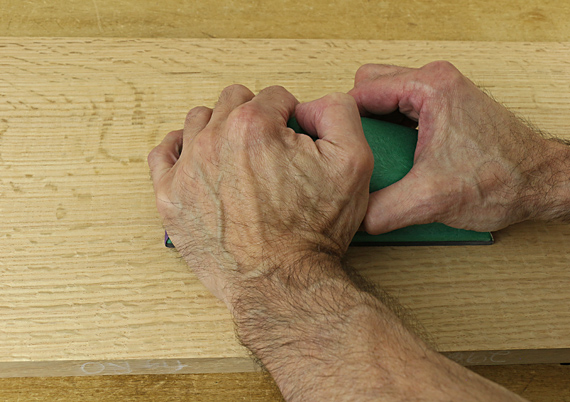
This is, hands down, the best hand-sanding block I have used. What I like best is that the substantial weight, the thoughtfully designed contours, and the 7 3/4″ x 2 3/4″ dimensions combine to give it a purchase in my hands that resembles a small wooden smoothing plane. This feel, plus the outright effectiveness of the tool, actually raise the dignity of sanding. 

grip on Preppin' Weapon

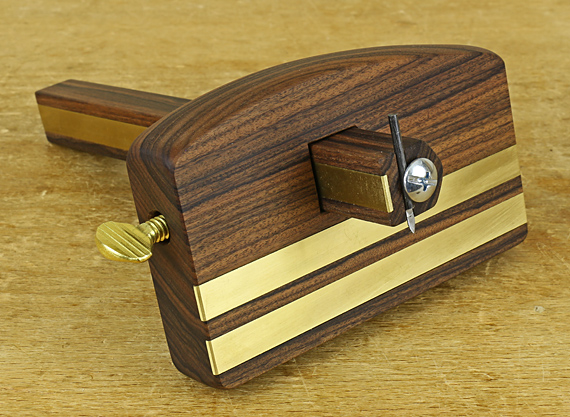
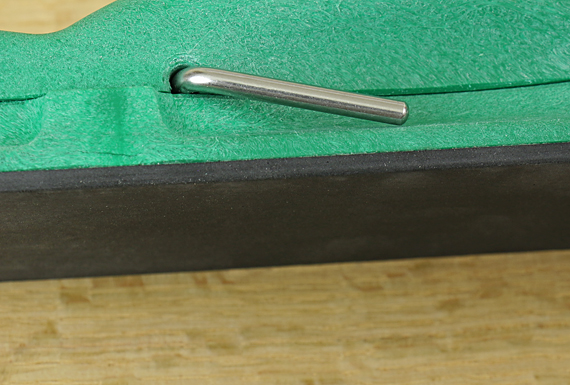
It is also very practical. It is fast and easy to clamp strips of 2 3/4″-wide paper, which are produced by three tears across the width of standard 9″ x 11″ sheets. (Here’s how to make that easy.) The clamps grab a strip near its ends so there is minimal waste. You can install multiple sheets and tear them away in succession but I prefer the feel with a single layer of paper. Now is a good time to restate my opinion that 3M is the clear winner in sheets for hand sanding. 

Long accustomed to my cork blocks, I bought the Preppin’ Weapons on a whim, but for all but small-scale work, I now favor them over the corks. I suggest buy different color Preppin’ Weapons to code the installed sandpaper and make jobs move along faster. 

Now for an idea or perhaps a bit of insight into some of what happens at the sandpaper-wood interface. We know that a smoothing plane blade with a straight edge and square corners will promptly produce “gutter” marks on the wood surface, which are slight steps across the width of the board. To eliminate this problem, we sharpen the blade with a very slight curve (camber). This actually makes imperceptible waves that pretty much cancel each other with successive passes of the plane as the peaks of the waves are shaved away. Note that the depth of the blade camber is coordinated with the anticipated shaving thickness. The result is a surface that is, for all practical purposes, nice and flat.

Similarly, imagine a hard block of steel used as a sanding block, especially with substantial pressure. Of course, no one would use that. It would create tiny gutters or steps, and the process of erasing them would just produce new ones. 

Preppin' Weapon pad

The cushion, or resilience, of the bottom surface of a sanding block – cork, rubber, or foam – solves this. With variable hand pressure, we must be producing miniscule waves (probably variably oriented) that get evened out with successive strokes, leaving an essentially flat surface. We never see steps. We intuitively use a little more pressure with coarser paper, inducing more flex in the sanding pad, analogous to coarser plane shavings. Finer sandpaper and less pressure give more shallow waves and ultimately we end up with a nice flat surface.

Coordinated with the area of the contact surface, the flex of the 5/32″ foam pad on the base of the Preppin’ Weapon is just right for producing a smooth and true surface.

This tool gets everything right.

Category: Tools and Shop  | 4 Comments
Author:
• Sunday, July 31st, 2022
Daitei chisels

What are the best hand tool and the best power tool in your shop? Just considering this question will give you pause to ponder what really makes a tool great. The answers will help guide you in what tools to buy and what tools to employ in a project. 

For me, the best hand tools in my shop are my full set of blue steel “suminagashi” (or “mokume”) Japanese bench chisels made by Teiichirou (Teijiro) Okukbo in Yoita, Niigata, Japan under the brand name Daitei. A few are pictured above. 

I suppose it is possible (e.g. Tasai) but it is hard to imagine a better chisel than these. They can be made hair-popping sharp, they are the easiest tools to sharpen that I own, and the durability of the edges is astounding. The ergonomics are just right for me, and their beauty is inspiring. “Eleven” stars.

Other candidates were: my Bad Axe backsaws and Lie-Nielsen #4 and #7 planes. These are full of intelligent, functional features and the accuracy parameters are excellent. Honorable mentions: Starrett straightedges because of their core accuracy that forms the basis for accuracy in the whole shop.

A sports team coach knows that when a job needs to get done in crunch time, he’ll go to his best athlete. That player has the composition, inherent abilities, and playing smarts to find a way to get the job done, often in a manner no one expects.

Similarly, a good woodworking tool must start with a great design, usually time-proven but allowing for smart innovation. Then, the execution must be top quality. You do not want a tool that contains frustrating design or construction flaws for which you must constantly compensate.

With that great tool in hand, your confidence is uplifted. You find ways to get things done well that you maybe did not even expect. The bottom line: that tool helps you become a better craftsman. When at all possible, those are the tools to buy and put to work.

So, the best power tool in my shop is the Byrd Shelix carbide spiral cutterhead that I installed in my DW735 thickness planer. The design is about perfect. The rows of cutters are in a true spiral (helix) pattern, and each cutting edge is cambered. Each cutter can be reset or replaced to make use of its four edges. Along with the outstanding qualities of the DW735, the Shelix allows me options in stock preparation that no conventional cutterhead comes close to matching. 

Shelix cutterhead
DW735

Just like a coach, these great tools allow me to form a better game plan, execute it well, and very often go beyond what I could otherwise do. These tools do not drag me down, and do not need to be questioned and compensated for. I become a better craftsman and I do better work

That is the test of a great tool. I suggest keep this in mind the next time you open a tool catalog or visit your favorite drool tool store. 

Category: Tools and Shop  | Comments off
Author:
• Thursday, June 30th, 2022
Elu collet

I often prefer solid carbide center-cutting upcut spiral end mills for router mortising, especially for 5/16″ mortise widths. They come in longer cutting lengths and longer overall lengths than comparable diameter spiral router bits, and they cut smoothly and cleanly. 

The cutting and shank diameters are the same for end mills. This is especially an issue for 5/16″ bits. I do not like to use router collet bushings to reduce the collet diameter. The inserts are not as flexible as a high quality collet itself and so I think they do not grip the bit as reliably as the regular collet alone. A slipping bit is a bad day, so I do not want to place my trust in the bushing set up if I don’t have to. 

That said, for what it’s worth, I think the best bushings, if that’s what you want to use, are from Infinity Tools, pictured below. I do not like versions with fewer slots because they do not seem to be as flexible. 

collet bushings

DeWalt (for my old Elu, which is essentially the same as the current DW625) and Bosch (for my 1617EVS) do not make dedicated 5/16″ collets, as far as I know. 

There is, however, an ideal solution available! Elaire Corporation makes a wide range of router collets diameters for many routers, including DeWalt and Bosch. These are made in Ohio, and the specs and quality meet or exceed the OEM parts, in my experience. 

Check out their selection here. Prices are reasonable. 

Problem solved. Go mortise.

end mill ready to mortise

[Usual disclaimer: This review is unsolicited and uncompensated. I have no proprietary interest in Elaire.] 

Category: Tools and Shop  | Comments off
Author:
• Saturday, April 30th, 2022
Record holdfast

The Record #146 holdfast has generated some inquiries over the years, so I’ll address the topic in this post. I bought mine nearly 40 years ago, and while still a good tool, I would not recommend it now because there are better choices. 

I like the Gramercy holdfasts, which I have been using more than the Record for more than 10 years now. They fit in simple 3/4″ holes that you drill directly into the bench top. They cost only $39.95 per pair. I suggest buying the pair because it is helpful to use them together when you want a very secure hold to resist lateral force on the work piece. And you will certainly want more than one of these holes in your bench top because they can be used for many other holding tools, most notably Veritas products including Bench Pups, Wonder Pups, planing stops (I made my own out of wood), and their own holdfast.

If you do want to use the Record, you have to decide where to place the metal collar that it requires. This collar allows you to place lots of pressure on the work if you need it, making this the strongest holdfast I’ve seen. The collar is not really too obtrusive (I don’t recall having rammed a cutting edge into it) but it would not be there if I was setting up a bench now. Happily, I installed only one, those many years ago, and the location has worked out well. 

This collar placement allows a work piece to be held where I can chop dovetails over the right leg structure of the bench. It also can work in conjunction with the tail vise and dog system on the right side of the bench. The pad of the holdfast reaches close enough to the front and to the right side of the bench for practical purposes, and still extends about two feet from the right edge of the bench.

Record holdfast placement
Category: Tools and Shop  | Comments off
Author:
• Saturday, April 30th, 2022
Hammer A3-31 infeed adjustment bolts

Lots of information can be found on this website about jointer-planer combination machines and the Hammer A3-31 in particular. I have received many inquiries, especially regarding setup and adjustment of the Hammer. One thing that I have not covered in detail is how to make the infeed and outfeed tables parallel to each other along their lengths. This is quite doable but not simple. 

Let us first set the context. As described in detail here, there are several logical steps to adjusting the jointer. In summary:

1. Start by verifying the flatness of the tables.

2. The width of the outfeed table is then made parallel to the cutterblock

3. The arc of the cutting blades must be consistently adjusted relative to the outfeed table. Here is a practical and accurate method applicable to most machines.

And here are the nuts and bolts on the A3-31.

4. The infeed table and outfeed table are then made parallel across their widths by adjusting the infeed table. Step 4 here describes the details, including for the Hammer. 

5. And now for the tricky part. The infeed and outfeed tables must be made parallel along their lengths.

For reasons similar to wanting a hand jointer plane to have a flat sole, so should the machine tables be adjusted. In my opinion, this adjustment should be done with a one-sided tolerance. Aim for the tables to be parallel, but a trace of convexity, like the letter “A,” is OK, but there should be no valley, like the letter “V.”

So, how is this done on the A3-31? In those earlier posts, I referred to “geometry” without presenting the details. You could work hit-or-miss to make the adjustment, but with four points of adjustment involved, it would probably be unnerving and cause you to give up, and then tolerate using a poorly adjusted jointer, which will in turn wreak all sorts of ugly havoc on your ensuing work. So, really, it is worth deciphering my geometric method. It works. 

I attached my handwritten notes, made years ago. Click on the little picture below for a full-size version. 

The front-side adjustment bolts are shown in the photo at the top of this post. 

The hinge-side adjustment screws are found under this plate:

Hammer A3-31 back plate

The pencils are pointing to them: 

Hammer A3-31 hinge-side set screws

These bolts must be both be loosened to allow the set screws to move: 

Hammer A3-31 hinge-side bolts

The method starts with placing a straightedge to extend the full length of the infeed table with a sufficient amount to also have a good register on the outfeed table. The infeed table starts low and then is adjusted upward to the first touch on the straight edge. If you have done all the previous work as described above, the place of the touch will tell you how the tables are aligned. In my machine, the tables were delivered tilted toward each other, like a “V,” so the first touch of the straightedge was at the outer end of the infeed table.  

Measure the gap as shown in my notes. Note then that I have simply diagrammed similar triangles among the straightedge-table and the pairs of adjustment screws, and calculated the amount of adjustment to be made at the appropriate screws. I then converted that into how much to turn each screw based on the thread pitch. 

OK, I think you can see why I did not include this in my original set of posts! It is a bit painful. I like math so I admit to a bit of joy in working this out, but for those A3-31 owners not so disposed, contact me and I’ll try to help. 

Thankfully, the machine holds its adjustments very well. 

Author:
• Sunday, February 27th, 2022
marking gauge

I built this gauge to incorporate specific features that I like and could not find in combination in commercially available models. 

This is a hefty tool with a Honduras rosewood (old stock) fence 4 1/2″ x 2 3/4″ x 7/8″. The contoured top edge is similar to my Japanese cutting gauge that has always felt comfortable in my hand. The lower part of the fence gives plenty of area to register on even thick stock, and is protected from wear by two 3/8″ x 1/16″ inlaid brass strips.

In use, my thumb is on top of the fence, with the muscle at the base of the thumb on the lower part of the contour, while the other fingers are below the stem where they can exert pressure on the fence where it meets the workpiece. I like they way the tool handles.  

The stem is about 11/16″ thick and 7″ long. It is shaped to go through a matching mortise in the fence that has three sides of a rectangle and a point on the fourth side – like a house. This wedge action makes the stem lock very securely with only modest pressure from the locking screw. Note that the peak on the length of the stem is cut back a bit to prevent it from bottoming out in the mortise. 

A feature that I strongly prefer in any gauge (with the exception of a mortise gauge) is the scribing point at the very end of the stem where I can see what it is doing. Here I used a simple half-point scriber from an old gauge. It is secured in a groove with a pan-head screw threaded into the wood.

marking gauge

The other end of the stem is set up with a groove and a tiny bolt that threads into an embedded nut. It holds the excellent Hamilton fingernail shaped knife, which works nicely as a cutting gauge. It also works well along the grain but there I more often like the heavier mark of the half-point scriber. This is two gauges in one. 

The locking screw is a 1/4-20 brass thumbscrew that travels through a bronze bushing and threads through an embedded cylindrical nut that is placed about 3/4 of the way along the route of the screw. I like the thumbscrew at the front of the gauge where it is fully out of the way when marking. The locking screw meets a 5/16″ x 1/16″ brass wear strip embedded into the stem. There is no loose metal button pad to get lost.

On the back of the fence, I sealed the hole for the cylindrical nut with a wooden plug. The locking system works very well but in retrospect I think it would have been easier to make or find a brass cylindrical nut, and simply leave one or both ends of it showing.

Overall, I’m pleased with the function, accuracy, and appearance of the result. As usual with any tool making, I suppose I could make another one in a third of the time and with no regrets, but I only need one. 

Category: Tools and Shop  | Comments off
Author:
• Friday, January 14th, 2022
Veritas Bevel-Up #1

This is the Veritas Bevel-Up #1 plane, which I have been using for a year now. With a 1 7/32″-wide blade, it is indeed small but it works legitimately as a seriously useful plane. An ancillary tool, not a necessity, still I reach for it a lot more than I expected, so I want to share its merits with readers.  

This plane excels for small or concentrated work where its maneuverability and the vision of the work that it affords are significant advantages. In fact, even large projects involve plenty of detail work, such as a leveling touch-up at the shoulder of an assembled mortise and tenon, and fitting small components, especially those involving angles and round-overs. 

What makes this plane worthwhile for me is the feel. While there is some crossover in function with a block plane, this plane is different. Getting both hands in non-cramped positions on the handles of the BU#1 away from the sole affords feedback and control that I really appreciate. I can readily feel the tilt, and I like the excellent visual clearance. I also find that it handles significantly better than the Stanley style (bevel-down) #1.

I keep the BU#1 tuned about like a smoother with the blades mildly cambered. Because there is little momentum behind this small plane, it is particularly important to keep the blades sharp, especially if using a high attack angle. 

Veritas Bevel-Up #1

This plane has a 15° bed so you can sharpen with a secondary bevel of 30° for a good all-round attack angle of 45°. It is also useful to keep a second blade sharpened to 40° or 45° for a 55° or 60° attack, respectively, to use as a touch up plane on difficult grain. The short sole helps in this function. By the way, I would prefer a 20° bed but I’ve covered that issue at length elsewhere

Other features that I like are Veritas’ Norris-style combination adjuster with set screws near the front of the blade to make responsive lateral adjustments, and the adjustable front sole plate with a retainer set screw to easily regulate the width of the mouth. The sole of the BU#1 that I first received was slightly but significantly concave along its length but Lee Valley, being the great company that they are, exchanged it without bother. I slightly touched up the sole of the replacement, just because I’m picky. 

The BU#1 does not suffer from the unfortunate handle design that plagues most other Veritas planes. (They can be replacedtalk to Bill Rittner.) It has only a mild curve but this works well for this plane; it feels right and comfortable to me. 

My usual disclaimer: This review is unsolicited and uncompensated. My goal is only to point out good tools so you can make great stuff.

Author:
• Friday, February 05th, 2021
table saw

A reader who recently sold his table saw asked about managing without it.

If you have been reading this blog over the years, you probably know my opinion. Of the five major small shop machines – table saw, bandsaw, jointer, planer, and router table/shaper – the most dispensable is the table saw.

Don’t get me wrong, the table saw is certainly helpful and I don’t want to give up my Saw Stop. It is great for clean, accurate ripping and crosscutting among other tasks. But you can still build everything you want without that cast iron landing pad with an emergent blade, just not as fast or conveniently.

I suggest the following tools as keys to working efficiently without a table saw. The links give lots more information. 

1.  Bandsaw! This takes up much less shop space than a table saw, though you still need infeed and outfeed space. 

You can rip quite accurately on a well-tuned bandsaw. Decent crosscutting can be achieved with or even without the miter gauge though you will need outboard support. And, of course, the bandsaw is much more versatile than the table saw. 

No bandsaw either? I could still do just about everything by hand (but I really, really don’t want to) with my Disston ripsaw, wide and narrow-blade bowsaws, an inexpensive crosscut breakdown saw, large and medium ryoba saws, a Gyokucho “05” crosscut kataba, the wonderful Bad Axe hybrid backsaw, and a few more. 

2. Cross-grain shooting board with an appropriate, ideally dedicated, plane. Here’s how I made my current one. This will clean up your crosscuts like no other tool on earth, hand or power.

3. Long-grain shooting board. This underutilized technique is great for accurately and conveniently cleaning up short to medium length rip cuts. My current board accommodates work up to about three feet. This is very easy to make and does not really require a dedicated plane, though I prefer my Lie-Nielsen #9. 

4. A jack plane, or better yet, a jack and a jointer, round out the essentials for the shop without a table saw. 

This is all in addition to the usual complement of hand tools and machines that you would want to have with or without a table saw.

By the way, my longstanding recommendations for machinery remain: for your first machine, get a thickness planer. Then get a bandsaw. Then get a jointer, 12” or wider, if you can. Build a router table. And, yea, get a table saw too, if you can. 

Category: Tools and Shop  | 10 Comments