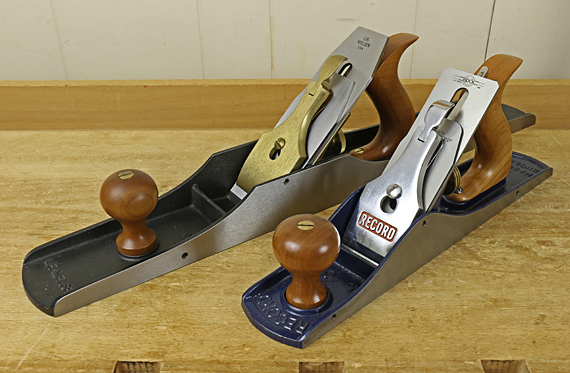
Founded in 2008, Heartwood is among the longest-running active woodworking blogs on the internet. It contains 266,000+ words of original content in 600+ posts, all written by me alone. (That is not including comments.) And there are 1400+ original photographs.
Here you will find plenty of serious woodworking instruction, information on tools, shop setup, and wood, along with musings about the craft. All for you to enjoy for free. No adds, no selling, no nonsense.
Very conservatively, there has been 6 million+ visits and 20 million+ page views (actual human visits, not bots, crawlers, etc.).
I am always delighted to hear from fellow enthusiasts and anyone exploring fine woodworking.
The process I used to construct these markers ensured their accuracy.
I used bubinga but many dense, fine-grained hardwoods such as hard maple would do fine. Start with a 1 3/8″-thick, flat board without internal stresses, at least 12″ long and 5″ wide for safety, with a straight, squared long grain edge.
Using appropriate safety precautions, make a 1″ x 1″ rabbet on the long grain edge. I used many shallow passes with a 1″ diameter straight bit on the router table, finishing with a light pass over the entirety of the inside surface.
On the table saw, rip away a 1 1/2″ strip containing the rabbet.
For safety and accuracy, short pieces – the markers themselves – will be cut on the table saw from this long work piece.
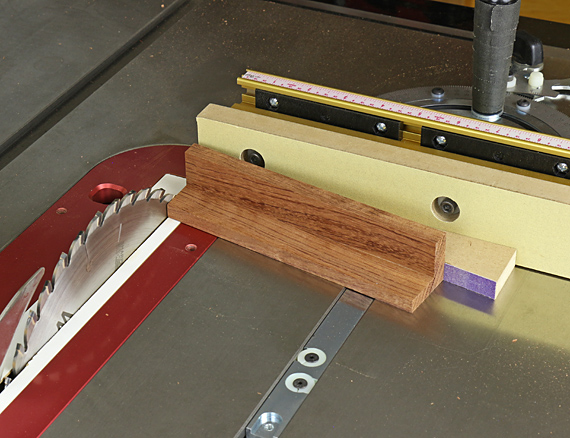
Two principles guide the process. We want to work with the rabbet always facing the blade to eliminate even the minor tear out that can occur at the trailing edge of a cross cut. This keeps the inside edges of the marker crisp. This also keeps the work piece stable against the fence.
We also do not want to reset the miter gauge in case there is even the slightest inconsistency from the right side to the left side settings.
So, prepare by making a wedge. Use the miter gauge to cross cut a squared edge on a piece of scrap or MDF. Then set the miter gauge at the desired dovetail angle and cut off a narrow wedge. Glue sandpaper to the angled edge, and to the straight edge if you don’t have sandpaper on your miter gauge fence.
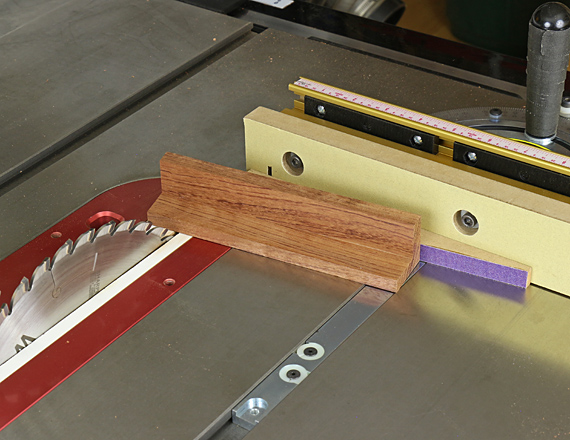
Use the wedge against the miter gauge fence, set at 90°, to cross cut the end of the work piece held against the wedge. This creates one side of the marker (as in the photo at top). Then, flip the wedge end for end, and cross cut to produce the finished marker about 1 1/4″ wide (as below).
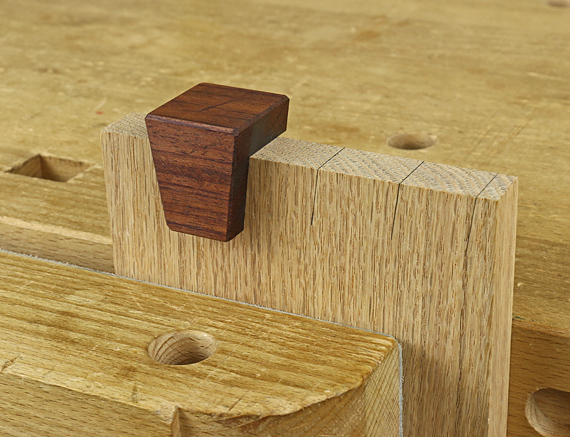
Check the marker with a square and bevel gauge. Both sides should be the same. Chamfer the non-working edges on the outside. Label it with the dovetail slope – I carved the numbers. The oil (non-film) finish has worked well over the years.
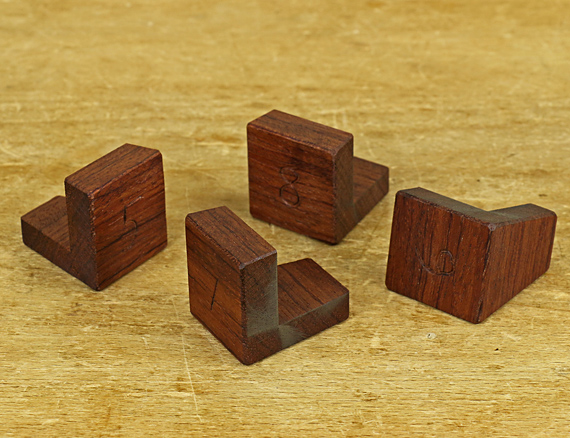
Make dovetail layout easier and speedier with these shop-made markers. I have been using them in my shop for many years.
Unlike most commercially produced markers, they allow you to pencil the entire length of the line on the end grain and face grain with one positioning. This produces an accurate alignment of those two lines, which in turn helps you saw accurately. They work for tails-first woodworkers as well as pins-first iconoclasts.
The outside dimensions are 1 1/2″ tall, 1 3/8″ deep, and about 1 1/4″ wide. There is 1″ of length on the inside of each arm of the marker, which will accommodate almost all dovetailing for most woodworkers.
They are easy to make in a variety of dedicated dovetail slopes. No more setting a sliding bevel.
You can also use them to square the pin layout on the end grain (that you transferred from the tails) down the side of the pin board with a pencil to help guide your saw.
Note that there is no “relief” at the inside corner of this marker. All the working edges are crisp. A relief at the inside corner, though present in many, if not most, commercial markers, is unnecessary and misguided. Come on, who has “saw whiskers” on the pieces they are about to dovetail? The relief causes a break in the pencil line at the corner of the work piece, thereby disturbing an important visual link for guiding the saw.
The construction method makes these markers as accurate as anything you can buy. And, of course, the cost to make them is negligible.
I detailed their construction in an article in Popular Woodworking magazine, November 2009, issue #179, but now I will present show the simple process here on the Heartwood blog in the next post.
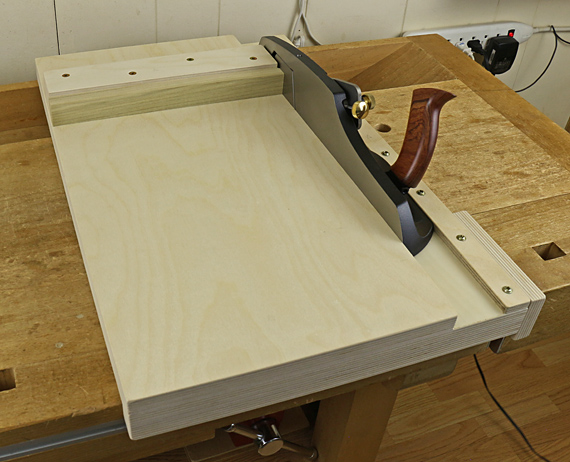
Here are the details of the shooting board I use. It is designed for use with the Veritas shooting plane, as well as to fit my workbench, the work I typically do, and my personal physical characteristics (I’m right handed).
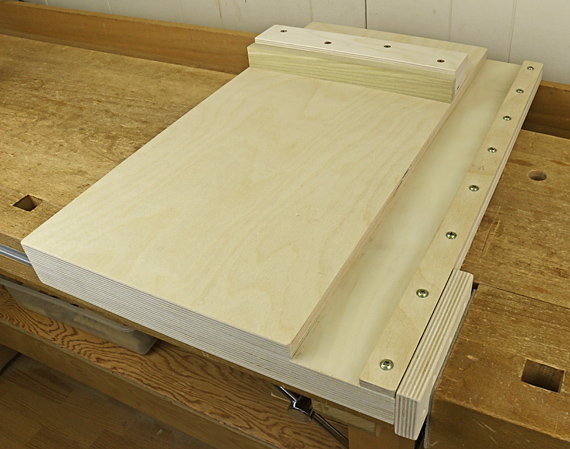
It is constructed primarily from 18mm 13-ply birch plywood. The base and thus the overall dimensions are 22 3/4″ x 14 1/2″. The platform upon which the workpiece rests is 11 1/4″ wide, and is glued and screwed to the base.
The right side of the platform was planed accurately straight before installation. The tiny rabbet, which is the basis for how a shooting board works, is created with the first few passes of the plane that “break it in.”
The cleat at the front, glued and screwed, hooks onto the front of the workbench. The cleat on the right side fits into the tail vise. Together, they give the shooting board rock-solid stability in all directions while in use.
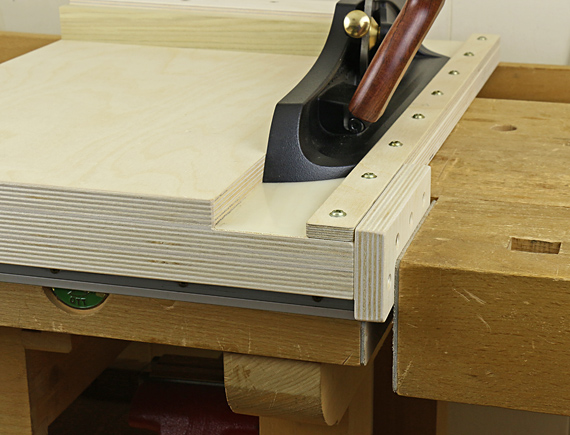
The channel for the plane is about 2 1/8″ wide, and lined on the bottom with 3/64″ PSA UHMW plastic. The 9mm 7-ply birch strip, 1 7/32″ wide, on the right side of the channel is adjusted to create a snug fit for the Veritas shooting plane, and firmly secured with pan-head screws placed at 3″ intervals. It is not glued, so it can be adjusted if needed. The inside wall of the strip is waxed.
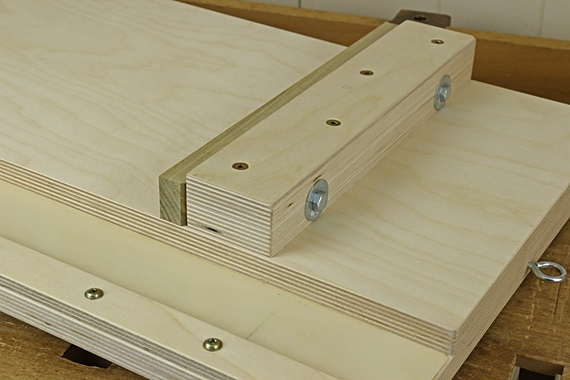
The fence block is 2 1/4″ wide, made from two glued layers of the 18mm plywood. It is glued and screwed square to the sole of the plane nestled in the channel. The 3/4″-thick (or 7/8″) poplar replaceable subfence is attached with two 3″ x 1/4″ lag screws that enter from the back of the fence block, accompanied by heavy washers. The pass-through holes in the fence block for the lag screws are actually small slots that allow for some lateral adjustment of the subfence. You may want to use a third lag screw to ensure the subfence is snug against the fence block.
There are three ways to tune the 90° angle of the subfence. You can use whatever suits you; that is a big advantage of this design. Remember, we are using the in-place sole of the plane as a reference, not the channel edge itself.
First, when you create the subfence itself, you can easily plane it as needed – it’s friendly poplar. Then, when you attach the fence you have the chance to put very thin shim(s) between it and the fence block. Now, if you placed the fence block dead on and use a perfectly thicknessed subfence, you should not need to do this, but it is good to have the option! Finally, when in use, you can put a piece of tape or a shaving between the workpiece and the subfence to fine tune the working angle.
For angles other than 90°, you can make and attach a different subfence.
The front of the subfence is 7 3/8″ from the back edge of the shooting board. This gives more than enough length to fully support the 5 1/2″ toe of the Veritas shooting plane. I prefer the plane to have full registration against the channel edge all the way through the cut. There are many shooting board designs with the fence at the end, which causes the plane to lose full registration before the cut is completed.
Also, the 7 3/8″ works out to make the front of the fence not too far away from me, so I don’t have to lean forward too much, while still allowing the base of the shooting board to reach across the tool trough to get full support from the rear wall of the trough. This also results in enough platform depth to accommodate the vast majority of workpiece widths that I use.
The 11 1/4″ fence is long enough to firmly register almost all the work I do. You may want to make your shooting board wider. For any board longer than 20″ or so, I stack a couple of pieces of plywood under the left side of it to prevent it from tipping up at the working end.
The screw eye allows you to store the shooting board on the shop wall, away from abuse.
Remember:
sharp!
dynamic stability in use
low-tech micro-adjustment
and . . . the grippy glove on the left hand
I put a lot of forethought into this design, gathering ideas from many other designs. It has worked out very well for me. I hope it helps you with your work.
Addendum:
A plane such as the Lie-Nielsen #9 or a bench plane on its side can be gripped directly above and just behind the cutting edge. For these planes, a snug enclosed channel in the shooting board, such as shown here, is still very helpful but not essential. For the Veritas (or Lie-Nielsen) shooting plane where the grip is far behind the cutting edge, a snug channel is, in my opinion, a practical necessity. The grip location in these planes makes it too easy to get off track in the shooting stroke. Both systems work but I have come to prefer what I have detailed here for you.
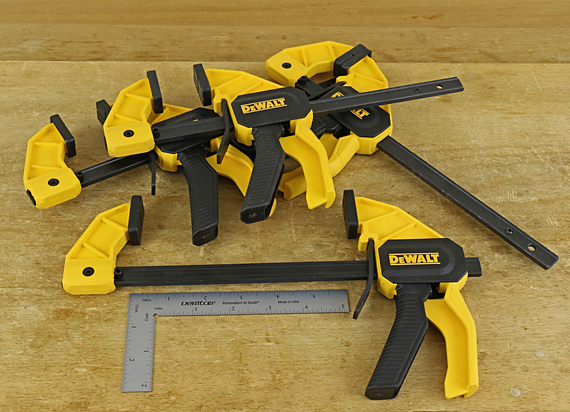
No respectable woodworker can venture to the local Home Depot for that next-on-the-list home fixit thingy and resist a stroll through the tool corral because, you know, there might be something there that you absolutely need without having realized it. So, in this lucid state, I acquired a few of these little DeWalt trigger clamps.
DeWalt calls them “medium” but I rate them: small enough but strong enough. They are an excellent alternative to spring clamps, which I have never really liked.
The 2 5/16″ (actual) throat depth is at least that of most spring clamps except for some awkwardly large steel and ratcheting models. The 6″ clamping length of the model I use is longer than nearly all spring clamps. There is remarkably little bowing of the I-beam bar even with the maximum force applied, which is nominally 100 pounds.
The fixed jaw can be reversed for spreading. The jaw pads have horizontal and vertical V-grooves for use on corners and small round pieces.
A trigger clamp is not quite as easy to use one-handed as a spring clamp. However, they are still convenient to apply with one hand if you preset the jaw opening, then carefully set the first jaw flat on the workpiece, and finally squeeze the handle to plant and tighten the second jaw.
DeWalt’s trigger clamp series also includes “small,” which is too tiny for much use in my shop, and “large,” which I skip in favor of the “extra large,” which generates 600 pounds of force. I wrote about those in another post.
Shooting is a gateway skill to precise hand tool woodworking. So get started by shooting with the planes you have.
The basic requirements are:
Mass. You want substantial momentum to firmly and steadily carry the blade through the cut after you get it started, especially for end grain shooting.
The side of the plane should be square to the sole. If you only have a not-so-great plane, use tape to shim the side. I did this with my old Record jack plane when it was the only one I had. [Please see in the Comments section reader Michael’s germane point and my lengthy reply for more details on the squareness issue.]
It helps a lot to have a comfortable, secure grip to consistently apply pressure where it is needed. Dedicated shooting planes have this feature.
The blade must be sharp. Sharp! A dull blade is not only harder to push through the cut, but accuracy will suffer as the plane and the blade itself deviate from a true path.
For end grain shooting:
Best: a dedicated shooting plane.
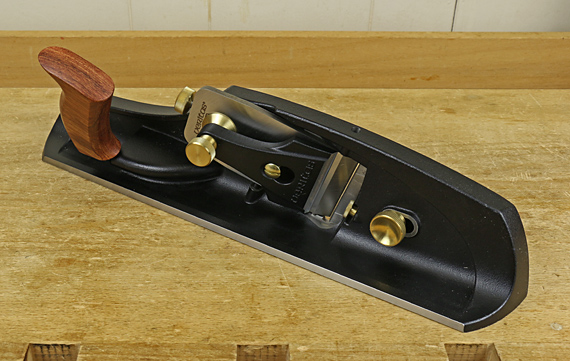
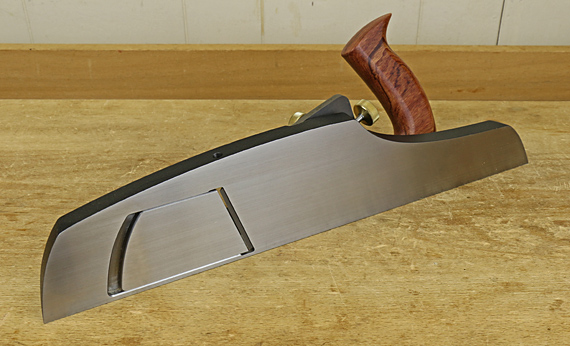
I use the Veritas shooting plane, and love it. Comfortable and accurate to use, it meets all the requirements above. The adjustable-angle handle properly and comfortably directs pressure, and the 20° skew really eases the blade through the cut. The bevel-up design is easy to set up and adjust, and provides excellent support to the blade close to its edge.
Is it worth spending about $350 dollars on a plane just for shooting? In view of all the other expenses involved in woodworking, yes, it is. (See the first sentence of this post.)
Lie-Nielsen also makes a great shooting plane, which I have had a chance to use briefly. This massive tool uses a bevel-down design and a skewed, Bedrock-style adjustable frog. Personally, I like the Veritas design and features, but both merit consideration.
I use a straight edge blade for end grain shooting – no camber.
Good: a bevel-up bench plane.
The Veritas BU jack plane is perhaps the most versatile plane of all, and a good shooter. The BU design gives good blade support, and makes it easy to swap dedicated blades for its varied uses. You can get a decent grip on this plane for shooting.
Adequate: a bevel-down bench plane.
I used a BD jack and jointer for shooting for years. I do not consider these ideal but they can get the job done. Don’t let anyone tell you that you “can’t” cut end grain with a bevel-down plane. Use a sharp blade, and set the chipbreaker close to the edge to reduce deflection.
Gripping a bevel-down bench plane for shooting may be a bit awkward for some. With the jack, I squish the base of my thumb behind the side hump and plant four fingers on the lever cap. A grippy glove can help. (So then you’ll have one on both hands.)
For long grain shooting:
Compared to using a plane with the blade on the bottom (the “regular” way) this is just a matter of different manual mechanics. The plane is not running in a track as in end grain shooting.
So, a BU or BD bench plane is fine, as long as it has decent mass and stability, the side is square to the sole, and you can get a decent grip. And . . . the blade is sharp.
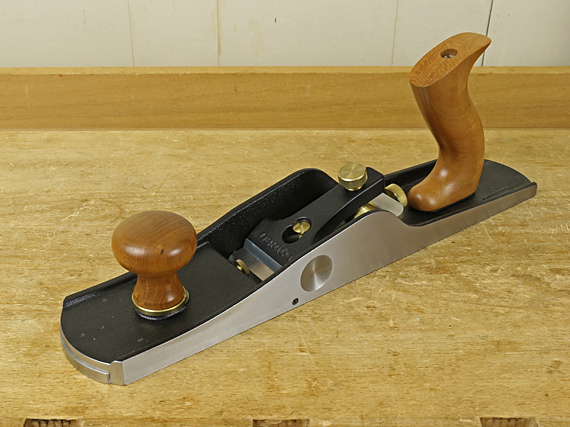
I like my Lie-Nielsen #9 “iron miter plane,” which I’ve dedicated to long grain shooting, because its beefy, boxy design makes it stable through the stroke, and it handles exceptionally well with the “hot dog” grip. This is a bevel-up design with a 20° bed. (Hmm . . . ) Unfortunately, I don’t see it on their website any more. Veritas sells a somewhat similar plane.
I keep the #9 set up with a straight edge blade, mostly because it is easier to maintain and works well for the thin stock that I’m usually using when long grain shooting. A mild camber, such as for a jointer plane, is also a good option, especially if you will be long grain shooting thicker stock, or if you are also using the same plane and blade for general tasks.
Have you given much consideration to your footwear in the shop?
The power input and the control of your tools originate from your stance. If it’s not well placed and reliable, your performance will suffer. You will also fatigue sooner.
Dependable footing is also essential to safety, especially with machine work. There, you cannot afford to compromise.
Our shop floors are usually littered with sawdust and shavings even with a good dust collection system gathering most of the waste from machine work. No matter what type of floor is in your shop, these make it potentially slippery.
That said, sure, I’ve been known to get a few things done in my jammies and slippers in my home shop. But for serious work, I like low-cut hikers or at least trail-running shoes. Lately, my favorites are these sturdy Red Head Blue Ridge Low Hiking shoes from Bass Pro Shops. They have good support, wonderful grip, and a beefy toe cover. And the camo accents look kinda cool, don’t ya think?
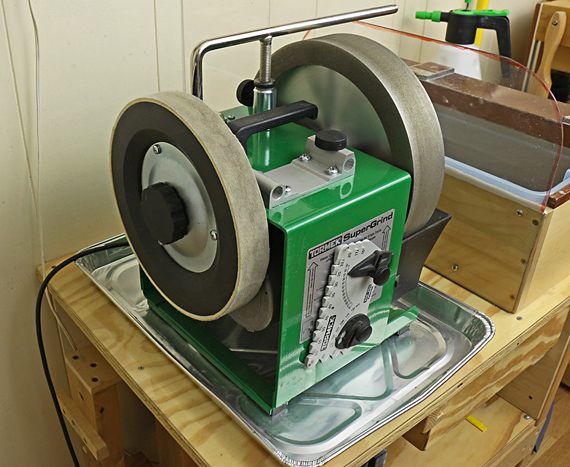
For a long time, I have not liked the leather honing wheel on the Tormek. I never used it for general sharpening because I prefer stones, but even for knives, gouges, and an occasional touch up of other edges, I find it fragments easily and does not hold the honing compound as well as I would like.
I finally got around to setting up the wheel with felt. It was easy to remove the leather and scrape clean the plastic base of the wheel.
I got the felt from McMaster. I first tried PSA-backed felt just for the convenience of applying it to the wheel. The hardest available in this style was “Firm” F1. A 3/16″-thick strip proved to be still too soft.
The harder “Hard” felt is available only in sheets without the PSA backing. I cut the 1/8″-thick, 12″ x 12″ sheets into strips and applied them with 3M General Purpose 45 spray adhesive using simple butt joints to make a continuous layer around the wheel. The S2-20 (durometer 50A) works best. The S2-32 (durometer 80A) is nominally about half as compressible as the S2-20 but the difference does not seem to matter for this purpose. I prefer the texture of the S2-20 as it seems to grab the honing compound better.
Because I use the wheel for fine finishing, I charged it with 0.5 micron diamond. Mineral oil-based paste and water-based spray will both work but I think the paste is better. They cut fast but can get expensive over time. An economical alternative is a stick of Formax “green micro fine honing compound,” which I surmise is also about 0.5 micron, available from Woodcraft. Of course, it cannot cut as fast as diamond but with patience it can still produce an excellent edge.
My preference is mineral oil-based synthetic diamond paste from Beta Diamond Products. It cuts fast and consistently, and a little bit goes a long way. I find the jar easier to deal with than the syringe.
Bottom line: the felt replacement works very nicely; I like it a lot better than the leather wheel. It is especially helpful for knives, gouges, and is even handy for quick touch ups of plane blades and chisels. I keep these touch ups very light because I don’t want to round the edge too much, which would interfere the next time I work the edge on stones.
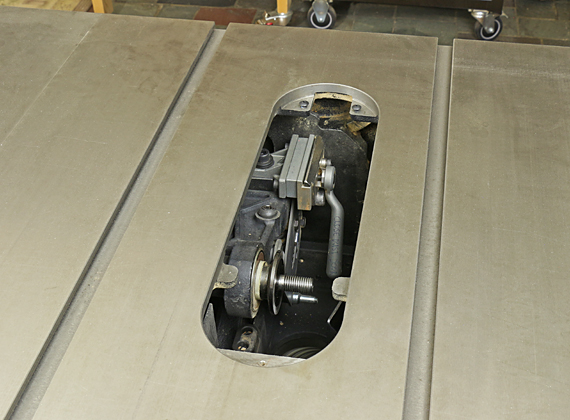
Oops, I had a SawStop “event.” But it was not my flesh that met the blade. Rather, I foolishly forgot to reset the miter gauge fence when setting up an angled crosscut, and ran the aluminum fence into the blade, and . . . boomp! So, I had to send out the damaged blade for repair along with my spare blade that was damaged 14 years ago when I was setting up the new saw. This, plus buying a new SawStop brake, made for an expensive goof up. All told I’ve lost use of the tablesaw for four weeks.
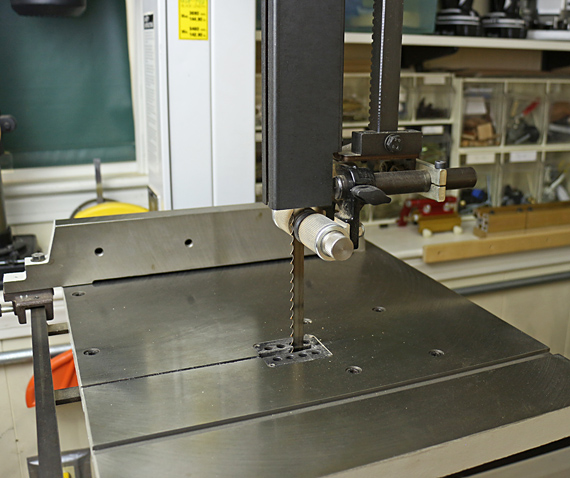
But, I’m doing just fine, thank you. In fact, the episode has reinforced my longstanding conviction and advice that the tablesaw is not the key machine in the furniture maker’s shop. In my view, that distinction belongs to the bandsaw, especially when it teams up with a good thickness planer, or better yet, a wide jointer-planer combination machine.
Far from being a hand tool purist, I was happy ripping on the bandsaw with surprisingly little clean up required with a handplane. I also cleaned up lots of 15/16″-thick, 3″/3 1/2″-wide pieces by standing them on edge going through the DW735 planer with the Shelix cutterhead. I made sure the rollers and bed stayed clean, and it went well.
“What about crosscutting,” you say, “that’s not likely to go well on the bandsaw.” Well, using the little miter gauge that came with my bandsaw, the crosscuts are pretty accurate and not too rough even with my all-purpose 3-tpi blade.
Which brings me to another longstanding conviction and advice. And that is the importance of shooting. It was a pleasure to clean up the bandsawn crosscuts cleaner and more accurately than even the tablesaw could do. Shooting is so critical to accurate furniture making that I suggest sparing no effort and tools to set up good systems for end grain and long grain shooting. (I’ll describe my current long grain setup and have some tips in an upcoming post.)
I won’t be selling my tablesaw – it does a lot of tasks efficiently and well. However, I do want to reinforce this advice regarding machines, especially for woodworkers setting up or upgrading their shops:
The first machine to buy is a good portable thickness planer. The DW735 has no peer.
As soon as you can, buy the best bandsaw you can. Steel frame style, at least 12″ resaw height, preferably something close to 2.5 HP or more.
Get a 12″ jointer if you can.
And sometime, yes, you’ll probably want a tablesaw.
Most important, no matter what tools you have, build things.