Tag-Archive for ◊ quick tips ◊

Author:
• Sunday, November 23rd, 2014

step ladder

More quick tips to bring the total to 65 in eight posts.

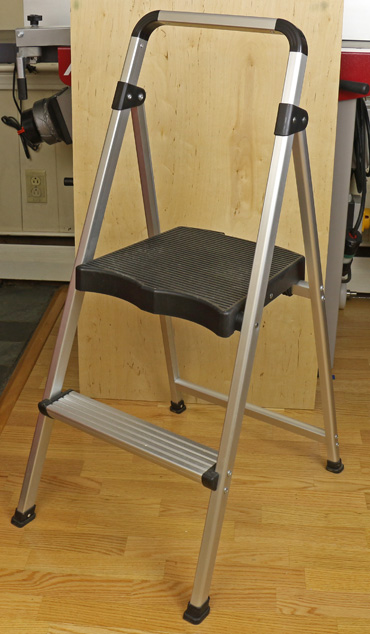
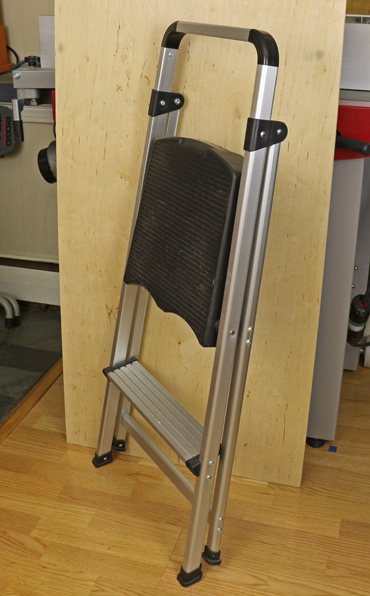
Placing and removing heavy boards while reaching overhead to high lumber racks is a danger we do not need. I feel a lot safer on the large platform of this very lightweight stepladder. With a platform height of 21″, it folds flat for storage, securely locks into its open position, and has a top crossbar that you can hold on to. It now comes with a tool tray at the top and taller models are also available.

step ladder

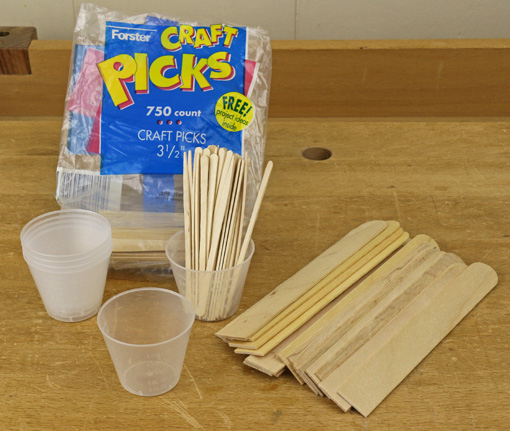
Tongue depressors can be handy glue applicators but only if the rounded ends are sawn flat. It is easy to clamp a bunch together and saw the ends square or, if you like, at an angle. When I need a narrower applicator, it is easy to split one lengthwise with my fingers. For smaller work, the craft picks are good. For small, multiple joints like dovetails, glue up goes faster by filling up one of these little cups with glue and withdrawing blobs rather than repeatedly fussing with the glue bottle.

glue sticks

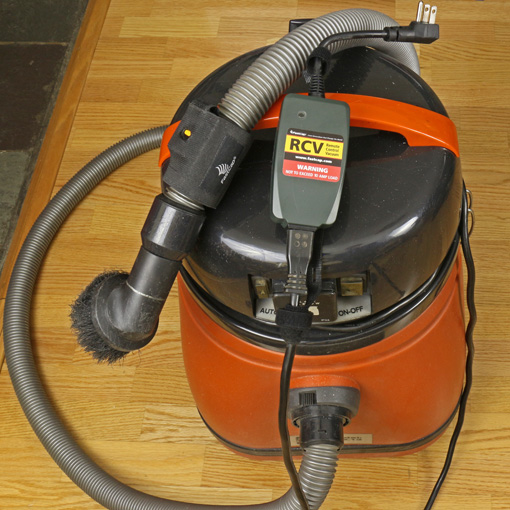
For vacuuming furniture parts between grits while hand sanding, as well as for certain other intermittent vacuuming tasks, I got tired of over and over reaching for the switch on the shop vac. Now I love this rig made by FastCap. The receiver plugs into the outlet and receives the shop vac plug. The small remote with an unobtrusive yellow button slips into a hook-and-loop collar that can be secured anywhere you prefer near the vac nozzle. The shop vac main unit stays out of the way and the work goes faster.

FastCap vac remote

Most slick varnished wooden tool handles make no sense and are a pain. The hockey stick handle wrap is an excellent remedy, demonstrated here by a real hockey guy. For tool handles, I found it better to precede the raised helical wrap with a base flat layer. The cloth friction tape that I’ve mentioned in other posts works well for this. He saws, he scores!

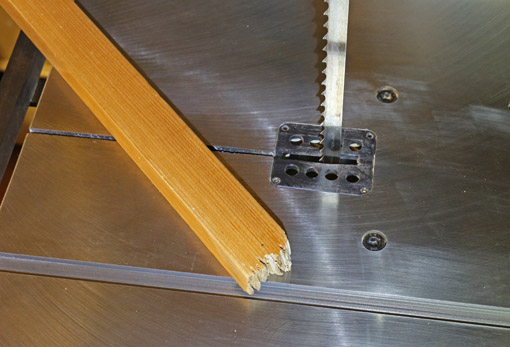
When you don’t want friction, this spray beeswax is a pleasant, natural alternative and very handy to apply. Thanks to saw maker extraordinaire Mark Harrell of Bad Axe Toolworks for this idea.

spray Bee's wax

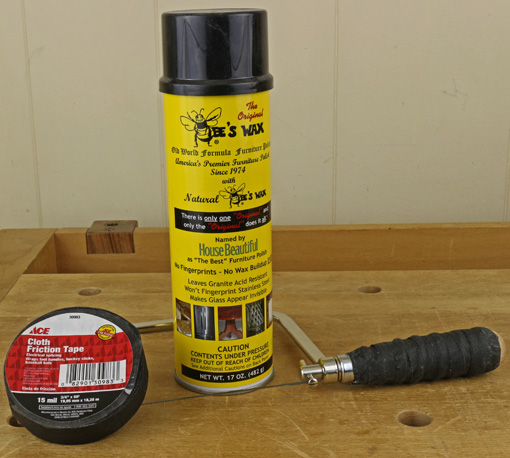
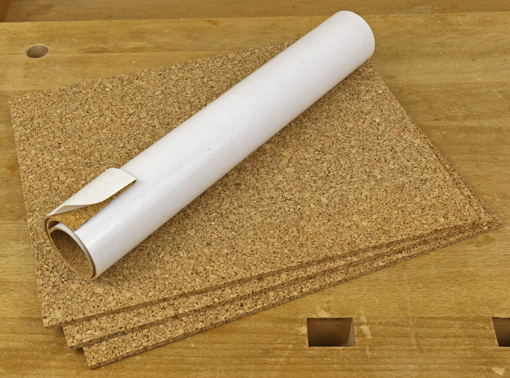
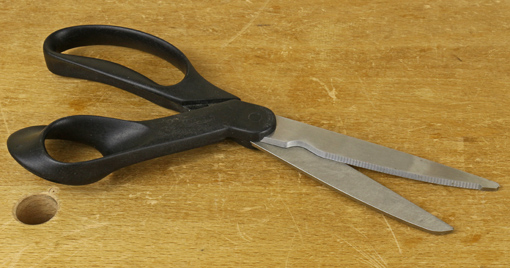
Woodworkers need to cut things besides wood, often fairly heavy things like brass shim stock, cork sheet, plastics, and so on. A tough pair of scissors with one lightly serrated blade manages this work without being overwhelmed and slipping like kitchen scissors with smooth blades, and are still fine for light work. These by Fiskars are old but Wiss model #W912 appears similar.

shop scissors

Remember, 65 quick tips in 8 posts can be found in one place, via the Series Topics link list.

Category: Tools and Shop  | Tags:  | 2 Comments
Author:
• Friday, November 21st, 2014

Big Gator drill guide

Again emerging from the sawdust and shavings of my shop, here are eight more quick tips that I hope you will find helpful.

Pictured above, the Big Gator drill guide is great for accurate perpendicular drilling when use of a drill press is impractical, which is surprisingly often. There are cheap tools for the same purpose but this one is nicely machined to tight tolerances and feels solid. This model has holes for 1/8″ – 3/8″ in 1/64″ increments and others are available. Big Gator – they must be in Florida right? Nope, Kansas.

Next to it is a mini ratchet driver that takes 1/4″ hex bits. Whew, this tool has saved the day in tight quarters numerous times. I’ve used it not only with short driver bits but also with short hex shank drill bits. You can probably find one at a local hardware store that’s inexpensive enough to buy before the day you need it.

Below, cork sheet is probably the handiest shop material that comes from trees that isn’t wood or paper. Having just the right balance of firmness and resilience, without a slick surface, it is useful for clamp pads, sanding blocks, pads for metal bench dogs, and so forth. Find it in craft/hobby stores in various thicknesses, with or without PSA backing.

cork sheet

When I bought the transfer punch set four years ago, below left, it vaguely seemed useful but I had nothing specific in mind. Time and again since then, however, I’ve realized, “Oh, I have those, this will be easy.” The set includes 3/32″ – 17/32″ in 1/64″ increments. You could use brad point drill bits for the same purpose but these are more suited to the task and most of us don’t have all those sizes in brad point bits. My set runs about .001″ – .0015″ undersized, which works out fine.

shop helpers

Lee Valley sold me again with the feeler gauge set with unusually long 5 1/2″ fingers. I have a standard length set but this is the one I reach for when tuning machines. The extra length usually proves helpful and, unlike most sets, it goes down to .001″.

Gauge blocks are usually more accurate to use than a rule when making settings at the router table, table saw, and bandsaw. There are more complete and clever sets available but I usually get what I need by combining 1/16″, 1/8″, 3/16″, 1/4″, 3/8″, 1/2″, 1″, and 2″. I suppose I could use a metal 1/32″ instead of the caliper-validated piece of wood I use now.

I’m not sure if I’m on board with all of these silicone gluing accessories but I do like the little textured roller and tray. It is just under 2″ wide but really speeds application on moderate-size open areas. Wait until the glue is dried before cleaning and then it’s amazing how it peels off.

silicon glue trays

Accept no look-alikes; Sharpies are awesome! They write on just about anything – router bits, jig hardware, storage units, and on and on. I write lots of notes on jigs, templates, and tools to save head scratching later on. Oh, and be sure to keep at least one handy in the shop in case anyone stops by with an autograph request.

The Metallic Silver Sharpie is a great all-around lumber marker that shows well on planed and rough wood of any species. It doesn’t tend to bleed in like the regular colors. I wish they also made it in the Super size point.

Sharpies

More tips coming soon.

Category: Tools and Shop  | Tags:  | 4 Comments
Author:
• Monday, December 23rd, 2013

First, the tips:

IMG_1131_edited-2

The cutoffs from thick curved cuts on the bandsaw will probably prove useful, so think twice before trashing them. With a little cleaning up, they can become clamp blocks, sanding blocks, or supports under the work pieces for hand tool work.

IMG_1135_edited-2

Camellia oil oxidizes very little but enough to make it somewhat gummy after a long time in a tool oiler or on the surface of infrequently used tools. Since adding a generous amount of vitamin E oil, an antioxidant, to my storage bottle of camellia oil, the problem has been all but eliminated.

IMG_1134_edited-2

After just a few weeks, the magnetic-mount LED work light from Lee Valley has become a shop favorite. I always use it for bandsaw work where the powerful magnet keeps it stable while the 18″ flexible neck stays put. At the workbench, it is easily set up for joinery work by using the mounting plate with the 3/4″ post in a dog hole. It is also invaluable for creating a low raking light for surface finishing tasks.

[Addendum: Over time I have found this lamp to be unreliable. High quality batteries seem to drain unusually fast and leaked in the original lamp and again in a replacement lamp. I no longer recommend it.]

IMG_1133_edited-2

IMG_1129_edited-2

I find this simple bandsaw push stick (above) handy and safe. The key is the hacked-up tip that grips a corner of the work piece. The tip is self-renewing as it gets passed into the moving blade (so my fingers won’t), until the stick gets too short, when it takes only a minute to make a new one.

Now, the irritations:

While A2 steel certainly has merits, it dulls differently than O-1, often with minute chip-outs, even with higher secondary bevel angles. I am also convinced that it must be very difficult to manufacture consistently with regard to carbide grain size, because I have some durable A-2 blades that almost never chip out and some that do so much more often, despite all being from highly regarded makers.

IMG_1136_edited-2

Jorgensen’s otherwise excellent #37 series heavy-duty bar clamps come with soft orange pads that leave oily stains on the wood when tightened hard. (On sanded mahogany in the photo below.) The stains do seem to get obscured by oil or varnish finishes, but are a risk and annoyance better avoided. The manufacturer acknowledged the issue when I contacted them, but I have seen no changes in the product in the more than one year since. I replaced the OEM pads with Bessey pads on the screw end and thin adhesive cork on the fixed end.

IMG_0742_edited-2

This one goes in the DAMHIKT file. I think I’d work outdoors in single digit temperatures rather than do topside routing of MDF in the shop, at least when a router dust collection attachment is impractical. It’s just not healthful.

IMG_1137_edited-2

Another one: Non-tapered sliding dovetails longer than about 3 or 4 inches should be considered a major risk factor for insanity. This was a situation where a tapered sliding DT would not work, but some things are just not meant to be.

It’s all OK though, because making things continues.

Category: Tools and Shop  | Tags:  | 3 Comments
Author:
• Saturday, February 09th, 2013

IMG_0897_edited-2

Here are more morsels of shopology from the “sawdust and shavings of my shop” that I hope will be helpful for readers.

1. Recognize the difference between efficient rhythm and dulling repetition. Finding the sweet spot can improve the quality, speed, and enjoyment of your work.

For example, in the above photo, sawing the cheeks for four tenons in a bunch put me in a nice sawing groove, accurate and fairly fast. After four more sets for the other ends, I was ready to move on to other tasks. Immediately doing likewise for another set of rails, would probably have put me over the threshold of monotony, and induced careless inaccuracies.

2. It is helpful to have a separate sharpening station, however modest, so you do not have to clear space on your bench for sharpening gear and the mess that sharpening can create. A dedicated station will also encourage timely attention to edges.

3. Milling rough lumber to finished thickness in one session can be risky, especially if there is substantial thickness or distortion that must be removed. If there is any doubt at all, it is safer to mill to near the final thickness, watch the wood for a few days, then, when it is convincingly settled, go to the final thickness. Then joint the edges and square the ends.

4. Keep router collets clean at all times. A slipped router bit is not fun. I use cotton-tip swabs before putting the router away after use. And clean the pitch off the bits before putting them away. I like CMT 2050 cleaner for that.

5. Be cognizant of the “zoom power” that you are working in. There is a larger margin for error for joints and edges in a basic pine bookcase than in a small, fine walnut jewelry box. Working at the wrong zoom power can create undue stress in the building bookcase, and obtrusive sloppiness in the box. Be practical.

6. Move and adjust the light to where you need it. Just do it. Then resume working.

7. There is almost always a smarter and less smart order to do things in building a project. Without going too crazy, take some time to think about the planned outcomes of processes and what can commonly go wrong. Then plan a course.

8. Without reinventing the wheel, it pays to once in a while rethink common procedures, constructions, and tool setups. Without a doubt, there is always more to learn, and I want to put at least some of it to use in my shop.

Happy woodworking, dear readers.

Category: Tools and Shop  | Tags:  | 6 Comments
Author:
• Monday, July 25th, 2011

From among my habits of work at the bandsaw, here are some that you may find handy.

1- The yellow velcro band placed around the blade is a reminder to tension the blade before work. Starting up the saw with a loose blade is not a happy moment (yes, of course, I’ve made that mistake) but it could be particularly damaging to a carbide-tipped blade. The velcro is placed aside during work so replacing it when the work is done is a reminder to release the blade tension.

2- Much has been written about proper blade tension, but like all tool adjustments, the goal is good performance. The same blade used to saw 8/4 stock will very likely need more tension when it is used for a 10″ resaw. Whether cambering a plane iron, choosing a bevel angle for a chisel, or tensioning a bandsaw blade, it always pays to “close the loop” by using feedback from the tool’s performance to confirm or modify the adjustments. Wood density, blade cleanliness, and heat build-up are just a few of the variables that make it unwise to tension the blade without thought. 

3- After installing and tracking a blade and before going to work with it, it’s a good idea to close the doors on the saw, run it for just a few seconds, wait until it stops completely, and then open the doors to check the position of the blade on the wheels and make sure all is OK.

4- It is easier to follow a layout line when it is viewed with both eyes (binocularly). Sometimes the blade guard or the guide bearing assembly will block one eye’s view of the line, depending on where you position your head.

5- When bandsawing freehand, I always think, “Feed the line to the blade teeth.” This is just the opposite of handsawing and I often have to remind myself to maintain the correct mentality at the bandsaw after I’ve been sawing by hand.

6- The push stick (below) has a rare-earth magnet which allows it to be stored within easy reach on the saw’s frame. The hole is a reminder of which end has the magnet. The short saw kerfs at the front end of the stick, which accumulate as it is used, can grip the corner of the wood as the cut nears completion. The stick has a limited life, of course, so the magnet is in a removable cup.

7- Large sawdust particles inevitably accumulate on the lower tire despite the actions of the wheel brush and the wood plate below the lower bearing assembly. A paint scraper held lightly against the tire as the wheel is spun by hand quickly removes the debris. A “synthetic steel wool” pad such as Scotch-Brite can also be used.

8- The variable-pitch, carbide-tip blade from Suffolk Machinery is a big help in resawing. It also is great for preparing leg stock and any other straight sawing of thick stock. Below is a 10 1/2″ wide Claro walnut board from Northwest Timber which I resawed with this blade. One of the many reasons why the bandsaw is so endearing.

I hope some of these tips prove useful in your shop.

Category: Techniques  | Tags:  | 2 Comments
Author:
• Thursday, February 18th, 2010

Here’s more. Looking over my shoulder . . .

Three for the brain:

1. Blue tape reminder not to move a gauge setting. I often like to preserve the setting on a layout gauge until I must change it for another purpose, or at least until I’m positive I won’t need it again. This avoids clearing the setting, only to later find that it is needed for one more piece, such as a remake of a part that I goofed up.

2. Sharpening “recipe” written for each tool. Each tool has its own characteristics and purposes from which evolve the best grinding and honing angles. Experience with a tool may indicate changes in the optimal angles. I keep a recipe sheet of angles for my tools at my sharpening station to save time and confusion.

3. Date glues and finishes when they arrive in the shop. I do this routinely, with a Sharpie marker, to avoid guessing the age of a product when I later go to use it and wonder if its shelf life is over.

Three for the body:

4. Adjustable-height chair/stool. I’m fine being upright if my feet are moving but I don’t like standing for long periods. This compact folding chair gives me relief. I don’t do most woodworking sitting down but there is no need to use my standing endurance for things like chopping dovetails or cleaning pitch from a router bit. The adjustable height comes in handy more often than I would have guessed.

5. Shoes for the shop. Sturdy shoes, such as my low-cut hiking shoes, give me more standing stamina and a better grip on the floor for tasks such as planing, especially as the floor accumulates sawdust and shavings. I run in running shoes but avoid woodworking in them.

6. Wood floor! Many years in my old shop with a concrete floor made me hunger for a wood floor when I set up my current shop seven years ago. The concrete was tiring and not kind to dropped tools. I installed this “floating” wood floor over a concrete slab. After ensuring there was no moisture problem, I leveled the concrete with compound, laid a polyethylene moisture barrier, a thin foam pad, and then the wide-strip, pre-finished red oak flooring. It is not nailed or glued down. There have been no problems rolling a 600 pound table saw and other heavy machinery. A less glossy finish would have been better, so I am considering dulling this floor a bit by sanding it.

Three for the wood:

7. Supply of sticks readily available for storing boards. Newly purchased wood is stickered to allow good air flow so its moisture content can equilibrate to the shop environment. It is also important is to similarly store a part that has been dressed for a project rather than sitting it on a pile or bench leaving only one side exposed.

8. Date and note the moisture content of wood as soon as it arrives in the shop. This allows me to monitor changes and avoid guessing when the wood has equilibrated.

9. Consider end coating new wood. If the moisture content of the newly arrived wood is very different from the anticipated equilibrium MC, I coat the end grain with a wax emulsion. This prevents a too-rapid change in MC at the ends of the boards via the end grain pores, and thus possible checking.

Good luck with your current or future projects!

Category: Tools and Shop  | Tags:  | One Comment
Author:
• Monday, February 15th, 2010

These are simple shop set ups and work habits that, while not original or profound, nevertheless make a real difference in helping me get things done in the shop. If a fellow woodworker was observing my shop and work habits, he might remark, “I notice that your shop has . . .” or “I notice that you . . .” So, I’m passing along these little helpers with the hope that they will be helpful to you too.

1. Remote switch for the dust collector. I can operate the dust collector without leaving whatever machine I’m using. In my small shop, the low-budget 610 CFM dust collector’s hose goes to each machine as it is used. The remote switch, purchased at a local Ace Hardware, just plugs into the wall outlet and easily handles the 120V/8.0A motor.

2. Autostart shop vac. I would not want to use the random orbit sander and the oscillating spindle/belt sander without this type of vacuum. The tool plugs into an outlet on the vacuum which cycles on and off when operating the tool’s power switch. There are many brands and models of shop vacs with this feature. I find my old model Fein Turbo II to be quiet and efficient.

3. Magnifier on workbench lamp. This is handy to have readily available for checking for a nick in a router bit, or a million other tiny things. Various models are available in art supply stores, at Rockler, and other sources.

4. Rechargeable light. I use this all over the shop for many jobs where I want a more directed light, such as at the bandsaw, or to create a low, glancing light, such as for evaluating the surface quality of wood while using a smoothing plane.


5. My large hand tool cabinet is two steps to the right of my workbench. I reach for tools quickly, without breaking the flow of working. Since I am right handed, the cabinet feels naturally accessible off to my right.

6. One-reach tool storage. As much as possible, I like to store tools that are directly accessible. I don’t like the feeling of hesitation or inhibition that seems to arise when a tool must be unearthed by moving other gear.

7. Wear an apron. Somehow, putting on my apron gets me oriented for work. It seems to tell me that now it’s time to get serious and get work done. I feel more free about wiping my hands on the apron than I would on my clothes, and I freely lean into dusty work. I’ve found the Lee Valley canvas apron to be just right.

8. Separate planing from sanding, and metal working from woodworking. Sharp tool edges are vulnerable to sanding grit. I also don’t like the idea of hacksaw “dust” and metal filings getting into the grain of my workbench or work pieces. So I separate these processes with a good clean up with the shop vac.

Simple stuff that helps. Happy woodworking.

Category: Tools and Shop  | Tags:  | 7 Comments
Author:
• Sunday, September 06th, 2009

[Note to Heartwood readers: the series on drawer making has a few more entries on the way.]

This is the time of year when NFL rosters get pared down to the final 53 players. It is often reported how veteran players attribute much of their success to the unspectacular but important training, preparation, and performance principles that promote survival in the extremely competitive league. These are not matters of specific football technique, but rather are work habits that allow their physical abilities and football skills to flourish.

Sure, I have relentlessly gleaned woodworking understanding and technique from countless sources over several decades. I love learning. Yet there are mundane shop work habits, borrowed or discovered, that I have come to value as equally important. Readers, let me share with you just some of the things about which I’ve had to “get my mind right.”

1. Know, don’t hope, what a process will yield. When bringing steel to wood while building a project, it should be clear to you what the result will be. Your hand may wander, your line may be a bit off, but there must be reliable intent and integrity in the process before you start. This allows the craftsperson to work with confidence and relaxation. For example, if you find yourself thinking, “Maybe if I feed the router this way, it might cut OK,” it’s time to step back and rethink.

2. Be neither blind to innovation nor saddled with doubt. Trial runs and testing are useful, especially for unfamiliar processes, but give yourself credit for what you already know. While there are almost always several ways to get a result, if you have learned a good, efficient method, go with it and get the job done.

3. When constructing multiple parts, it is often helpful to carry the process to completion on one part to see how early steps influence later results. This gives you a chance to modify steps to improve the final product. It often helps, therefore, to make an extra part.

4. Before leaving the shop for the day, note where you left off, perhaps write it down, so when you return you can resume work without hesitation. For example, “drawers fit, no more trimming.”

5. Put away tools when a job is done. Keep your bench and mind clear.

6. A process in one wood may not work well in a different species or even a different board of the same species. Remember, wood is a biological product, it varies. Making a mortise and tenon in bubinga feels different from making the same joint in pine.

7. Attempt to cut to the line while knowing what happens if you are off on one side or the other. Leaving large margins of safety because you’ll “make it exact later” is a way to never get good at woodworking. Go for it. If you make a mistake, relax.

8. Creating useful and beautiful things from wood is one of the fine things in life. Be grateful, be humble, give thanks.

Happy woodworking!

Category: Ideas  | Tags:  | 4 Comments