Author:
• Thursday, March 14th, 2013

IMG_0968_edited-2

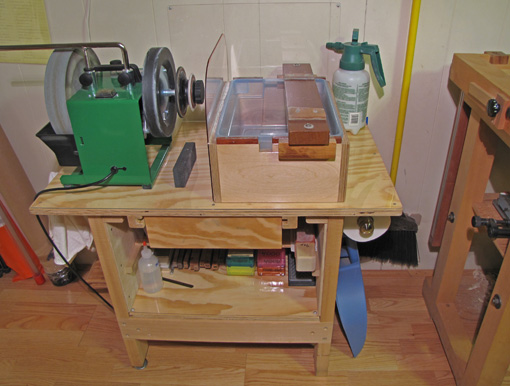
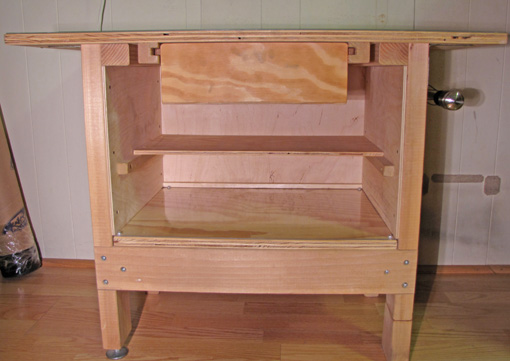
The base frame is 23 7/8″ wide, 15 3/8″ deep, and 24 1/2″ high, built using the straightest, driest, clearest 2x4s I could find at the local home center.

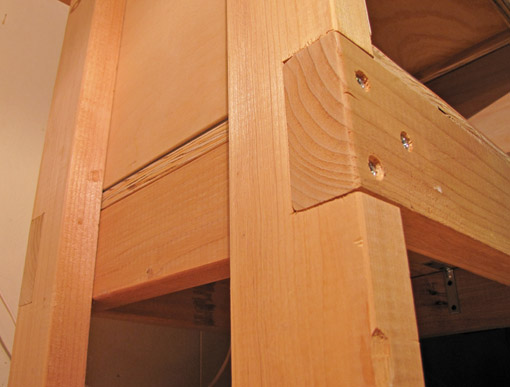
The lower front and back rails are notched into the legs. The lower side rails are simply butt-jointed and screwed from the outside to the front rails, and from the inside to the legs. Use glue and #12 or #10 x 3″ deep-thread screws. A leveler is installed on the front left leg.

The spliced sections on the lower right legs are evidence of some of the evolution of the bench. There had been heavy-duty locking casters there, but I found I did not need them, and they slightly decreased the rigidity of the structure.

The 2×4 upper side rails are notched into their widths to accept the tops of the legs, and are glued and screwed in place. There are no front or back top rails. The back and sides are closed in with sturdy 1/4″ 5-ply, glued and screwed to the 2x4s for rigidity.
IMG_0969_edited-2

The top measures 33 7/8″ wide x 19 1/2″ deep, and is centered laterally but overhangs the front of the frame by only 1″. The surface of the lower shelf is 10 1/2″ above the floor. Both are 3/4″ exterior-grade SYP 5-ply attached with strong steel L-brackets. The top is also screwed to the upper side rails from underneath.

An important feature is the 3/32″ polycarbonate sheet over the top and lower shelf to protect them from water. (I use waterstones, but the surfaces should be likewise protected from oil if you use oilstones.) Acrylic can also be used. The top sheet is secured with small stainless steel flat-head wood screws, carefully countersunk, which is nicer than the round head aluminum screws and tiny rubber washers that I used for the lower shelf.

The upper (inner) shelf, 3/8″ 3-ply, is spaced 5 1/8″ above the lower shelf and is 10″ deep. It is screwed to simple side supports that are screwed all the way through into the legs.

The top surface of this sharpening bench is 25 1/4″ above the floor. This is what works for me (at 5’9″) with the box-basin-bridge apparatus (which I will detail later) for hand sharpening, and the Tormek machine. I can work comfortably, bringing body weight to bear as needed.

The height is a critical issue, but everyone is different and so you must decide what will work for you. I suggest, as the most reliable approach, going through the same sort of process that I have recommended for deciding on a workbench height. Yet, if after building and then using your bench for a while, you find that you misjudged, don’t worry, you can always shorten the legs or even splice on some extra.

The drawer is 15 3/8″ deep overall with a 12 1/2″ wide x 4 1/8″ high front. The construction is simple rabbet and groove using exterior plywood, glued and screwed. The front and back are 3/4″ thick, the sides 1/2″, and the bottom 3/8″. Inside depth is 3 3/16″. The drawer is side-hung, using 1/2″ x 1/2″ cherry rails that fit in matching grooves in the 1 3/8″-square oak supports, which are screwed to the top from underneath.

Go heavy duty on everything with this. This sharpening bench is the type of tough, practical, non-fussy shop fixture that I like. I think it also has its own rugged good looks that fit in well in a woodshop.

Next: the box, basin, and stone-holding bridge apparatus.

Author:
• Wednesday, March 13th, 2013

IMG_0971_edited-2

Sharpening is such an important part of woodworking that it deserves its own place in the shop. A dedicated bench is made with features conducive to efficient sharpening, such as an ideal height, just as your workbench is designed for efficient woodworking. Furthermore, bringing sharpening gear onto the main workbench interrupts the workflow of a project, and can create considerable mess where you do not want it.

In this series of posts, I will discuss my sharpening bench and setup, the product of many years of evolution, which I have been using in essentially its present state for about ten years. It works well for me but I hasten to add that there are lots of good ways to do these things. This series may be the source of only a single handy tip, or you may want to duplicate the entire setup.

Let’s start with the bench itself. The key features are:

  • It’s compact, with a projected footprint of only 4.5 square feet.
  • Very rigid and strong, it does not move or wobble when sharpening.
  • There is storage for all sharpening paraphernalia.
  • It is inexpensive and easy to build.
  • Most important, it is suited to the task.

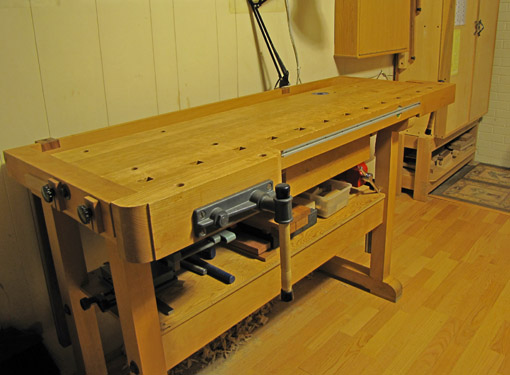
The photo above shows the sharpening bench in its inactive state, nice and neat, though minus the Tormek’s cover. The edge of the tabletop is only 8 inches to the left of the woodworking bench.

Good lighting, an absolute must, is supplied by a fixture above the bench on the wall (just out of range of the photo), and by moving an articulated-arm lamp (with a large magnifying lens) into the workbench’s left-side shop-made bracket (visible near the corner of the woodworking bench).

Water is imported from a nearby bathroom using the pump sprayer bottle, seen on the right. The rear wall is protected from overspray and splashes by a polycarbonate (or acrylic) plate. Paper towels are close by on a dispenser on the right side of the bench, and there is a hook for rags on the left. A scraper/small saw vise is barely visible hung on the left side, in the back.

The yellow paper with a plastic report cover, tacked to the wall on the left, is my sharpening “recipe” sheet.

Thus, when standing in front of this bench, everything is at hand. True, I’d still rather be working wood, but I am ready to sharpen!

In the next post, I’ll discuss the details of the design and construction of the main unit. Later, I’ll cover the box-basin, and the various functionalities of the setup.

Author:
• Tuesday, February 26th, 2013

IMG_0966_edited-2

The word count tool tells me that I have now written more than 100,000 words on this blog, enough to fill two average non-fiction books, in addition to posting more than 500 original photographs since starting in September 2008. At this milestone, I again say thank you, dear readers, for including Heartwood in your woodworking reading among the ever-growing multitude of choices online and in print. I hope this blog helps expand your technical understanding as well as your enjoyment of woodworking.

I still believe that blogging can share information in a fresh and nimble way unmatched by textbooks and magazines, often exploring areas that other media neglect. Topics can be covered briefly or, using the series format, at considerable length and depth. Moreover, it’s fun.

I will continue to offer content based on my hands-on woodworking experience – real-deal stuff “arising from the sawdust and shavings of my shop.” If there is a topic you would like to see covered, drop me an email and I’ll try to write on it, but only if I know what I’m talking about.

If you are at all inclined to add a comment on a post, please do! I wish there were more comments because they share knowledge and help me connect with readers. I must hold comments for moderation and close commenting 30 days after posting because though Akismet blocks 98-99% of the many thousands of spam comments, a substantial number get through and they are often ugly.

Also, please feel free to email me with your woodworking questions. I love this craft and want others to enjoy it too, so I especially like helping novice woodworkers get oriented and move on to building things.

As a personal update, I am recovering from recent shoulder surgery so I cannot do any woodworking for a while. I should eventually be fine, but in the meantime, oh, how I miss building stuff! This has also forced me to cancel the talk-demonstrations on drawer fitting and options for smoothing plane setups that I was scheduled to present in March at the Northeastern Woodworker’s Association annual Showcase event in New York.

The next series in the blog will be on my sharpening bench and setup which has undergone many revisions and refinements over the years.

As always, thanks for reading, and happy woodworking to you.

Category: Ideas  | 18 Comments
Author:
• Wednesday, February 20th, 2013

IMG_0909_edited-2

When fairing a curve by hand, you need tools that give continuous feedback about the curve you are forming – a closed-loop system. The tool must have sufficient rigidity and effective length to reduce unwanted bumps and span aberrant troughs. For concave curves, the rounded contact surface of the tool must be a bit steeper than the curve being formed in the wood. The other key point is to distinguish between the shaping and the smoothing processes.

There are plenty of options. Here’s what I use.

Shaping

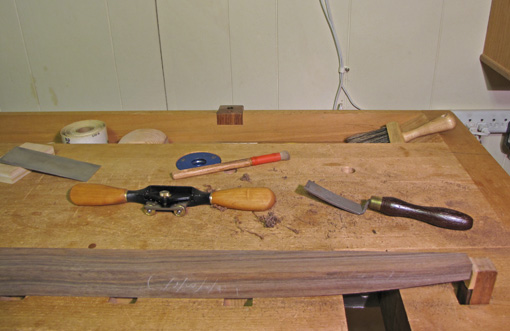
The Veritas round-sole metal spokeshave and Auriou “curved ironing” rasps, 30mm-wide #8 grain and 20mm #10, are my go-to tools for concave curves. The ride of the blade and teeth changes as they meet the varying resistance of bumps and valleys, so I can sense beneath the tool when the curve is becoming fair. The effective length and contact surface of these tools can be altered on the fly simply by changing the skew angle.

Working the surface of a curved leg to a slight crown across the width makes it easier going with the spokeshave, and in fact, I often finish it with this shape for appearance.

For quick hacking of big bumps, which might be present if I was daydreaming at the bandsaw, the inexpensive Stanley Surform Shaver works well.

The convex side of a half-round rasp can be used with some success on concave curves but there are cautions. The skewed stroke presents a varying contact profile as you push along a varying curve, so short strokes may be better. If the rasp is skewed too much, the teeth act like tiny knives and deeply groove the wood.

Convex curves are simpler to manage. A regular flat-sole block plane and the flat side of a half-round rasp work very well.

Smoothing

Smoothing the shaped surface is a different matter, much like smoothing and jack planes perform different functions. Here, card (hand) scrapers, especially in 0.024″ thickness, are my go-to tools, followed by light sanding.

Scrapers excel at smoothing, not eliminating, bumps and troughs, and so are not good for shaping, with the exception of light use on small, tight curves. With skewing, they may work for larger curves but it can be surprising how many lumps they preserve even when they seem to be shaping well.

Curved sanding blocks can be similarly deceptive. When working concave curves on legs, I find they are best left for smoothing because I just do not get as good shaping feedback as from rasps, spokeshaves, and planes. However, I have had success using carefully shaped sanding blocks with 60-80 grit paper to do the latter stages of shaping of broad concave surfaces. Also, a simple flat cork block does well on shallow convex curves.

Since I’m usually dealing with curly woods, rowed mahogany, or tough bubinga, I keep the spokeshave as a shaper.

What about spindle sanders and vertical belt sanders? I like my Ridgid combination oscillating spindle/vertical belt sander for many jobs, but use it only with trepidation for critical shaping or smoothing. I find it is just not as sensitive as hand tools, and it is more risky. Still, there are some curves where it is the best tool for the job, such as steep concave changes.

Pattern routing or sanding (with the Robo-Sander) with a template is a good option for single-plane curves, but I think is impractically complicated for multi-plane curves. Anyway, handwork is still required to make the all-important template.

I hope these tips help you become more comfortable, confident, and efficient with using curved elements in your woodwork. Choose the tools that are practical for you. No straightedge can be the arbiter of rightness for this work. You are a craftsman, so trust your senses!

Category: Techniques  | Tags:  | Comments off
Author:
• Monday, February 18th, 2013

IMG_0960_edited-2

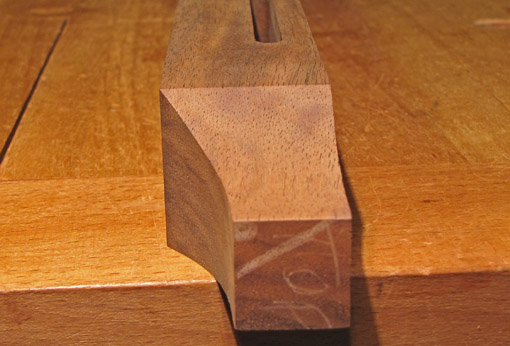
Almost all the woodwork I make contains several curves. In fact, a key curved component, such as the legs of a table, is often the initiating design idea.

My usual approach to making curved parts is much like an athlete competing in a sport – lots of organized preparation followed by trusting the instincts when the time comes. For a table leg, for example, the work progresses from sketches, to mockups, measured drawings, careful construction of a template, milling a squared blank, and marking out the blank. Then I carefully bandsaw the curves up to the layout lines, but never destroying the lines.

Next comes “fairing” the curve – eliminating lumps and valleys to produce a smooth, pleasing curve. At this stage, working to the layout lines may be helpful but is definitely not sufficient to get the desired smooth curve. This is game time – you must trust your senses.

Look and feel: use your eyes, hands, and tools.

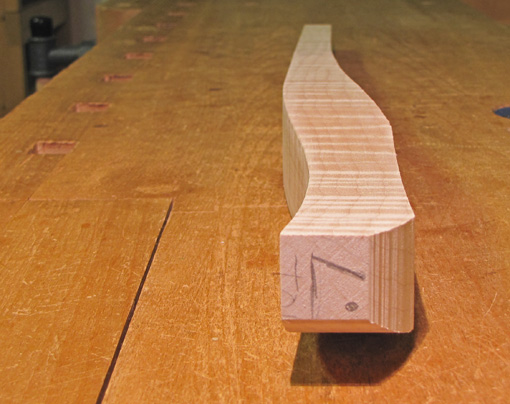
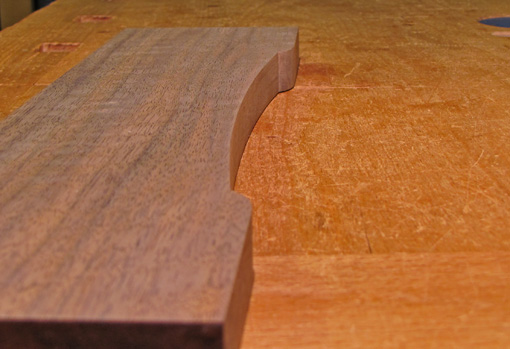
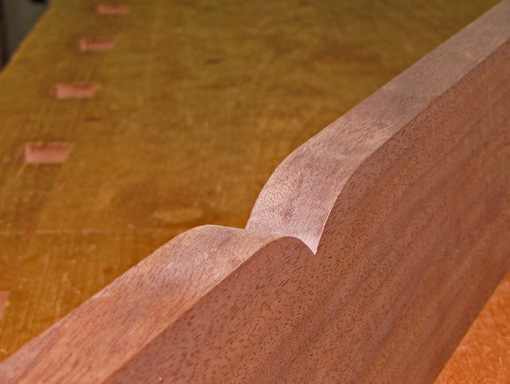
I am going to describe these in reverse of the order that they are used in fairing the curve. In practice, there is a dance among these techniques. (The examples pictured in this post are in various stages of formation.)

Look

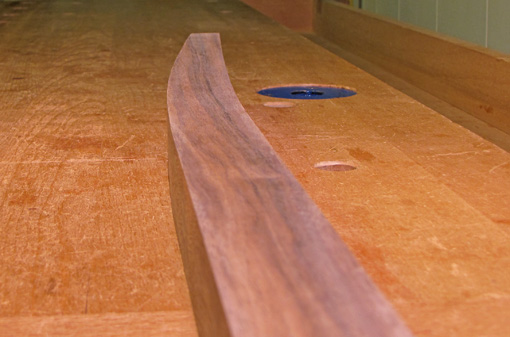
Position your eye near the work piece and sight along the curve, preferably against an uncluttered background. This vantage point makes aberrant bumps and troughs easy to see. Reach out and mark them because they will no longer be so obvious when you move away. You will know when the curve is right – it flows without doubts.

IMG_0957_edited-2

For my taste, the most interesting curves do not have a constant radius or are even portions of an ellipse, but are born of intuition with a rightness that is plainly and satisfyingly evident.

Feel

When the work piece is dogged in position for shaping on the bench, the working face is usually upward, making it awkward or impossible to do the look test. Repeatedly unclamping and lifting the work piece or bending yourself into awkward positions gets tedious. Therefore, use your fingers to test the curve quickly and frequently as the work progresses.

IMG_0914_edited-2

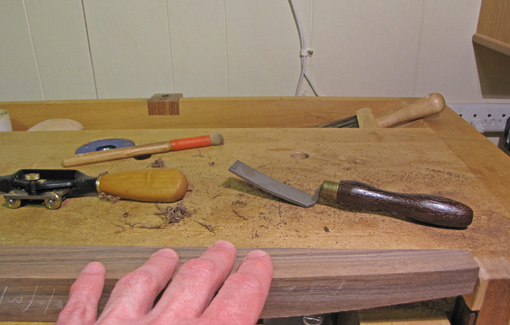
Here’s how to use this often-underestimated sense. The fingers may be tense and slightly desensitized after gripping a tool, so take a moment to reawaken the touch receptors by shaking or lightly fidgeting the fingers. Then “calibrate” your fingers by lightly swiping them on a clean area of the flat surface of your bench. Brush debris off the curved work surface. All this takes just a few seconds.

Now lightly “ride” the curve on the work piece with your fingers. The fingers should be mostly relaxed but with just the slightest tension to feel the changes in the ride caused by bumps and valleys. On concave curves, I find an uphill ride to be more sensitive than a downhill one.

I think you will find this to be remarkably sensitive. This is like tuning a musical instrument – don’t predict the next moment of sensory input, just let it in. Gradual deviations of less than 1/64-inch can be felt. You can check the look test to see how the two methods correlate.

However, along with these tests, it is necessary to feel what is happening under the tool as you are working, moment by moment, so you can efficiently remove wood with intent and direction. In the next post, I’ll discuss the tools that I find effective for fairing curves, and also why some common tools do not work so well.

IMG_0958_edited-2

IMG_0959_edited-2

IMG_0963_edited-2

Category: Techniques  | Tags:  | 3 Comments
Author:
• Sunday, February 10th, 2013

IMG_0955_edited-2

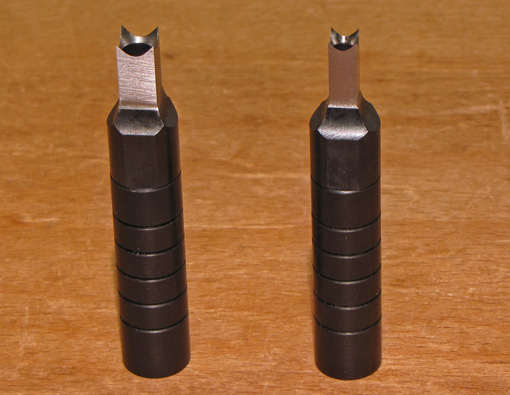
Lee Valley Tools recently made available Square Hole Punches that easily form a square hole for filling with a square peg.

A simple peg or, even better, the drawbore method, are time-tested ways to reinforce mortise and tenon joints. I prefer the look of a square peg, but it is much easier to use a round peg inside the joint. I have tried various methods such as whittling the lower portion of a square peg into a roundish shape. Still, it is fairly tedious to neatly form the square portion of the hole with standard tools.

I have tried using a corner chisel and experimented using a hollow chisel mortising bit for this. Despite some success, I was still not happy with those methods. Lee Valley has made this much easier with their Square Hole Punches. Please see their website for how they work. I’ve tried them out in the shop and they work well.

They are well made and cleverly designed – except for one problem! However, I think this problem could be solved by adding some options to another one of their new tools, the Dowel Former. I sent the following message to Lee Valley. I invite your comments.

Hi Lee Valley folks,

I would like to suggest a coordination between your excellent Square Hole Punches and your new Dowel Former.

As you know, the diameter of the round hole in each Square Hole Punch is 3/64″ less than the size of the punch. I think I understand why. If the hole were larger, the thickness and strength of the wall of the punch would be compromised. If it were smaller, it would be too hard to drive the punch. Because the punches are sized in common convenient measurements, such as ¼” and 5/16″, the holes are necessarily odd sizes in the 64ths, such as 13/64″ and 17/64″, respectively.

However, when using the punches, I would like to use the drilled hole to insert a round peg for the mortise and tenon joint, and then fill the square hole with a square plug. I think for many woodworkers that would be the major benefit of the Square Hole Punches. However, to my knowledge, dowels are not available in odd sizes such as 13/64″, 17/64″, etc. Machining my own dowels is a hassle I would rather avoid. Whittling them to those sizes is tedious and inaccurate. True, I can make my own dowel plate but it is not likely to be as good as what you can manufacture, and I like working wood more than metal.

One solution would be to make the Square Hole Punches a bit larger, so that the holes would be in 32nds. For example, the ¼” punch could be 17/64″ and its hole would then be 7/32″. But, once again, who has a 7/32″ dowel? Not a good solution. Another approach would be to make the punches in sizes such as ¼” + 3/64″ = 19/64″ and  5/16″ + 3/64″ = 23/64″ so the round holes will be handy diameters, namely ¼” and 5/16″, respectively.

Enlarging the round hole is not a good solution. It would likely create inaccuracies and sloppiness, especially since enlarging it up to the next common dimension would make its diameter equal to the width of the square hole.

I think there is an easier approach. I suggest keep the Square Hole Punches just as they beautifully are, and make inserts available for your new Dowel Former to form dowels which fit the holes in each of your Square Hole Punches. I suspect this could be done relatively easily without a lot of retooling (unlike altering the sizes of the punches), and, if I understand correctly, you manufacture the Dowel Plate at your facility since it is a Veritas tool.

I present this suggestion in the context of having the highest regard for your company and the contributions you have made to the craft of woodworking. I plan to post this suggestion on my blog at www.rpwoodwork.com/blog and invite comments, as readers so often come up with good ideas and constructive suggestions.

Thank you very much,

Rob Porcaro

Category: Tools and Shop  | 6 Comments
Author:
• Saturday, February 09th, 2013

IMG_0897_edited-2

Here are more morsels of shopology from the “sawdust and shavings of my shop” that I hope will be helpful for readers.

1. Recognize the difference between efficient rhythm and dulling repetition. Finding the sweet spot can improve the quality, speed, and enjoyment of your work.

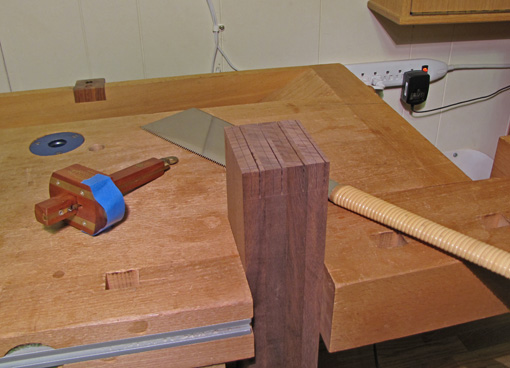
For example, in the above photo, sawing the cheeks for four tenons in a bunch put me in a nice sawing groove, accurate and fairly fast. After four more sets for the other ends, I was ready to move on to other tasks. Immediately doing likewise for another set of rails, would probably have put me over the threshold of monotony, and induced careless inaccuracies.

2. It is helpful to have a separate sharpening station, however modest, so you do not have to clear space on your bench for sharpening gear and the mess that sharpening can create. A dedicated station will also encourage timely attention to edges.

3. Milling rough lumber to finished thickness in one session can be risky, especially if there is substantial thickness or distortion that must be removed. If there is any doubt at all, it is safer to mill to near the final thickness, watch the wood for a few days, then, when it is convincingly settled, go to the final thickness. Then joint the edges and square the ends.

4. Keep router collets clean at all times. A slipped router bit is not fun. I use cotton-tip swabs before putting the router away after use. And clean the pitch off the bits before putting them away. I like CMT 2050 cleaner for that.

5. Be cognizant of the “zoom power” that you are working in. There is a larger margin for error for joints and edges in a basic pine bookcase than in a small, fine walnut jewelry box. Working at the wrong zoom power can create undue stress in the building bookcase, and obtrusive sloppiness in the box. Be practical.

6. Move and adjust the light to where you need it. Just do it. Then resume working.

7. There is almost always a smarter and less smart order to do things in building a project. Without going too crazy, take some time to think about the planned outcomes of processes and what can commonly go wrong. Then plan a course.

8. Without reinventing the wheel, it pays to once in a while rethink common procedures, constructions, and tool setups. Without a doubt, there is always more to learn, and I want to put at least some of it to use in my shop.

Happy woodworking, dear readers.

Category: Tools and Shop  | Tags:  | 6 Comments
Author:
• Wednesday, January 30th, 2013

In a recent post on the Fine Woodworking website, FW Senior Editor Matt Kenney questioned if employing jigs and shortcuts to achieve excellent results constitutes “cheating” at woodworking. His emphatic answer is that the result, not the method, is what matters. He encourages each woodworker to unapologetically find the methods that work best for him to produce the furniture of his desire.

By and large, I agree with Matt. Judging from the numerous comments on the post, this question concerns many woodworkers.

But it got me thinking, is there cheating  of another sort in woodworking? I believe the answer is yes, there is.

Cheating in woodworking is pretending that what you made is better than you know it to be, or that it meets your standard when you know it really does not.

Honest craftsmanship, at whatever level, is a result consistent with an intention. It is not necessarily a precisely realized prediction of each procedure, or of each element of the design, but at least the concept, the core idea, of the piece should be successfully expressed. That, after all, was your purpose in building it.

Now, there is always some unpredictability, and thus risk, involved in craftwork because until the piece is completed, its full impact cannot be felt. In other words, despite all of a craftsman’s designing and workmanship, he never can fully grasp what he has gotten himself into until the piece is done and stands there before him.

You may have chosen to make a simple functional bookcase or a high-class cabinet. The piece may have involved a novel design that you were not sure would “work,” or may have pushed the limits of your skills.

In all cases, there is a reckoning that comes when the work is done.

Is the piece within the range of what you intended? Has your concept – your core idea – been expressed? If so, was it a good idea in the first place? And the workmanship: is it of such level to carry that expression? Put simply, did you make what you really wanted to?

I know if I did or did not. It’s not an absolute judgment, but there surely is a discernible threshold – an overall truth about the piece. Cheating in woodworking would be to kid myself about that.

Fortunately, there is no need to cheat. Just get a pencil, more wood, and sharpen your tools, including the one on your shoulders, and get back to work.

Category: Ideas  | 9 Comments