Author Archive

Author:
• Monday, June 23rd, 2014

bed width

Stock preparation is the essential foundation for any woodworking project, and there are three keys to doing it well: accuracy, efficiency, and knowledge. A jointer-planer combo machine can be a big help.

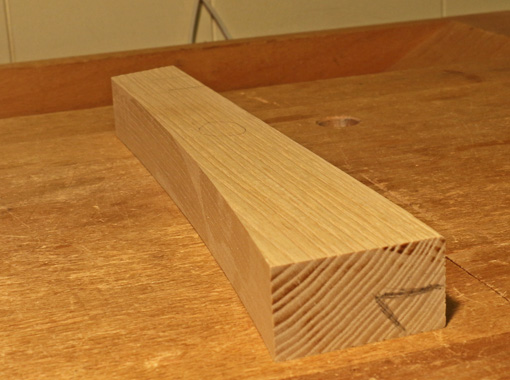
There are countless pitfalls in stock preparation that can haunt even the most skillful woodworking that may follow. Twist, convex edges, and bowed surfaces are common inaccuracies that create problems. As for efficiency, well, I like making things and I do not want to spend forever grunting out stock, so the noise emanating from well-tuned machinery is music to my ears at the start of a project. Still, none of this works if a woodworker fails to appreciate wood movement from moisture exchange as well as from stresses created in the drying process.

By way of explaining how I settled on the combination machine, let me recount my stock preparation history. I think many readers will relate to much of it. Very early on, two things became obvious. First, it is very limiting to use only the thicknesses available in pre-dimensioned hardwoods, and second, dimensioning with only hand tools is slow and really not a lot of fun.

So, I got one of those ubiquitous cast iron 6″ jointers, and rigged up a marginally effective way to also use it as a thicknesser. Then, some years later, in the late 1980s, I bought a Ryobi AP-10 portable thickness planer, and its 10″ capacity made me feel like I was in heaven (“. . . man”). Still, I was stuck with only 6″ of machine jointing capacity and, despite trying the workarounds found in the tips sections of magazines, I was still doing too much hand work and longed for more machine jointing width, especially since I enjoy using fairly wide boards in my projects.

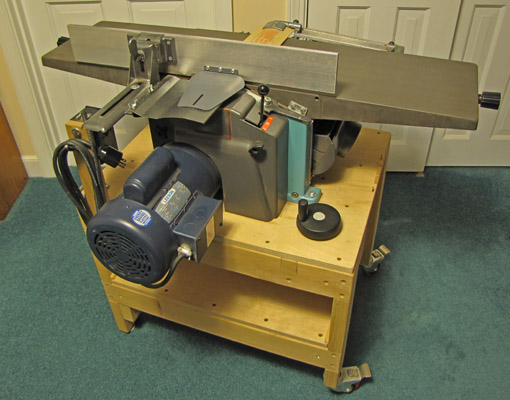
Enter, the Inca 10″ over-under jointer-planer. This wonderfully accurate machine, with its precise cast aluminum tables and great Tersa cutterhead, served well in my shop for more than ten years, perched on the feature-rich, battleship-grade stand I made for it. The only thing the dear Inca lacked was a lot of muscle, and so when I upgraded, I felt at peace selling it to a musical instrument maker.

Inca jointer-planer

Inca jointer-planer

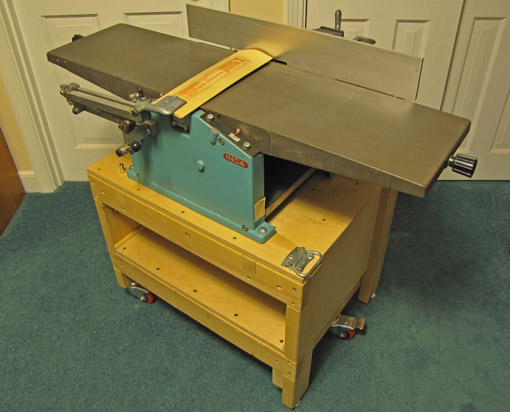
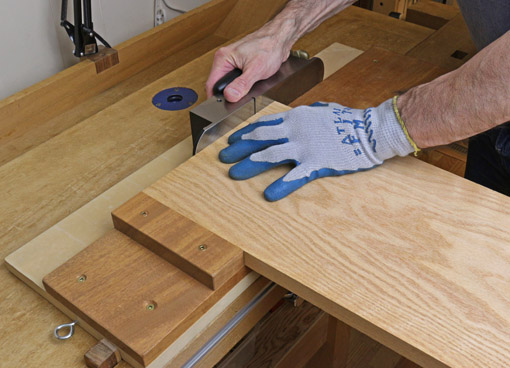
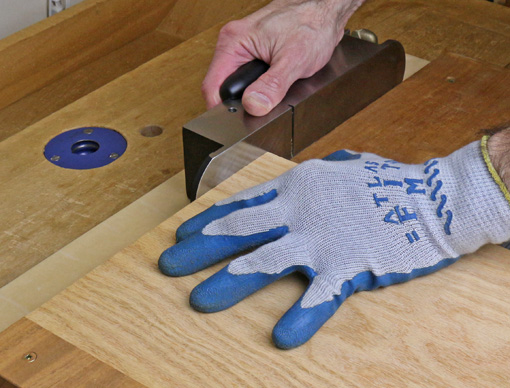
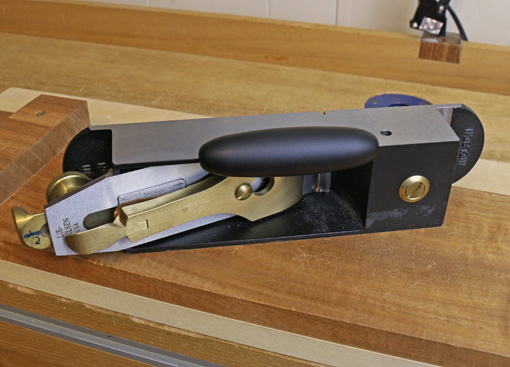
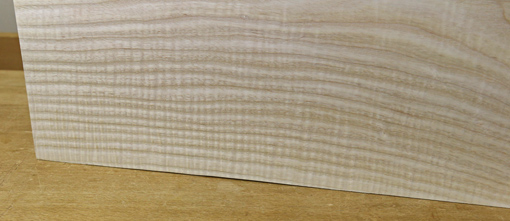
Now, after 2 1/2 years of using the Hammer A3-31, and privately answering many inquiries about it, I’m ready to write. The opening photo shows off its width. I will discuss the A3-31 in some detail (spoiler alert) – I like it! – but will precede that with a post to consider the merits of the whole idea of a jointer-planer combo.

One more thing. I made the case several years ago for a portable jointer-planer as an excellent choice for a first machine for small-shop woodworkers making furniture and accessories. After many discussions with woodworkers during the ensuing years, I still hold that opinion, though I certainly understand how many feel a bandsaw should be first in line (I place it second) among other valid opinions.

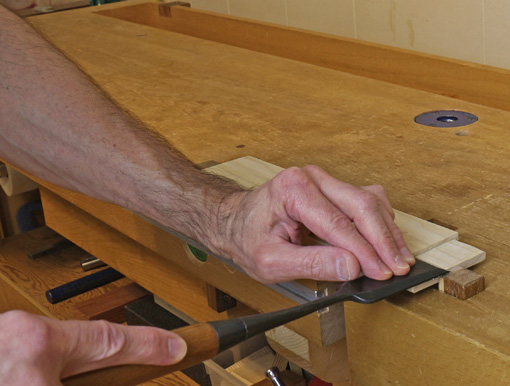
Keep in mind that with a thickness planer as the only machine available, the initial jointing of one face by hand (which, again, I’d rather not do!) only has to produce a surface that will sit on the planer bed without twist, bow, or flex. It can be ugly with tearout, scrub plane gutters, or whatever; it just has to register on the bed so the planer can produce a flat surface on the opposite face. Then the board is flipped over, etc.

Author:
• Friday, June 20th, 2014

ash curves

From baseball bats to crates to tool handles, ash certainly earns its keep as a versatile workhorse wood, but how about for fine furniture?

For this discussion, ash, as a furniture wood, refers to what is generally sold as “white ash” or just plain “ash,” most of which is Fraxinus americana, though there are several other commercially significant ash species.

Ash has a prominent and usually fairly uniform annual ring figure produced by the great difference between the large earlywood cells and dense latewood. It lacks the flashy visible rays of the oaks, and the large majority of it is composed of unimposing light blonde sapwood. So, is ash a boring wood?

Used unimaginatively in low-end furniture, yes, it is rather boring. However, like most products of nature’s bounty, the key is how it is used and what the craftsperson can draw from it.

To my mind, one of the prime virtues of ash is that its rift-cut or quartered surface is great for bringing forth and enhancing artful gradual curves. The uniform figure of the wood seems to sensitize the eye to subtle design. It energizes the form of a piece. Sometimes it reminds me of the raked sand in a Japanese Zen garden – not boring, but peaceful.

Ash can be a pleasing contrast to more intrinsically glamorous woods, but it can also shine on its own. Curly ash is beautiful and impressive, yet retains the species’ inherent composure. I recently picked up some beautiful curly pieces – I’m thinking thick veneer drawer fronts for these – from Kevin Koski at Curlymaplewood.com, where you can find lots of other gorgeous curly species. Also, ash heartwood has a nice soft brown color that creates interesting contrast when used judiciously alongside the sapwood.

curly ash

With green-to-oven-dry shrinkage values of 4.9% radial and 7.8% tangential (T/R = 1.6), ash is decently stable, and it generally works well with machines and hand tools. I’ve enjoyed using it for frame and panel work, legs, drawer parts, and in bent laminations. The species presents a challenge and an opportunity for thoughtful design and balance in a piece.

I like ash finished with a less-is-more approach, using a “water white” acrylic water-base or maybe thin bleached shellac.

In recent years, ash trees in the central and eastern US have become seriously threatened by the emerald ash borer. Here are some ways to help avoid spreading the infestation.

By the way, all of the “Woods I love” posts, with more to come, can now be conveniently viewed on a single page as one of the Series Topics.

bent lam cutoff and tool handle

Category: Wood  | Tags:  | Comments off
Author:
• Tuesday, June 03rd, 2014

Readers of this blog may have noticed that the author has a few pet peeves. Among them are the belief in magic, pretending that woodworking is quick or easy, and purporting perfection.

Here’s another one.

We contemporary woodworkers have a lot of advantages. We benefit from access to lots of excellent instruction, centuries of accumulated craft wisdom, and great quality tools.

“So, Rob,” you say, “what’s the problem?” Well, there is the danger that the more there is of all that, the less there may be of any one of us. 

There is, however, an absolute protection from that danger. It is your brain, but only if you use it.

A technique, method, or tool is not right just because a guru said so. Now, of course, we should heed expert advice and ages of experience, but woodworking is right there in front of you, where the steel meets the wood, and the product of your work is also right there for honest appraisal by you and others. Though each woodworker does not need to reinvent the wheel, he should assess and choose what works at his bench in his shop.

The issue is how one might take in what is put forth. A technique, approach, or tool is good or bad on its own merit, and one can also have reasonable preferences among good options, but reflexive adherence is not the road to genuine craftsmanship or artistry. It is similarly foolish to offer the annoying “I was taught,” or eighteenth century dogma as the decisive justification for a methodology.

Consider that no instruction can cover all situations, woods, designs, and preferences. Moreover, technology changes, and no one is infallible. Many nuances of the craft are very difficult if not impossible to communicate but must be discovered through your hands. For these reasons and more, second hand information should become first hand – pun intended.

I think the right road is to continually learn and put the learning through your head and your hands, so that skills are not merely borrowed but absorbed, refined, and customized.

Thus, your woodworking will be grounded in solid technique but evolves to become your own. And that, in my view, is the heart of the matter here. Your woodworking is personal. Make it that.

Photo courtesy photos-public-domain.com

Category: Ideas  | 2 Comments
Author:
• Friday, May 30th, 2014

fitting tenon

A good fit of the tenon to the mortise can be described as a comfortable swish fit. You should not need to pound the joint together, nor should the tenon simply drop into the mortise, nor should the tenon wobble in the mortise.

This matters because a mortise and tenon joint derives its strength from the restraining effect of the shoulders transferring stress to the bond between the tenon cheeks and the walls of the mortise. Against this shear stress, a well-made bond has great resistance, stronger than the wood itself.

To create a square assembly, M&T joints must also be true – the tenon cheeks should be in planes parallel to the reference face of the rail. Also, ideally, the tenon should have a good fit over the entire surface area of the cheeks, though perfection is not necessary because the glue does permit some leeway.

Whether the tenon is made by hand or machine, it is very helpful to have reliable ways to adjust the fit using hand tools. Test the corners of tenon into the mortise and feel for tight areas, then check the cheeks for burnishing. Look for bumps and steps from inaccurate sawing.

A rabbet block plane is one of my two favorite tools for trimming tenon cheeks. It starts easily, works right up to the shoulder, and automatically makes a flat surface. Pictured next to it is Lie-Nielsen’s big 1 1/4″ shoulder plane, which also can be used. Though it’s a great plane for other tasks, it and other shoulder planes are a bit tippy for this work.

rabbet block and shoulder planes

My other favorite is the Iwasaki 10″ coarse float. One might expect a file or rasp to round over the surface but this tool has such a decisive bite it can be controlled very well. What’s more, it leaves an incredibly clean surface, without tearing, for a tool with such big teeth. The safe edges prevent damage to the shoulder. I use three fingers on top of the tool for feel and control. I like this tool a lot.

Iwasaki float

using the Iwasaki

A wide paring chisel is another good option, especially for localized clean up. The length of a paring chisel offers considerably more control than a bench chisel. Pressure with left hand fingers on top coordinates with the right hand, which transmits depth of cut via the handle. Still, for a thin shave down of the whole tenon, the rabbet plane works better.

using paring chisel

Yet another option is the router plane. I only use this if I think I’ve messed up the trueness of the tenon and need to establish a cheek into a plane parallel with the face of the rail.

Press the sole of the plane onto the face of the rail and start by setting a light cut at the most prominent part of the cheek, then work down from there. Mostly swing the plane, pivoting on the rail face, more than push it, to maintain steady contact and thus depth control. The tool is acting as a gauge to make the cheek face parallel to the rail face.

router plane in use

I generally hand saw tenons because setting up machines is usually not worth it for me for one-of-a-kind pieces. Even with several good options for fine tuning the tenon cheeks, I strive for a good fit directly from the saw, maintaining a one-sided tolerance to avoid having to patch up a tenon.

Category: Techniques  | Comments off
Author:
• Sunday, May 25th, 2014

DWP611

Just a few woodworking machines have the adaptability and almost the friendliness of hand tools. Chief among them is the bandsaw, but the compact router, especially the DeWalt DWP611, also earns a place in that category.

In the stage of building where the big machines have been unplugged, the radio is on, and the hand tool work is proceeding, it still is handy to call on a controllable, precisely adjusted tool that has more power than a horse.

For example, in mortising for hardware, I will clear the bulk of the waste and produce an accurate final depth with freehand routing. Rather than set up a jig or fence for the router, I simply chisel to the side layout lines, though this has been made much easier by the router.

On the other hand, for the socket part of a short sliding dovetail, I make a dedicated jig and use a bushing. The only chisel work is to square the end.

My general approach is to use the power of the compact router and, when convenient, its precision, especially in depth. I take advantage of its maneuverability for freehand work and use jigs and fences when necessary or when there is a clear advantage in overall time spent.

The best feature of the DWP611 is the precision cutting depth adjustment. The indicator on the large black adjustment ring moves more than 1/4″ along the adjacent yellow scale ring for each 1/64″ of depth change. When adjusted in the upright position, backlash is minimal but even that amount can be easily cancelled by resetting the zero mark on the scale ring, which is movable. After the depth is dialed in, the cam clamp holds it reliably. In this way, cutting depth adjustments rival the precision of a paring chisel or router plane.

DWP611 adjustment

This is a larger and heavier tool than the Bosch Colt and the Ridgid model but I found neither could be adjusted in cutting depth with the precision of the DeWalt, which is still easy to maneuver with one hand. I’ve used the DWP611 for about three years now and it is my clear favorite.

The 1/4″ collet is a two-piece self-releasing type, a must for any router. Unfortunately, bit changing involves one wrench and a shaft lock, a sadistic system, though I suppose DeWalt can be forgiven considering the tight quarters of a tool this size. The clear plastic sub-base has an extension on one side that improves stability for edge routing. The base can be repositioned for an optimal configuration of hand grip and sight line. I also bought the accessory base for standard bushing inserts.

The two LED lights that straddle the collet are invaluable for freehand work. The soft-start, 7 amp motor gives surprising power for a small tool.

This tool feels so friendly in hand that it might cause you to let your power-tool guard down. When routing, I remind myself that this little guy really does have more kick than a horse. Also, there is a tendency with this type of tool to get in close to the spinning bit and flying chips, so safety goggles are a minimum must.

A set of 1/4″-shank carbide straight bits down to 1/8″ cutting diameter is helpful for freehand work. Use good judgment and very conservative depths of cut for narrow bits. I also have a 1/16″ bit but I avoid using it.

So, hand tools and power tools can play together. I like to use the advantages of each to find simple and reliable ways to get the work done.

Category: Product reviews, Tools and Shop  | Comments off
Author:
• Sunday, May 11th, 2014

shooting glove

Shooting is a gateway technique that produces reliable accuracy and control unattainable with machines. Here are three simple tips to improve your results with shooting.

1- Put a grippy glove on your left (non-dominant) hand

An inexpensive, widely available glove with a rubbery grippy palm adds remarkable strength to your hand. The work piece must be controlled with the left hand in two respects. First, it must not slide or pivot during the cutting stroke of the plane. The torque can be considerable with a wide work piece of dense wood. The glove gives you control with much less effort than a bare hand.

Second, in preparation for the cut when shooting end grain, the work must be advanced a tiny amount along the fence toward the plane. Without this, the blade edge will simply clear the work piece because it has already cut away the previously projecting thickness.

Practically, the work piece is advanced just to meet the toe of the plane sole, as in the photo below. This is done almost without thinking but it is a precise move made more controllable by the gloved hand.

registering the board

2- Simple microadjustability

Everything is not square in woodworking, even when we intend it to be so. For example, when fitting a drawer front to its opening, the sides of the front piece should be made to match the opening, even if it is a bit out of perfectly square.

To minutely adjust the shooting angle away from 90°, just place a piece of blue tape at the appropriate end of the shooting board fence. Realize too, that the angle can be adjusted with phenomenal precision by slightly altering the position of the tape.

microadjustability

Of course, this is done empirically, but for some mathematical fun, note that a .003″ thick tape placed at the end of a 7″ fence will change the angle .025° from 90°, and moving it to the 6″ position will adjust that new angle, in turn, by .004°. Using a .001″ plane shaving would create an initial adjustment of .008° from 90°. Shims are magic!

3- Hold the plane like you mean it

Whether you have a dedicated shooting plane like the #9 I use, or use a nice heavy bevel-up bench plane, or, yes, a bevel-down bench plane, grip that righteous beast over the blade. Get the big muscles at the base of your thumb firmly down on the sidewall of the plane, wrap your fingers around into the throat of the plane, and plant the ends of the fingers on the lower part of the lever cap. That way, you can control the ride of the plane on the horizontal track while keeping the sole tight sideways against the vertical runner.

grip the plane for shooting

Furthermore, you get a good tactile sense of the blade’s cutting action. In concert, all of this promotes accuracy by preventing the plane from tipping in any direction as it takes a firm, uninterrupted stroke.

I like the “hot dog” attachment from Lie-Nielsen on the #9. This is something I imagine could also be readily made by the user.

hot dog attachment

Category: Jigs and Fixtures, Techniques  | Tags:  | 5 Comments
Author:
• Friday, April 25th, 2014

IMG_1218_edited-2

This unpretentious tool, for about six bucks, is surprisingly useful to modify concave curves on fairly narrow work such as table legs. I use it for fast, corrective takedown if my bandsawing has wandered off the layout line, or if I’ve changed my mind about the curve after having sawn it.

Its molded plastic handle and snap-in cutter certainly do not exude cool-tool cachet, but the varying curve of its sole, flatter toward the toe, steeper toward the handle, is quite effective. It cuts on the pull stroke. However, it tends to tear the wood and leave a surface too ripped up for efficiently transitioning to refinement with finer tools.

To remedy this problem, I hone the cutting face with a fine diamond stone. While this sharpens the cutting teeth, it has the more significant effect of limiting their depth of cut. This does make it a somewhat slower tool, but the resulting surface is considerably improved, so the whole process of refining the curve is actually faster.

The macro photo below shows the honed teeth, which have been lowered relative to the peaks of the “waves” on the cutting surface. (The cutting edges are facing upward. The honed area is the silvery line visible on each of the two teeth near the center of the photo.) This is similar to the working of an “anti-kickback” router bit, in that it limits the depth of bite of the cutter. If you go too far with the honing, the teeth will have too little bite or won’t work at all, so proceed gradually with the modification and test the tool as you go.

IMG_1216_edited-3

The tooth lines are angled to the length of the tool, pre-skewed, in effect, so I find it works best after this modification by pulling it with little or no additional skew.

IMG_1219_edited-2

A great tool it is not, but it does the job decently well. I wish Stanley (or Microplane) would make a longer version, say four or five inches, retaining the varying-radius curve, with room to place a second hand on the front of the tool. Not currently made, but perhaps a Shinto rasp in such a profile would be useful, or larger rasps in the style of curved ironing rasps, both with a knob at the toe for greater control and power.

Other options for a tool that is curved along its length and flat across its width include: metal and wooden compass planes, Auriou and Liogier curved ironing rasps, shop-made curved sanding blocks, and a new flexible rasp by Liogier that they call “The Bastard,” which I have not tried.

The Stanley Surform Shaver now comes with a bright yellow handle. Nuance that.

Category: Tools and Shop  | Tags:  | 3 Comments
Author:
• Tuesday, April 22nd, 2014

IMG_1234_edited-2

As I said, I’ll use whatever tool it takes to get the desired result for a particular curve in a particular wood. So let’s take a look at the available players and which make the cut (pun intended). Most of the game is won or lost on concave (inside) curves; the outside curves are easy.

Spokeshaves perform well on relatively narrow work with cooperative grain, but they can disappoint on highly figured woods, even using a skewed attack. The round shave sees almost all of the action, while the flat shave spends most of the time on the bench because I generally don’t find it has much advantage over a block plane or other flat tools on gradual outside (convex) curves. It’s all in the wrists.

The convex side of a half-round rasp is a good workhorse but has some weaknesses. If it is held at an acute skew, such as for steep inside curves, the teeth start to function ineffectively as tiny knives slitting along the grain, but if the tool is pushed more across the work, tearout results at the far side. Also, the tool is really working the curve at different points, and thus possibly different radii, at once.

So, for more control on gradual curves, I call up the Auriou curved ironing rasps (fourth and fifth from the left in the photo). They have an excellent reliable feel on the curve but lack speed, so they are not for hogging off a lot of wood.

The compass plane, which is a shaping plane in my view, was covered in two earlier posts, but a different twist on curved soled planes deserves mention. As discussed in the previous post, the sole must be set to accommodate the steepest portion of a chosen length of inside curve, so a given setting is approximate at best. Thus, a reasonable alternative to an adjustable compass plane is a set of a two or three wooden fixed curve sole planes, vintage or shop-made.

Hunting on vintage tool sites will turn up a few wooden curved sole planes with an adjustable toe piece to accommodate different inside curves. I have not tried one but I wonder if any readers have.

The little Lie-Nielsen spoon bottom plane is a different type of player but performs well despite its lack of size.

A card scraper is a good player if used in the proper role – great for smoothing curves but poor for shaping them because it simply rides whatever curve it encounters.

Underestimated but well within anyone’s salary cap is the curved sanding block. Customized in length, width, and curve, they can smooth curves but also can be designed as pretty fair shaping tools using coarse grit paper.

Speaking of sanding, the Ridgid oscillating spindle sander is very handy because it can be set up as a sideways belt sander or as a simple spindle sander in a range of sleeve sizes.

IMG_1235_edited-2

Back to the opening photo, the humble Stanley Surform shaver, a product of a program whose glory days are past, is an effective rough hogger. Surprisingly, it can be tuned to perform with a bit more finesse, as will be discussed in a future post.

The Allongee style gouge, #5 sweep, 38 mm, is a good reserve player for cross grain hogging in wide curved work, much like a freehand scrub plane for curves.

A couple of other tools are not in the TFC Team photo because, though they arrived with promise, were cut after tryouts. I found the flexible curved float file to be slow and awkward, and did not live up to the reputation of its flat cousins. The same was so for the Microplane flexible insert for a hacksaw frame. These are just this coach’s calls; you might like them.

When there is a simple curve in one plane, as shown below, to be made in multiples, I go to the pattern routing game plan, as represented by the pattern/flush cut bits on the right in the top photo.

IMG_1236_edited-2

Of course, just about all curves start with good, accurate sawing, which usually means a well-tuned bandsaw. That’s the fan base behind the whole team.

Next: nuancing the Surform Shaver.

Category: Tools and Shop  | Tags:  | 2 Comments