Shooting has no equal for producing an accurately square (or angled) end on a board while incrementally removing minute thicknesses of wood to make a component fit just right. This shooting board has seen many years of use because it meets my preference for jigs to be simple and adjustable for tolerance.
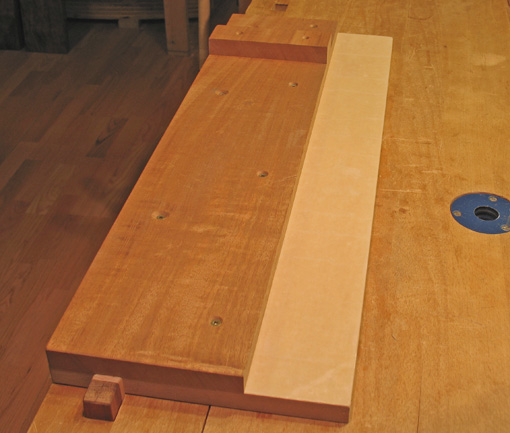
It is easily constructed using a 9″ x 26″ x 3/4″ piece of MDF for the base. Plane the working side of a dressed quartersawn mahogany board, 6″ x 3/4″, straight and square. Attach it to the MDF with screws, leaving a 3″ track on which the side of the plane will ride.
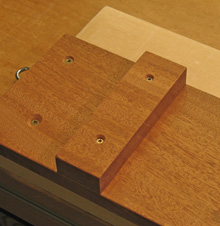
The track is covered with adhesive-backed 1/32″ thick UHMW slick plastic which makes the plane ride like a sled on ice. Screw a short grain fence, about 7/8″ thick, a few inches in from the end. To attach the fence, use oversize clearance holes and adjust the squareness until you’re satisfied.
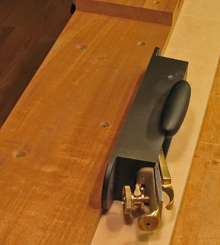
Break in the new jig by taking a few shavings off the side of the mahogany to create a miniscule rabbet. The outermost part of the plane’s sole will ride on the uncut straight edge while the tiny blade projection will nest in the rabbet.
In use, don’t worry if the woodworking gremlins confound your attempts to produce a square end on a board even though the fence is “perfectly” set. Just use a piece of tape or a shaving judiciously placed on the face of the fence to produce the squareness you seek. The same goes for squareness across the end of the board – use shims logically placed on the shooting board surface to get the desired result. This is microadjustability under your control!
A thicker fence can be attached for thicker workpieces or to stack workpieces to distribute blade wear. I seem never to use miters in my work but a fence could be attached at any angle. The scale of this shooting board is more for drawer making but I have used it to shoot carcase boards by using an adjustable support alongside the workbench. Remember, the shooting board also works great for long grain edges on small pieces.
A low angle, bevel up plane is ideal for shooting. I like the compact mass of the Lie-Nielsen “iron miter plane”. Don’t even think about shooting without a very sharp blade.


Rob,
Really nice…Thanks and Cheers!
Thanks Tom.
If I were making a new one I’d probably make it a couple of inches wider but this one has pretty much met my needs for years.
Rob
Hi Rob,
Very nice blog! I have tried to make a shooting board of my own with some success. When attaching the fence you say to use “over size clearance holes”.
Do you mean in the fence? Would it be like a counterbore so that the shank of the screw is clear of the fence (over size hole, now I think I get it) but the head bites into the shoulder of the counterbore?
Thanks for your time.
Tom
Hi Tom,
Thanks for your interest and comment.
Drill very slightly (<= 1/64") oversize clearance holes through the fence and countersink them. This will allow slight adjustment of the fence to get it as square as possible. The wood screw head will seat into the countersink to snug down the fence. By the way, as noted above, if I were building a new shooting board, I'd probably make the hardwood platform about 2" wider, i.e. 8" instead of 6". But above all, built it, use it, and have a great time with your woodworking! Rob
Rob,
Thanks for sharing the shooting board plans on FWW.
It’s great to have discovered your blog, as well. I’ll be visiting.
–Jonnie
Jonnie,
You’re welcome. Thanks for reading.
Rob
I’m afraid I have to call your bluff, Rob.
I’m thinking about shooting without a very sharp blade.
In fact, I might even be so bold as to call it “fantasizing about shooting with the back end of a blade.”
NOW what’re you going to do?
Haha.
Hey, thanks for reading.
Rob
Hi Rob,
I just discovered your blog. Looks like some good stuff.
Initially I saw your shooting board article on the FWW site and have a question or two.
Just finished a shooting board similar to yours after buying the LN Iron miter plane. I honed the blade the way LN suggests and tried it out. I had a dull chipped blade in no time.
Obviously I’m doing something wrong.
Any suggestions will be appreciated.
Thanks,
Jack
Hi Jack,
Though sharpening really does not have to be difficult, there are many things that can go wrong and so it is hard to say why it’s not working for you. My best guess, especially with a new blade, is that you might have neglected to flatten the back (non-beveled) side of the blade and work it successively through your finest stone.
My second guess is that you might have removed the burr from a coarse or intermediate stone too abruptly, such that it essentially broke off rather than was cut away.
L-N has some videos online with sharpening (and other) instruction:
http://www.youtube.com/user/LieNielsen%20#p/u/14/yzeAsX-09o4
There are good books on sharpening, including one by Tom L-N sold on the L-N site.
One thing is for sure, you will defintely get it right, and soon, so don’t give up! Good luck.
Rob
Oh, one other thing – end grain sometimes gathers and holds abrasive grit if the board was standing on end on a concrete or sandy floor. That would dull a blade. Maybe saw off a fresh end and see how the planing goes.
Rob
Rob,
Thanks for your reply and suggestions.
I had flattened the back of the blade but not very well. I got in a hurry to try out the new plane. (Senior moment!!)
Watched the video link and then resharpened as the video suggested.
After the resharpen everything worked better. Now as soon as the operator develops his technique I think all will be well.
I’m really enjoying your site.
Jack