Author:
• Tuesday, April 21st, 2015

drill stops

Maybe.

Of course, the best drill stop is on a drill press but the topic here is drill stops for hand drilling, which for most of us means with a portable electric drill, corded or cordless. So, let’s look at the candidates.

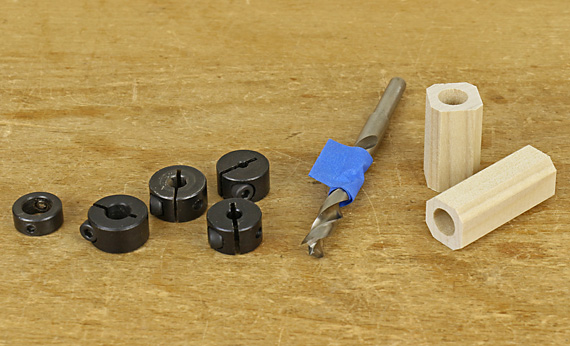
The most common store bought drill stop is a round metal collar with a single setscrew that tightens against the drill bit. These are cheap and not bad, but I’d stop short of calling them good. Most of them tend to tilt as the screw is tightened and all of them can damage the flutes of the bit. If you jiggle or turn the collar to direct the point of the setscrew toward the bottom of a flute and then tighten the screw carefully and firmly, they can stay put and perform decently. Fuller makes a version of these that is longer than the others.

Another type of stop uses a setscrew to close the metal collar’s diameter to bind it by friction against the drill bit. I’ve found that the metal is too stiff to reliably close down snugly against the bit, or on the other hand, that the inside diameter is too close to that of the drill bit so the collar is too hard to get on or off the bit. They’re borderline acceptable; I wouldn’t call them good.

Some of the stops used in conjunction with a countersink are pretty good and some of the Forstner bit stops seem good but those are other matters.

An utter failure is the red plastic stop that twists on and supposedly tightens against the drill bit. I have found them totally unreliable – they easily slip. Sorry, I wouldn’t use them in a hundred years on any project of importance.

Now let’s look at what I think most of us use: masking tape. Wrap some blue tape tightly around the drill bit and squish it in against the flutes. Then fold over the last bit of length so it forms a little flag that sweeps away the drilling dust on the work piece to signal that you are at full depth, and later to make the tape easier to remove.

In any careful work, I put a mark on the drill bit at the bottom of the tape with a Sharpie. Then, as I’m drilling successive holes, I check repeatedly to see if there is a gap between the mark and the tape, which would indicate that the tape has slipped. Alternatively, I keep checking with a ruler.

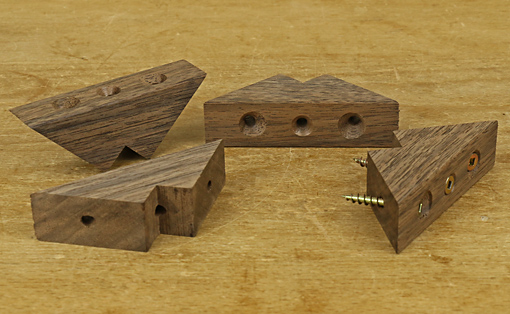
What about for very careful work, especially drilling many holes, such as in carcase dowelling? For this, remove all doubt and make a dedicated wooden collar drill stop as James Krenov recommended.

drill stop

Work out the required length according to the desired depth of the hole and the length of the drill bit. Use a drill press to bore into the end grain of an over-wide squared block then saw off the stop itself. Chamfer the long corners for safety so they won’t hack at your fingers. If you cut the cross section of the stop to size before drilling, it will register less accurately against the drill press table and the drilling is likely to be dangerous.

making a drill stop

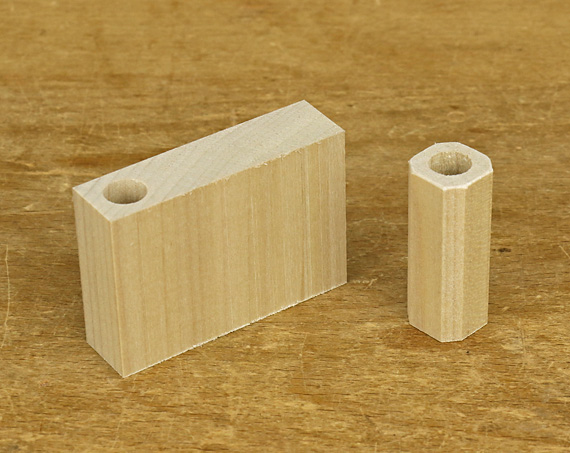
The cutting depth can be fine tuned by adjusting the amount of the drill shank inside the chuck – assuming it is a good chuck. This type of drill stop has never let me down. It’s worth the extra effort. By the way, dentists understand this.

So, yes, there is a good drill stop, but you have to make it.

Author:
• Wednesday, April 01st, 2015

A new steel developed at the Japanese Institute of Engineering and Metallurgy holds tremendous practical promise for all who use sharp blades, including busy woodworkers. Though not yet ready as a marketable product, it appears to have the potential to be a complete game changer. Here’s the details.

The key feature of this steel is its ability to, in effect, self sharpen. By combining sophisticated powdered metal technology with several unconventional alloying elements, the researchers have been able to produce a unique grain structure in the steel. Whereas a sharp edge in any conventional steel wears by “dropout” of iron, alloy, and carbide grains, which leaves behind a degraded surface and edge, the newly developed steel product wears in an entirely different manner.

The grain structure in the outer few microns of this steel gets compressed just before it wears. When metal wears away, it does so in minute thin “flakes,” leaving behind a surface – and a cutting edge – that is as polished and keen as it was before the wearing process started.

In fact, once properly sharpened, the edge actually becomes slightly sharper as it wears in this unique manner. It is as if the wood that is being cut by the blade’s edge acts as a very slow sharpening “stone”. There is a limit to how long this process can persist simply because the volume of steel near the edge is gradually depleted.

However, in personal communication with Dr. I. N. Sano, the lead scientist on the project, he predicts the sharpened edge of a smoothing plane would be expected to last through about one year of regular use in a typical hand-tool-based woodshop! Dr. Sano remarks that, “Woodworkers are going to be amazed at not only how long a cutting edge in this steel can last but how it actually improves with use. The traditional routine of continually resharpening plane blades and chisels is going to become a relic of the past.”

The details can be found in the latest issue of the Institute’s bimonthly journal but a full English translation is not available at this time. A brief introduction is reproduced below, with permission.

ここで問題の真実は、ケースにあなたが興味を持っている、である

あなたがこのナンセンスのいずれかを信じるなら、よく、あなたは、日付をチェックしていない。それとも、素早く、簡単にすることができます木工誇大広告、そして確実なことするたびに信じるものだまされやすい木工の一つです。申し訳ありませんが、それだけで何か他のもののように、練習と勝利と一緒にいくつかの障害がかかります。

The development group estimates that the new steel product will be available to tool makers by the end of this year. After a bit more tweaking, it is expected to have very favorable working characteristics for blade formation. I will keep readers posted with new information on this wonderful innovation that really has the potential to change the way we all work in our woodshops.

Sano-san has informed me of a single drawback to the new steel. It will only be produced on a single calendar day each year, namely today, which is named in honor of all those who believe that high quality woodworking is easy, quick, and every step is a sure thing every time.

Category: Resources  | 14 Comments
Author:
• Tuesday, March 24th, 2015

Early on the long road to proficiency in a craft or any serious skill, there are many mysteries to solve. In this first stage, there are countless individual elements that are difficult to master and all together they can seem overwhelming. For example, the vast range of tools can be paralyzing for a novice woodworker, and to make matters worse, most new tools must be tuned or sharpened before they can even work properly.

Gradually, each element is conquered and these early mysteries dissolve. Despite this progress, there is a growing feeling that, “I know what all the buttons do but I can’t get the thing to work.” In other words, the elements still must be synthesized – another set of mysteries to solve. In this second stage, the developing woodworker who has learned to use all of the tools and make joints must still learn how to integrate many skills to actually make a piece of furniture.

This is the big picture and it is becoming clear. Now you know what you are doing and you know it. You can really make stuff. With continued ambition, more practice, and, of course, a fair share of missteps and even disasters, you can make better stuff. There will always be lots more to learn but the big picture is no longer a mystery.

After all of this comes a mystery of a different sort, an important one that is actually welcome and is meant to persist. The skillful person is now doing some things without being cognizant of why, at least at the moment, yet the moves are very right.

It is as if the program, so to speak, runs on its own – not always, but at least during some of the most productive times. Call it instinct, flow, intuition, grooved neural pathways, or just a lot of plain old practice, but there is indeed a wonderful mystery to it.

Sure, this happens during some days or hours and quite disappointingly not during others. Moreover, some flights of supposed brilliance could be very wrong, though that is a risk hopefully worth taking.

Here are some examples.

  • Watch the great soccer player Neymar. He is surely not aware at the time of exactly how he makes split-second moves on the field, and even afterwards probably cannot fully explain his mental processes.
  • All the studies and data in the world will never fully supplant the instincts of an experienced medical clinician or a financier, each faced with the unique specifics of a case at hand.
  • A craftsperson’s hands seem to have mind of their own.
  • A very good every day driver may save his life with a moment of prescience, and NASCAR drivers probably do this all the time.
  • A good teacher knows with a sixth sense how to reach each student as an individual.
  • Most wonderfully, a refined creative sense tells us that when it feels right, it is right.

So OK, this is a very good place to be but what of use can be said about it? After all, it is a difficult matter to deconstruct. Certainly, reaching this level is not easy and requires time, practice, and talent.

I think most important is the realization that this level of functioning cannot be borrowed or directly taught. This form of doing something truly well must arise uniquely within each person after the first two stages have been taught and learned.

This happens as you train, practice, and confront the expanse of your freedom with courage. This learning grows in the quiet moments of concentration when persistence seems inevitable and you trust yourself even if the effort is uncomfortable. With humility and some luck, mastery may be ahead.

The late, great basketball coach John Wooden said, “It is what you learn after you know it all that counts.”

Category: Ideas  | 5 Comments
Author:
• Friday, March 20th, 2015

Corner blocks (corner braces) are a practical, effective way to strengthen furniture, particularly post and rail assemblies.

As previously discussed here, a properly designed and executed mortise and tenon joint will itself rarely fail but the wood around the mortise still can break. Two feet of leg extending below a table apron can impose huge leverage on the wood in the area of the joint.

Corner blocks are routinely used by chair makers but it surprises me when they are absent in tables where they could have been included. I use them whenever possible – belt and suspenders. Of course, sometimes there is no room for them, such as when a drawer is in the way, and sometimes they would disturb the appearance of the piece. The different mechanical stresses involved in casework make corner blocks generally less useful but there too they are still probably underutilized.

Working with tables

If the table aprons are at 90°, it is easy to make corner blocks with the table saw and miter gauge. The long side of the triangle could be as little as 3″ for a small table and 4 – 5″ or more for larger work. For thickness, 1 – 1 1/4″, using a single row of screws, is usually enough for small to medium work, though for large pieces, 2″ or more with a double row of screws is more in line.

I make corner blocks with a notch to accommodate the inner surfaces of the leg. I think it is best to leave a tiny gap between the block and the leg to avoid possible problems with wood movement that might affect the tenon shoulder line. However, in the past I have not always made a gap there and that has not caused problems.

If the aprons are not at 90° or are curved, I find it easiest to place a blank of wood diagonally spanning the aprons and simply trace the inside edges of the aprons and leg onto it, provided the top of the legs and aprons are flush. Then I bandsaw to the lines and, if necessary, refine the result with a plane. Alternatively, one straight cut, if required, could first be made on the table saw and used as a starting alignment. If the legs extend beyond top of apron, measure out and cut a notch, then place the blank and trace.

Another approach that is sound, though not my preference, is to make the block span the aprons but completely clear the leg. This sacrifices some glue area but should still be sturdy enough and seems easier to make.

Prepare the block by drilling and countersinking clearance holes for the screws. The center hole for the screw that will penetrate the leg is at 90° to the long edge of the block. I make the holes for the screws that will penetrate the aprons at 75°, not 45°, to the long edge of the block so there will be a good bulk of wood around the clearance hole. This also allows a little more screw length to penetrate the apron.

The blocks in the photo above show the features discussed.

I glue the blocks in place with Nexabond 2500M CA glue after sizing the end grain for about one minute, or similarly with quick set epoxy if the sawn surface is at all rough. After the glue sets, I drill pilot holes into the legs and drive those screws. Then I reset the masking tape depth stop and do the same for the apron screws, being extremely careful not to drill too far into the aprons.

If there is room for only a thin corner brace that cannot support a screw, a dovetailed attachment to the top of the aprons could be used. Otherwise, dovetailed attachments are difficult to make and unnecessary.

Category: Techniques  | 3 Comments
Author:
• Friday, March 13th, 2015

Mini Gorilla dust collector

My small shop requires making efficient use of every bit of floor, wall, and air space, including for dust collection. The setup described here has proven convenient and effective.

The Oneida Mini Gorilla is set on the “mobile” stand but since it will not be moved, I took off the wheels and attached wooden blocks under the platform (see photo above) to save a little space and make the assembly more stable. The whole thing is tucked away just to the right of the table saw, with the filter facing mostly away from the interior of the shop.

Using a 5″-4″ reducer, I attached a 4″ flexible plastic-wire hose to intake port of the collector. This type of hose, available from Rockler, Woodcraft, etc., is durable and easy to handle. A 5″ hose seems more awkward to handle and the 4″ certainly handles all of the chip production from my machines, as discussed in the previous post. It also meets the requirement specified by the manufacturer for airflow through the filter.

Mini Gorilla dust collector

I simply bring the hose to each machine as needed, which is very quick to do. The default location is attached to the table saw and with some of its length curled under the saw’s motor hood. Each machine – table saw, bandsaw, jointer-planer, router table – and a dust hood accepts a simple press-fit plastic female connector that is attached to the end of the hose. The ports on some of the machines required modifications for the hose connector to fit uniformly on all of them.

Mini Gorilla dust collector

The remote control is very handy, almost a must. It works by radio frequency, not infrared, so no optical line of sight is required.

Mini Gorilla dust collector

The steel collection drum holds 17 gallons. I empty it into a 45-gallon trash bag, which makes the job easy. Smaller trash bags made the job considerably more difficult. It is fairly tight quarters getting the drum off and back on the machine but not a big deal. I would have bought the super deluxe infinite capacity drum at an untold price but, um, I was told these have been banned because they defy the laws of physics.

The Mini Gorilla can also be ordered from Oneida with a wall mount bracket. This would not have worked out in my shop but you may want to consider it. It allows the use of a 17, 35, or 55-gallon drum, while the mobile stand is limited to the 17-gallon drum.

Now the steel drum is, of course, opaque, and if you let it fill up such that dust gets backed up higher into the system, you will have a very unpleasant time cleaning the pleated HEPA filter. I made this mistake – twice!

A drum level sensor is available from Oneida but my solution was to drill a hole (approximately 1″ in diameter) in the lid and block it with a rubber stopper with a screw eye handle. When my guardian angel taps on my shoulder, I check on the bin by removing the stopper and peering in with a flashlight or just inserting a rolled up piece of paper or dowel as a depth gauge. It works.

Mini Gorilla dust collector

The Mini Gorilla motor can be wired as 110V/16A or 230V/8A. I run mine on a 110V/20A circuit with a dedicated outlet. Keep in mind the collector draws a lot of juice and there will always be another machine running with it, so check your electrical capacity and outlets.

The dust hood shown below clamped to an outfeed stand is helpful at various locations, especially for the storm of debris produced by router mortising with an upcut spiral bit. By the way, the shavings under the bench are just fine for a while where they are, without a dust collector.

dust collection hood

Category: Tools and Shop  | 3 Comments
Author:
• Thursday, March 12th, 2015

Mini Gorilla dust collector

For many years, dust collection in my shop had been the basic bag-over-bag single-stage collector familiar to most of us small shop woodworkers. A few years ago I upgraded to the Oneida Mini Gorilla, a cyclone collector, and it has been excellent. I’ve received many inquiries about it from woodworkers considering upgrading their dust collection system, so I hope this report will be helpful.

A cyclone collector is more efficient that a single stage collector because it involves two stages of collection based on particle size. Here’s what happens. The impeller fan whips around the intake material in the big sheet metal cone that give these machines their characteristic appearance. The chips and larger dust particles that constitute almost the entire volume of the intake fall into the collection drum below the cone.

Thus, only the finest dust – the most unhealthful – gets passed on to the air filter, the cage-like cylinder sticking out the side of the yellow cone in the photo above. This permits the use of an incredibly efficient sub-micron pleated HEPA filter without it getting continually overburdened and clogged with debris.

What all this means is that my shop is cleaner, and more important, healthier.

The Mini Gorilla easily handles the biggest producers of chips in my shop, the Hammer A3-31 12″ jointer-planer and the DeWalt DW735 planer. The only limitation is the dust gathering efficiency at the source. Fortunately, the A3-31 and DW735 are great in this regard. The Minimax bandsaw is good while the Saw Stop table saw (vintage 2005) is just fair.

Oneida rates the noise produced by this machine at 76dB(A) at 10 feet. As a practical matter, it seems noisier than what I remember of the old bag-on-bag collector but it’s not bad and certainly not a deal breaker. The Mini Gorilla is very space-efficient – notice the motor on top of the cone – so its footprint is smaller than most small single-stage collectors.

It’s not cheap. The base price is now $780, according to Oneida’s website. A mobile stand or wall bracket, steel drum, and shipping push the total over $1 large.

Oneida’s website has details about the Mini Gorilla and the rest of their large line of dust collectors. This review is unsolicited and uncompensated.

Grunt machines like a good dust collector are not glamorous and there is a natural reluctance to invest in them. However, I think they support a sense of freedom in the shop because they take good care of the dirty work and produce a better working environment. That freedom, in turn, produces more creativity, which is what this is all about.

Next: How I set up the Mini Gorilla in my small shop.

Author:
• Saturday, February 28th, 2015

expansion washers

These are so eminently practical that it seems they should have been around for a century but it has been just several years since Lee Valley started manufacturing Chris Becksvoort’s clever idea. Since then, I’ve been using them whenever there is a need for a substantially long slot to accommodate the movement of a screw caused by dimensional changes in wood related to humidity.

One of the most common uses is for screws that go through cross grain support pieces and secure a table top. Another is at the back of drawer runners that are cross grain to the sides of a case.

The washers come in two sizes, designated #10 and #14, and both are thoughtfully made to convenient dimensions. The #10s shown here are slightly less than 1/2″ wide and 1″ long, with a slot slightly greater than 3/16″ wide. They are 3/64″ thick.

It is possible to rout slots for these but I find it easier to simply drill two 1/2″ holes with their centers 1/2″ apart using a Forstner bit in the drill press. Pare away the remaining web with a 1/2″ chisel. Next, without changing the fence setting, drill 3/16″ through holes on the same two centers. Then drill overlapping holes in between and gradually drill away the waste to form the slot.

The finished slots, and the washer and screw in place are shown below.

expansion washers

expansion washers

expansion washers
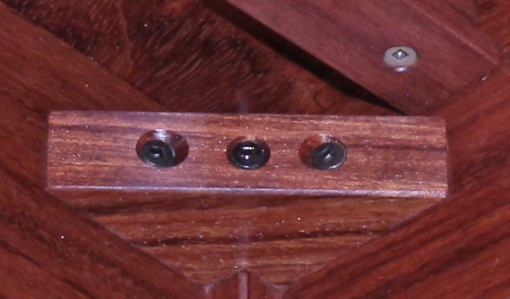
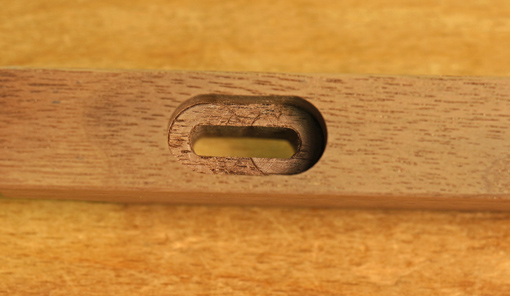
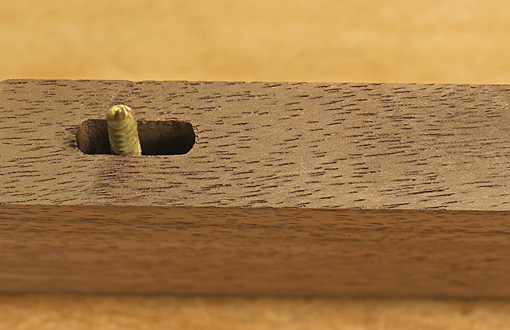
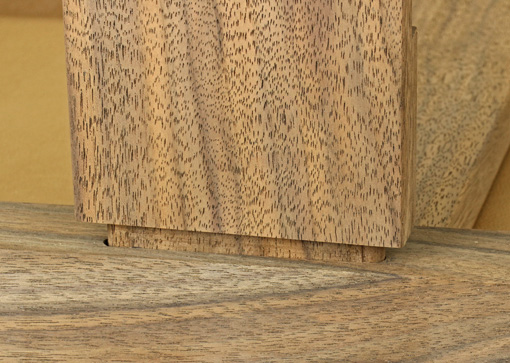
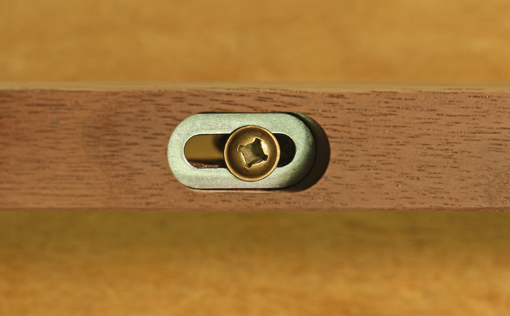
For this type of assembly, I prefer square drive, hardened, deep-thread, washer head screws, #8 in this case, available from McFeely’s. (Technically, this is a combo drive head but who in his right mind, given the choice, would use a Phillips driver instead of a square driver.) Of course, the depth of the large slot must be worked out according to the thickness of the stretcher or runner, the thickness of the piece that the screw will bind to, and the length of the screw. The view from the other side is shown below.

expansion washers

True, the same slot construction can be done without the washer and in fact, those that I have so made have functioned well for many years. And there are other good approaches to this issue. However, when sizable dimensional swings must be accounted for, it has always been too careful a setup done with some doubt about the possibility of the screw head binding. Perhaps if it was socked down too tightly in dry wood, I’ve wondered, it might get stuck in the swell of wood around it and not slide.

These washers make things simple and remove any doubts. The screw head will not catch on the metal washer. The construction is clean and sure. Thanks to Chris and Lee Valley for this handy hardware item that should be in routine use.

Category: Techniques  | 4 Comments
Author:
• Saturday, February 21st, 2015

mortise and tenon

The glue line of a properly constructed mortise and tenon joint will almost never break from external load. Other things might break but not that.

To get a good sense of this, let’s think about what’s going on in just a small joint with a tenon 3″ wide by 1″ long. There are 6 square inches of glue surface, which is equal to that in an 8″-long edge joint between ¾”-thick boards. Now imagine trying to break that edge joint, not in tension as in hammering down on the unsupported joint line, but in shear! The wood will break, the glue line will not.

The mortise and tenon joint is strong because even in a fairly small joint there is plenty of glue line and it is stressed in shear. So if you’ve fit that decently, don’t worry; it is very unlikely to break. The tenon shoulders transfer much of the stress to that glue line. (By the way, the glue line of a half-lap joint can be stressed in tension if, for example, a frame undergoes severe twisting forces.)

The tenon itself is stressed mostly in tension and compression along the grain, which are also quite strong. So don’t worry there either, because a reasonably sized tenon is also very unlikely to break.

Furthermore, for the purpose of strength, there is no point in fitting the tenon tight to both ends of the mortise. That does not make the joint strong.

If something is going to break, it is most likely to be the wood of the stile or leg, which can succumb to stress in tension across the grain. This is especially so if the joint is designed with injudicious distribution of wood among the components.

Thus, make sure the stile or leg will be strong around the joint. In general, the walls of the mortise ought to be at least as strong as the tenon. And though it seems less popular lately, a haunch is a good idea when joining an apron at the top of a leg.

Also, hygroscopic cycle changes in the wood will stress every mortise and tenon but don’t let this be any more than it must. Don’t let a tenon and excess glue bottom out in the mortise and don’t jam a tenon to each end of the mortise (see above). Placing a peg too far from the shoulder will tend to make hygroscopic movement eventually produce a gap at the shoulder, though placing it too close to the shoulder will make the mortise wall more liable to break.

Inspecting old broken or cracked furniture and other wood structures, wherever you can find them, and thinking about why the failures occurred, is one of the most useful habits a woodworker can have. I’ve been doing this for several decades – I suppose because I would rather not have the same things happen to anything I make.

Category: Techniques  | 3 Comments