Established in September 2008, this site contains 260,000 words of original content (through December, 2025), not including comments, and 1406 original photographs.
Here you will find plenty of serious woodworking instruction, information on tools, shop setup, and wood, along with musings about the craft. All for you to enjoy for free.
Heartwood is one of the longest running woodworking weblogs on the internet with, conservatively, 6 million visits and 20 million page views (actual human visits, not bots, crawlers, etc.).
I am always delighted to hear from fellow enthusiasts and anyone exploring fine woodworking.
In theory, the bottom tips of all four legs of a table should be in the same plane so it can sit on a flat floor without wobbling. Remember, however, the words of Yogi Berra, “In theory, there is no difference between theory and practice. In practice, there is.”
Now, if you made uniform leg lengths and mortise-and-tenon positions, you should have a flat base after assembly that requires no adjustment but stealth gremlins almost always prevent such perfection.
On the other hand, consider that rarely is a floor flat over the area on which the table stands, so making the four legs true is really just playing the odds. Furthermore, a table, especially a large one, may flex when you place it on the floor to produce an automatic correction. The same goes for chairs. Therefore, all of this is often of no concern at all – in practice.
For a small table though, this issue may be a significant concern. The small area of floor on which it stands may indeed be flat, the table may not flex much, and it feels creepy when it wobbles a lot. So, let’s look at how to assess this.
It is best to do this with the top attached in its final configuration, which contains any flex in the frame induced by the top piece.
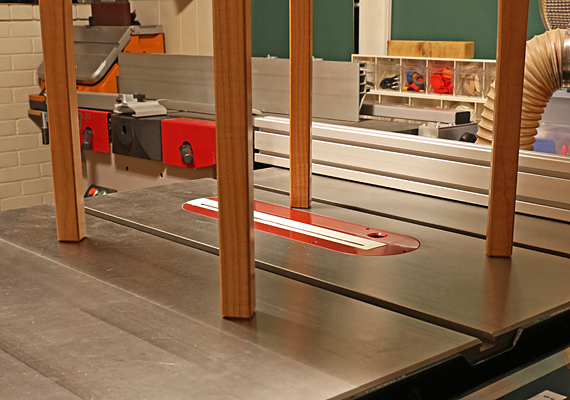
The simplest method is to put the small table on a true flat surface such as the table saw. If such as surface is not available, you can turn the table upside down and use winding sticks on the tips of the legs. Note that this may introduce error if the frame of a larger table flexes a bit differently than when it is right side up. In any case, for a larger table, I do not go hunting for a very flat floor, which probably does not exist; I just do not worry about the whole matter.
For small tables, I do like to get it pretty close. You can take off the error from the one long leg, as determined by how the table pivots on the flat reference surface, but I prefer to take off half that amount from each of the two long legs.
OK, if you have done everything just right in the shop and now place the table on the floor where it will live, which is not likely to be flat, and it wobbles enough to be annoying, what do you do? Shim it. A layer or two or more of tape such as duct tape is just fine – in theory and in practice.
Dry fit the joint with just two dowels. Using all five dowels makes it remarkably difficult to disassemble. However, check every one of the long grain holes to make sure it is full depth so you don’t get a surprise when finally closing the glued-up joint.
I find it less stressful to glue up in two stages. I apply glue in the holes, and then tap in the dowels in one of the tongued components. I limit the depth of the dowels with a registration block. When this subassembly has dried enough to keep the dowels stable, I complete the glue up by applying glue to the other set of holes, plus a little bit on the dadoed piece, and then push the whole thing together.
This joint must be clamped from the ends. I have found it strongly tends to stay accurately square but, of course, I check it anyway, and adjust the clamps as needed.
When the glue is dried and conditioned, I plane flush the outer edges. If made accurately, which is very likely if the dowel jig was made accurately, this joint will turn out neat and strong, and it will stay that way.
Much of the work in making this joint is in making the dowel jig, which is reusable for a joint of the same or less width. The joint also works with large width rails because there is no conflict from dimensional change due to moisture cycling.
This has been a good joint to have in my repertoire. You might want to give it a try.
Drilling the holes for the cross-rail joint is easy as long as you keep track of reference points and orientations.
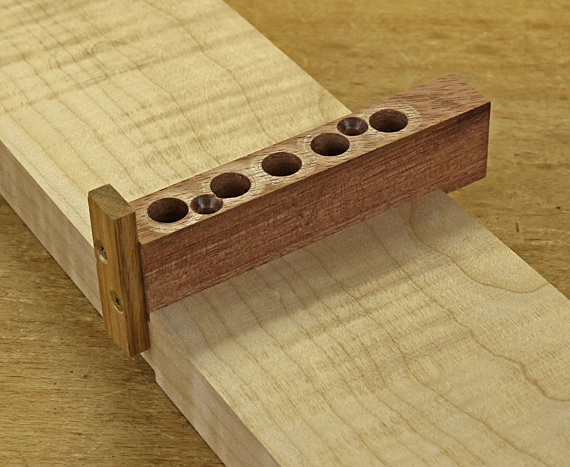
First, attach the jig to the first side of the joint. Use the reference cleat to set the jig in place in the dado, and clamp it there. Pass a snug fitting transfer punch or brad-point drill bit through the fixation holes to make dimples in the floor of the dado. This creates reliable centered marks to drill minimal-depth pilot holes for the screws. Screw in the fixation screws, which only project about 1/4″ into the workpiece, and then remove the clamps.
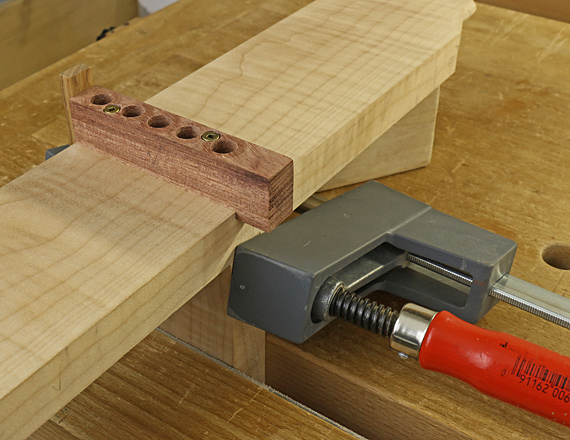
With the jig now securely in place in the dado, you can prepare to drill the dowel holes. I have found no good way to accurately secure the jig onto the end of the tongued piece, so it is best to insert and clamp the tongued piece in the dado on the opposite side of the dowel jig in the orientation it will be when the joint is assembled. Thus, the holes will be drilled, guided by the jig, through the dadoed piece and into the tongued piece, all in one step.
The photo above shows the setup in the vise. Note the support block that helps keep the components at 90°.
For drilling the holes in the joint, I use a hand-held electric drill and a DeWalt Pilot Point bit. Well made, its diameter is a good match to the high quality brad-point bit that I used to make clean holes across the grain in the jig. The DeWalt produces a little tearout drilling cross grain in the dadoed piece but that will not be seen and does not matter structurally. More important, it advances strongly through the long grain of the tongued piece, where a brad-point bit (essentially a cross-cut device) tends to bog down and burn.
A good drill stop is a must for this work. I do not like any commercially available stops, and so I use shop-made stops (described here), which have never let me down. When working out the drilling depth, remember to take into account the jig and the dadoed workpiece. I drill 1/16″ – 1/8″ extra deep into the tongued piece to allow for excess glue.
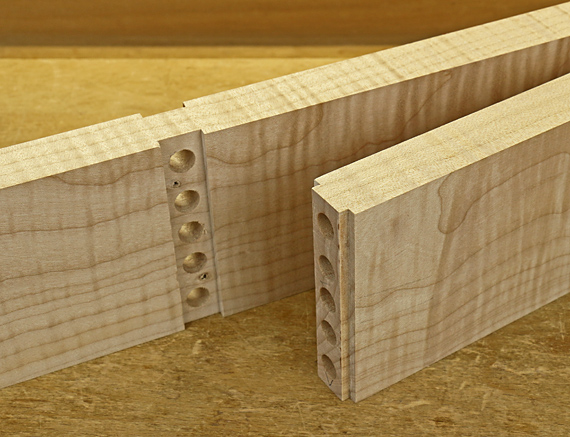
This is the joint so far:
Once you have finished drilling from the first side of the joint, detach the jig and reattach it to the dado on the “second” side of the joint. The cleat stays against the same edge of the dadoed piece but the opposite drilled face of the jig sits on the floor of the dado on the second side. The second tongued piece is set into proper orientation in its dado and the setup is clamped and registered the same as for the first side of the joint.
For this second round of drilling, the holes in the dadoed piece already exist, so you are just going through them directly into the long grain of the tongued piece.
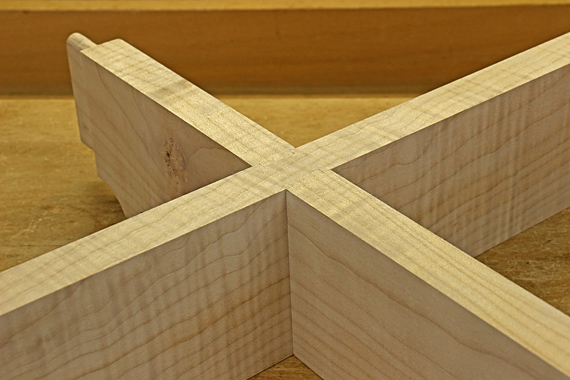
Here is a reminder of what we are trying to produce:
This is more difficult to describe than to do. This method ensures that all the components are drilled in the actual position they will be in the final joint. And that is why the dowel jig is made to be useable from both sides.
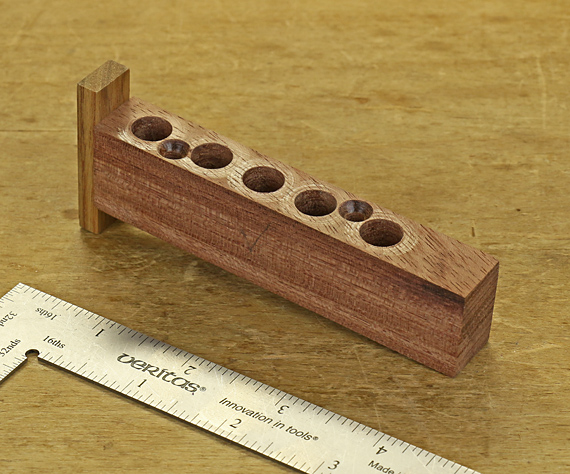
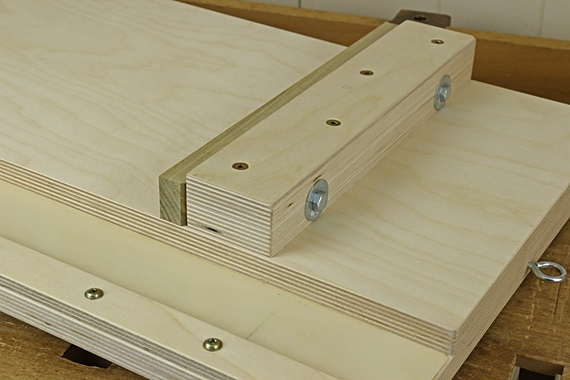
The dowel jig for this joint is simple but it must be accurate. Use a fine-grained, very hard wood. I used some of my old stock of bubinga, one inch thick. The width of the jig must fit snugly into the dado, 5/8″ in this case. A little extra length helps in handling the jig.
Make sure: all faces are flat and straight, the width and thickness are uniform over the full length, and adjacent faces are dead square to each other. Most woodworkers will use a table saw to make this little block of wood, as I did. Please be cautious working such little pieces, and make use of an appropriate work handling device. I like the GRR-Ripper for such work. It’s worth it.
Use a good brad-point bit to drill the 3/8″ holes. The drill press must be set up to drill true at 90° because the jig will be used from both drilled faces. If the holes or the body of the jig is out of square, the joint will be inaccurate and difficult or impossible to assemble.
The spacing of the holes is not critical but leave enough room for pass holes, countersunk at both ends, for two #6 x 1 1/4″ fixation screws. Attach a cleat with little screws at the end of the jig. It extends about 3/8″ beyond each drilled face, and will reference it to the edge of the workpiece.
Here’s how to make the joint described in the previous post.
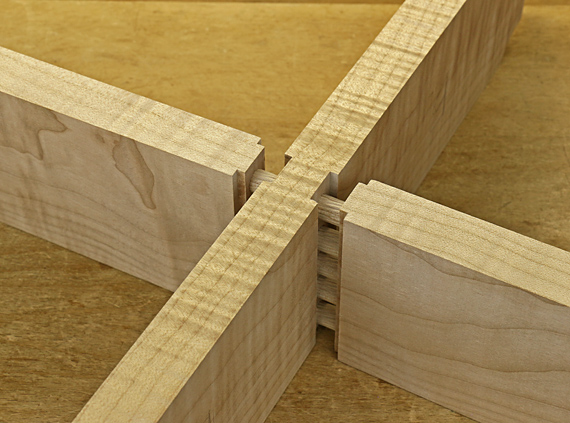
The joint starts with back-to-back dados. These must be precisely aligned because the dowels that extend across the joint will afford virtually no wiggle room when the tongues enter the dados. I didn’t take a photo of the dados before I drilled the holes but you get the idea.
For the 7/8″-thick stock used here, the dados are 5/8″ wide and 1/8″ deep. This leaves a 5/8″-thick web through which the holes will be drilled. Since the 3/8″-diameter dowels are 2″ long, there will be 11/16″ of dowel length to penetrate the long grain of each of the two tongued components.
For a 1/2″ dado, I would use 5/16″-diameter dowels to leave enough meat around the dowels in the tongued components.
How you make the dados is up to you, but accurate stock preparation is important for all methods. Handwork is doable: knife the lines, square them around to the other side, saw, chop the waste, pare the walls, and router plane the floor.
For machine methods you will be referencing from both long edges, so they must be exactly parallel. I used a 5/8″ downshear router bit, and a sled to move the work across my router table. A dado blade in the table saw would also work.
I used the same router bit and the router table to make the tongue in the other two components, sneaking up on the length and width to get a tight fit. If you make the tongue too long, or later reduce the depth of the dado with finish planing, it is easy to correct this by shooting off the excess tongue length. Just make sure the tongues are not too long (it’s a one-sided tolerance), which would prevent the shoulders from meeting neatly.
So, now that we have the double dado joint, we are going to bind the whole thing together with dowels. Note that the glue surfaces in the tongued components are long grain-to-long grain. That, plus the multiple mechanical locks make this a very strong joint. Here is “half” of the joint:
Next: Making and using a simple dowel jig to make precisely aligned holes in all the components.
For rails that cross over their widths, this joint is very doable, strong, and neat. It has several advantages over other options for this situation. (Note this is distinct from rails crossing over their thicknesses, face to face, where the familiar half-lap is a good choice.)
Let’s take a look.
Each crossing member has strength distributed over nearly its full width, and there is no unsupported portion of the width. Furthermore, there is mechanical resistance to twisting in all directions. This is superior to a cross-halving (or “cross-lap”) joint, which is just a vertically oriented half-lap.
This is a strong joint with substantial long grain-to-long grain glue surface – more than 8 square inches. Note that the five dowels are long and continuous from one side to the other side of the joint. Cross-halving joints yield minimal long grain apposition.
It is much easier to conceptualize and execute this joint the than refined but elaborate cross-halving designs that involve stepped notches, sliding double-dovetails, or tapered notches. They make my head hurt.
For an enduring neat appearance as well as strength, the pieces entering the dado have outside shoulders. This differs from some versions of the cross-halving joint that are designed to correct the problem of unsupported width, and involve a dado that houses the full width of the entering piece, which can leave gaps when the housed member shrinks in thickness.
Woodworkers of all stripes will be pleased to know that this joint can be executed by hand, by machine, or a combination of both. In fact, you will see that a single shop-made jig can be easily adapted for use with various workpiece thicknesses and even various widths.
Full disclosure: a disadvantage is that it must be clamped from the ends. This could be awkward for very long pieces, though that is not a likely application.
Next: How to make it. As with all woodworking, it’s a matter of being accurate when it counts.
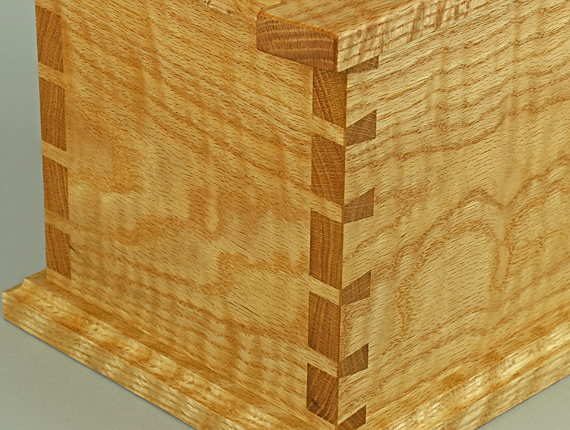
Here are the dovetail angles that I use. There is more than one good way to do almost everything in woodworking, and there are many situational exceptions, so these are not absolute. I do, however, know that they work. For the most part, they conform to what is usually written and taught, but here I also offer explanations for the various options.
My go-to angle for through dovetails in most hardwoods is 7:1 (8.1°), such as for a carcase or box in cherry, maple, or walnut with stock thickness of 9/16″-13/16″. It has enough angle to form a strong mechanical lock but not too much to produce fragile tail corners or overly fussy fitting. Vulnerable tail corners can be annoying in the making stage even though they are shielded after assembly.
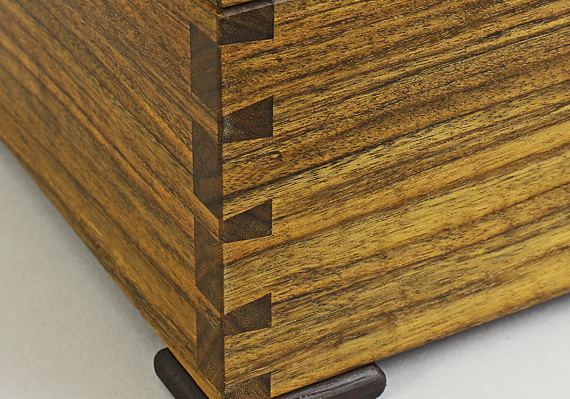
For more brittle, harder woods such as the curly oak shown below, I prefer 8:1 (7.1°). This helps to prevent chipping at the corners of the tails but still provides enough mechanical lock because the wood is less compressible. For the ovangkol small chest shown in the second photo below, I used 7:1 but the wood proved to be harder and more brittle than I first thought, so maybe I should have used 8:1.
For softer, more compressible woods such as pine or aspen, 6:1 (9.5°) works well. The steeper angle produces more mechanical lock, and chipping is not a concern.
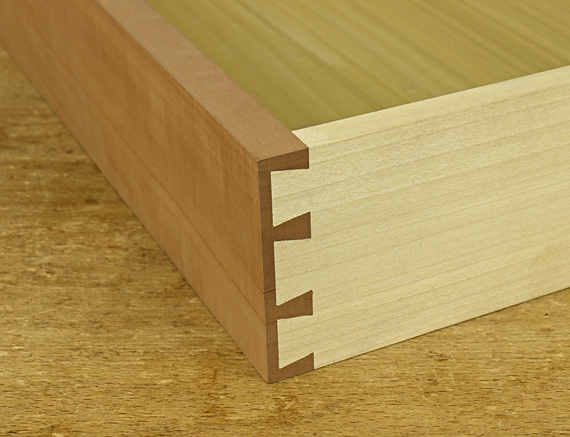
Half-blind dovetails are a different matter. The shorter length of the tails usually requires a little more slope to create a good mechanical lock. 5:1 (11.3°) works well in most cases. It also just looks right to my eye. This study drawer with poplar sides and pear front that I keep in my shop is a good example. Using a harder wood for the sides and/or a thicker front (longer tails), I would consider 6:1, ultimately going with what looks right.
Through dovetails in thin stock deserve similar consideration. Very generally, for thin pin stock (shorter tails) consider using a bit more slope than for similar circumstances in thick stock.
Interestingly, in all of this, the mechanics and the aesthetics seem to dictate the same answer, and not, I think, by coincidence.
I have been using the shop-made bubinga markers shown in the photo at the top for many years. Unlike most commercially produced markers, they allow you to mark the entire length of the line on the face grain and end grain with one positioning. I detailed their construction in an article in Popular Woodworking, November 2009, issue #179.
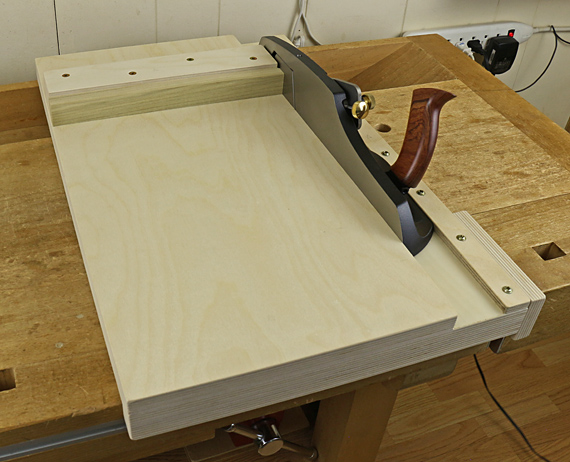
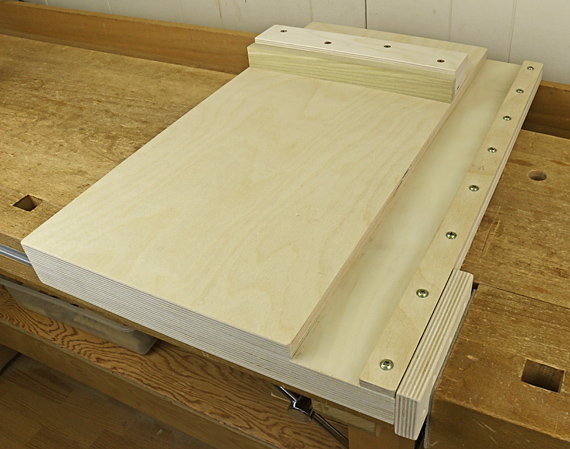
Here are the details of the shooting board I use. It is designed for use with the Veritas shooting plane, as well as to fit my workbench, the work I typically do, and my personal physical characteristics (I’m right handed).
It is constructed primarily from 18mm 13-ply birch plywood. The base and thus the overall dimensions are 22 3/4″ x 14 1/2″. The platform upon which the workpiece rests is 11 1/4″ wide, and is glued and screwed to the base.
The right side of the platform was planed accurately straight before installation. The tiny rabbet, which is the basis for how a shooting board works, is created with the first few passes of the plane that “break it in.”
The cleat at the front, glued and screwed, hooks onto the front of the workbench. The cleat on the right side fits into the tail vise. Together, they give the shooting board rock-solid stability in all directions while in use.
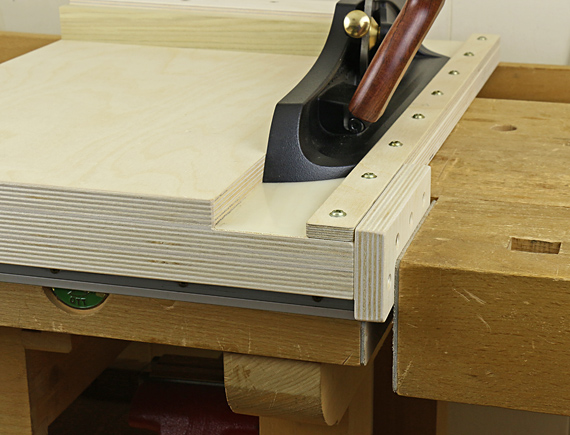
The channel for the plane is about 2 1/8″ wide, and lined on the bottom with 3/64″ PSA UHMW plastic. The 9mm 7-ply birch strip, 1 7/32″ wide, on the right side of the channel is adjusted to create a snug fit for the Veritas shooting plane, and firmly secured with pan-head screws placed at 3″ intervals. It is not glued, so it can be adjusted if needed. The inside wall of the strip is waxed.
The fence block is 2 1/4″ wide, made from two glued layers of the 18mm plywood. It is glued and screwed square to the sole of the plane nestled in the channel. The 3/4″-thick (or 7/8″) poplar replaceable subfence is attached with two 3″ x 1/4″ lag screws that enter from the back of the fence block, accompanied by heavy washers. The pass-through holes in the fence block for the lag screws are actually small slots that allow for some lateral adjustment of the subfence. You may want to use a third lag screw to ensure the subfence is snug against the fence block.
There are three ways to tune the 90° angle of the subfence. You can use whatever suits you; that is a big advantage of this design. Remember, we are using the in-place sole of the plane as a reference, not the channel edge itself.
First, when you create the subfence itself, you can easily plane it as needed – it’s friendly poplar. Then, when you attach the fence you have the chance to put very thin shim(s) between it and the fence block. Now, if you placed the fence block dead on and use a perfectly thicknessed subfence, you should not need to do this, but it is good to have the option! Finally, when in use, you can put a piece of tape or a shaving between the workpiece and the subfence to fine tune the working angle.
For angles other than 90°, you can make and attach a different subfence.
The front of the subfence is 7 3/8″ from the back edge of the shooting board. This gives more than enough length to fully support the 5 1/2″ toe of the Veritas shooting plane. I prefer the plane to have full registration against the channel edge all the way through the cut. There are many shooting board designs with the fence at the end, which causes the plane to lose full registration before the cut is completed.
Also, the 7 3/8″ works out to make the front of the fence not too far away from me, so I don’t have to lean forward too much, while still allowing the base of the shooting board to reach across the tool trough to get full support from the rear wall of the trough. This also results in enough platform depth to accommodate the vast majority of workpiece widths that I use.
The 11 1/4″ fence is long enough to firmly register almost all the work I do. You may want to make your shooting board wider. For any board longer than 20″ or so, I stack a couple of pieces of plywood under the left side of it to prevent it from tipping up at the working end.
The screw eye allows you to store the shooting board on the shop wall, away from abuse.
Remember:
sharp!
dynamic stability in use
low-tech micro-adjustment
and . . . the grippy glove on the left hand
I put a lot of forethought into this design, gathering ideas from many other designs. It has worked out very well for me. I hope it helps you with your work.
Addendum:
A plane such as the Lie-Nielsen #9 or a bench plane on its side can be gripped directly above and just behind the cutting edge. For these planes, a snug enclosed channel in the shooting board, such as shown here, is still very helpful but not essential. For the Veritas (or Lie-Nielsen) shooting plane where the grip is far behind the cutting edge, a snug channel is, in my opinion, a practical necessity. The grip location in these planes makes it too easy to get off track in the shooting stroke. Both systems work but I have come to prefer what I have detailed here for you.