Accurate construction of most furniture assemblies – frames, carcasses, post-and-rail construction, and drawers – usually involves 90° angles. “Square” is a big part of woodworking. Parallelograms, we do not want.
Will a square do the job? Yes, for verifying individual parts, but for most assemblies, the tool to use is pinch rods. Here are the reasons:
- They are more accurate.
- You can work faster, and don’t need to remember numbers.
- You will get a more intuitive sense of the magnitude and direction of the error.
- Most important, you will see immediately how to correct it, especially during glue up.
The idea is simple. You are comparing the length of the diagonals across the frame. If they are equal, you have a rectangle; if not, you have something else, such as a parallelogram. (Yes, the diagonals would still be equal in a symmetrical trapezoid, but you will not make that if you start with the opposite sides of the frame being equal, unless of course you want it ever so slightly that way in making a carcase to hold drawers.)
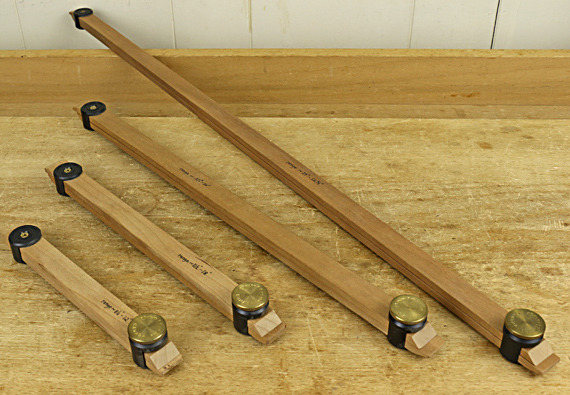
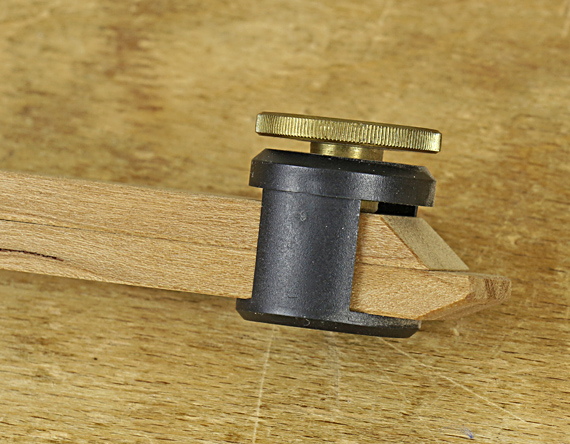
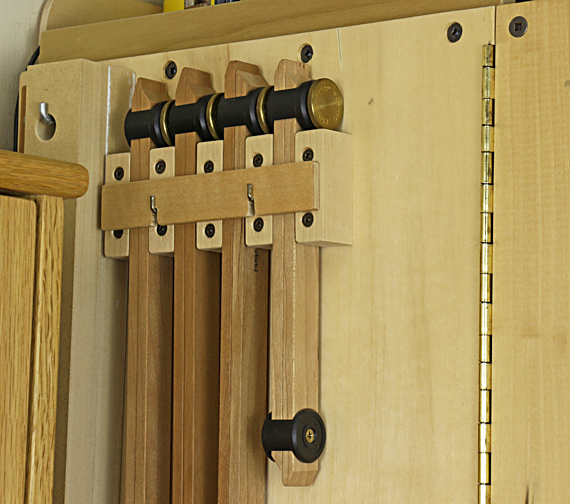
I have been using this set of pinch rods for more than 20 years, which I made with collars manufactured by Veritas. I recommend these because they simplify construction, and the result is a lightweight, low profile tool that is quick and secure to clamp, and adjusts smoothly.
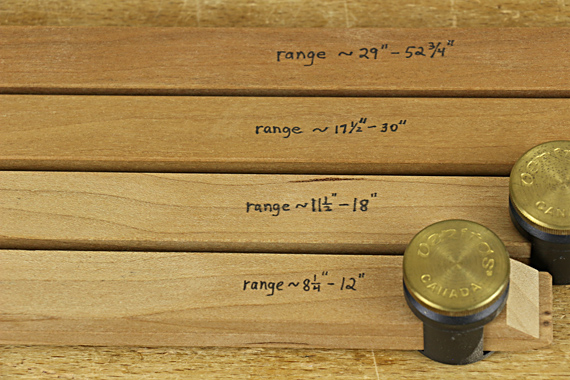
Veritas supplies basic construction instructions but here are a few tips. You’ll want to build a set of rods, so keep in mind that the shortest length a pair of rods can measure is at least 1″ longer than the individual stick length, while the longest measurement will be about twice the stick length minus 3″.
A 40° chisel-like business end works well, but contrary to Veritas’ instructions, I suggest orient the pair of sticks so the bevels face away from each other, toward the outside, as seen in the photo below. In use, the beveled side should always face the shorter side of the rectangular assembly. Thus, you will rotate the stick 180° along its length to measure the other diagonal. This allows the tool to manage even the narrowest rectangles.
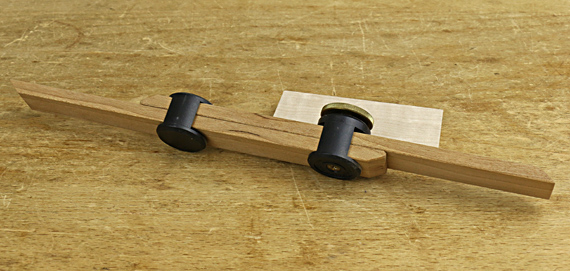
The storage position is shown in the photo below. The non-working blunt end protects the sharp-beveled working end. I prefer to apply the gentle accuracy of these wooden rods instead of metal ones on cleaned up work.
Nearly always, you will be measuring from the inside of the frame or carcass because the other parts of the assembly will interact with the inside surfaces and angles, not the outsides.
For very large assemblies, a tape measure, perhaps with the special tip made by Veritas, or an ad hoc pair of rods, is more practical than having a giant special pair of rods.
To make a parallelogram into a rectangle, there is a simple rule to remember: shorten the long diagonal. For dry assembly, this may mean tweaking the joints, such as trimming tenon shoulders in a frame or post-and-rail construction, or simply adjusting the positions of the clamps. During the crunch time of glue up, remember: angle the clamps to be slightly more along the long diagonal, as if you are trying to scrunch it shorter. I am always amazed at how little clamp adjustment is necessary to square up the assembly, especially using heavy clamp pressure. Don’t overdo it.
Sure, you did a meticulous layout and cut great joints – dovetailed that drawer, mortise-and-tenoned that frame – but somehow when it all goes together the evil forces still manage to sneak in. Assess and correct it with pinch rods.
You might even want to make a nifty rack to store them.

I like the blunt protective ends and various length rods, well thought out like all your stuff. Great post.
Great timing, I just picked up some of this hardware and plan to make a set. Depending on how that goes I might make a few like you have done here. That storage rack you made for them looks great!
Did you just use some scrap (maple?) or did you pick the stock for any reasons?
Thanks, Tico.
Erick, I used cherry because that’s what I had on hand at the time, and because it’s stable, easy to work, and tight-grained. The sticks are 1/4″ x 3/4″, so the main thing is to produce straight sticks, which can sometimes be tricky when dealing with such thin pieces.
Rob
I’ve been using these with the veritas collars too but my ends are cut into a blunt point. I like yours better with a 40 degree bevel on one side, I will try that. When checking for square, do you measure the rod or do you just make adjustments until it fits nicely in both diagonals? Also your rack for them is really nice! Thanks for the post, very interesting as always.
I have been using these too for a while, but I like the way you cut the ends in a bevel on one side, mine finish in a blunt point. When you check diagonals do you measure the rod or do you just adjust until it fits nicely both diagonals? Love how you store them, very tidy and clean!
Great post like always, thank you.
Hi Pascal,
The only thing that matters is the comparison of the diagonals, so no absolute measurement is needed. Aim to get the diagonals as equal as needed to meet the demands of the construction. The pointed working ends are essential for assessing the inside diagonals.
Thanks for commenting.
Rob