Other posts here have addressed the issues of case hardening, its effect on resawing, and the problem of excessive case hardening. But here’s a new twist.
To review, slight case hardening is to be expected in kiln-dried hardwoods. Here’s a simplified explanation of what happens in the kiln. Think of the board in cross section. The outer shell loses moisture first, making it want to shrink but it is restrained by the still moist and swollen core. The shell is thus in tension and the core in compression. The shell eventually sets in size, so later when the core loses moisture and wants to shrink, it is in tension while the shell is in compression. This is case hardening.
The kiln operator modifies the humidity near the end of the process to remove most of the case hardening but is careful not to go too far and create reverse case hardening, which is not practically correctable. Therefore, there is a bit of remaining case hardening in most kiln dried hardwood boards. It is not normally a problem.
Excessive case hardening, usually from inadequate air drying before going to the kiln or rushing the wood through the kiln, is a problem. This manifests most notably if the board is resawn. Both halves will cup inward toward the sawn surface and may bow inward a bit along the length. We can predict this with a test fork.
It is important to appreciate that this is not a matter of a remaining moisture content gradient across the thickness of the board! It is a physical stress caused by the drying process that releases when it can, which is typically right away or very soon after resawing or removing substantial thickness from one side of the board.
But how long can it take for the release of tension and consequent distortion of the board to fully manifest? From everything I have experienced (and read), it is mostly almost immediate, or in some cases it can trickle on for a day or so.
But this case is different.
I recently resawed some 8/4 quartersawn sapele. The boards were straight and true with nice, even straight grain. There was absolutely no moisture gradient across the thickness of the boards, as proven with pin meter readings at various depths across the end grain of fresh crosscuts well into the length of the board.
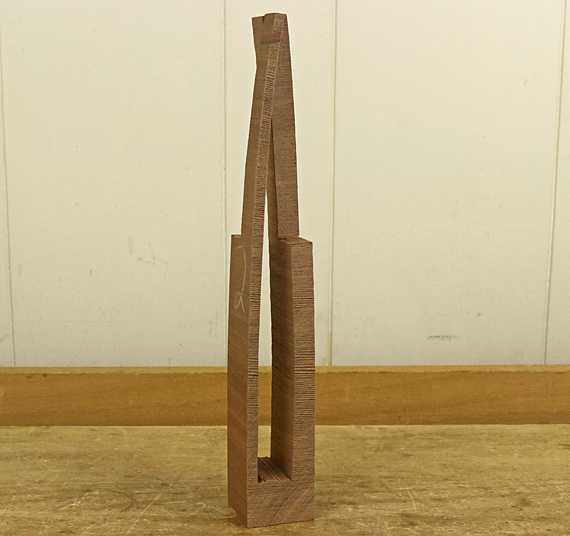
Test forks looked great – little or no inward bend of the tines – so I did the resaw. But after a couple of days, I was shocked to see the tines hooked inward. (The photo above is how they ended up.) The boards themselves distorted over several days. They showed both the classic effects of case hardening, and more disturbingly, some twist. I hate twist.
The wood seemed to settle down after a couple of weeks, so I dressed the resawn boards but then even several weeks later I could still find a small but significant amount of new distortion, primarily twist! Again, the grain of the boards was nice and straight. Furthermore, they contained no evidence of reaction wood, or other aberrations. The resawn wood was stored stickered and at a steady 50-55% relative humidity.
Why did it take so long for the distortion to fully manifest? I don’t know. Some online research and talking with experienced log millers, though hardly exhaustive, yielded no answers.
Here’s my little theory. For the mechanical release of tension (that creates the distortion) to occur, I assume the wood fibers have to slide against each other. Perhaps that sliding is just “stickier” and slower to occur in sapele than in most woods. Perhaps related, I note that sapele is among the highest measured woods in shear strength (at 12% moisture content) listed by the U.S. Forest Products Laboratory. (Wood technologists and scientists, please comment!)
In any case, it happened. Wood stresses can be stressful. So, there it is, one more caution to take with wood.