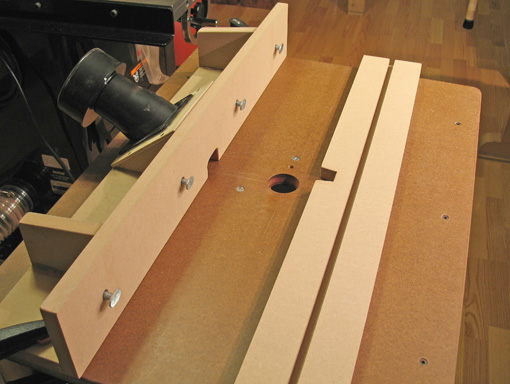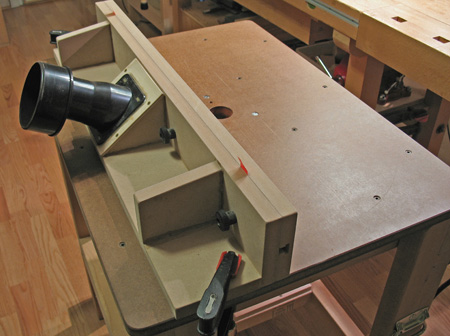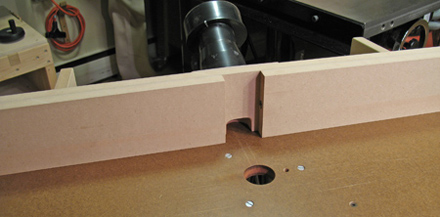
The fence for the router tableuses a removable face with a T groove in its back. Four T bolts penetrate the vertical piece of the base fence, and the heads slide in the groove. The face is secured using knob nuts on the bolts.
The base fence is constructed from two pieces of 4″ x 28″ MDF, glued and reinforced with 90 degree MDF braces set in with epoxy glue. At the center is a cutout, about 1″ high x 1 ½” wide x 1 3/8″ deep, in the horizontal and vertical components to allow dust to escape. Surrounding the cutout, on the back side of the fence, are two MDF 90 degree triangles with a 1/4″ plywood cover. The cover has a large hole, around which is attached a plastic face plate with a dust port. Attached to this is an adapter to fit a 4″ dust collection hose.

The removable fence has a smaller trapeziodal cutout, 1 1/8″ at its base and 7/8″ high. This accommodates most of the bits I use. Among the advantages of the removable fence face is the option to create additional facings with larger or zero-clearance cutouts. Another option is a split fence facing where the halves can be separated to make room for taller/wider bits. The outfeed half can be also be shimmed for edge jointing. Rockler carries all the fittings required to construct this fence.


When building this fence I tried hard to make it flat and square, knowing, however, that I could later tune it to tolerances of at least .002″, with a “highly sophisticated” microadjustment device: shims. The squareness of the fence can be tuned by placing tape shims under the base fence. The straightness can be tuned by placing plastic or brass shims between the facing and the base fence.
The fence is held to the table with an F clamp at each end. I don’t miss having a fancy microadjuster on the fence. I learned woodworking using hand tools and this has fostered habits of working as directly as possible, using consistency, not dead-on absolute measurements, to make parts fit. I prefer to bring the part to which I am fitting right up to the bit and fence and set them from that. Often this involves using test pieces and incrementally approaching a good fit.
In some cases, if the trial is off a bit and I want to correct it by a measured amount, I might measure the trial cut with a dial calipers, and make the fence adjustment with a leaf gauge and a block. Tiny changes can be made by pivoting the fence at one end and measuring at the other, resulting in a movement at the bit location of half the measured amount.
The important thing is not to mistake this low-tech shimming and matching for sloppiness. This is an intuitive, simple, but highly accurate way to work. Furthermore, you can feel the level of accuracy to which you are working, in much the same way as sawing to a line when cutting joints by hand.
Yup, simple, and it works. Complicated can be so boring.


Speaking of routers, Rob…
Did you know that the design of your blog page looks a whole lot like a Knapp joint? I think that was one of the first attempts at making a better machine-made drawer joint; dates from somewhere between 1890 and 1910 or so. It was made with a router cutting “pins” on the drawer face and making the holes on the drawer sides.
I have a night stand and a chest of drawers that have drawers made with this joinery. I like them because you can easily date the furniture to within 20 years (and they generally are found on simple, almost Eastlake-style pieces, which I like).
Oh, great job on the entries about how your shop uses “simpler” setups to achieve great results.
That’s the kind of stuff people (including yours truly) need to read more about.
Thanks,
Ethan
Ethan,
Haha, yea, I never thought of that but the spiral notebook theme does look similar to the Knapp (cove and pin) joint. I did a little hunting and found that Woodworker’s Supply lists a discontinued patented router jig dedicated to this joint. They also make a template for the joint to be used in their Matchmaker router machine. Fine Woodworking, July/August 1986, #59, pp. 74-75, has an article, “Cove and Pin Joint”, by David Gray, that describes making the joint with a drill press, plug cutter, and a modified gouge. Interesting, but I think I’ll stick with dovetails.
Thanks for the encouraging words.
Rob
Just came across this post…
I’m curious about the F-clamps. I use C-clamps for my fence; F-clamps seem much more likely to loosen under vibration. Have you experienced this?
I really like the fence design; I hope you don’t mind if I use it for a router table class I’m teaching in the fall.
Thanks,
Carl Stammerjohn
Hi Carl,
I’ve had no problem at all with the F clamps loosening. Were that the case, their name would apply to more than their shape.
The fence design, like just about everything we woodworkers do, is a conglomeration of ideas, a few mine, more from sources I’ve long forgotten. I hope the fence works well for your students. Feel free to refer them to the posts to view the pictures and description.
Rob
what did you use as a finnish for the mdf top on the router?
Ike,
Any oil-varnish mix, such as the widely available Watco “Danish Oil” or Minwax “Antique Oil Finish,” would work well. I used whatever of this type of finish that I had on hand when I made the table. Good luck with your router table.
Rob