Archive for ◊ September, 2009 ◊

Author:
• Tuesday, September 15th, 2009

Hopefully, the drawer will close with the front even all around with the edge of the opening. If not, now is the time to correct this by planing. Soften corners to your preference. Cut a substantial chamfer on the top of the entering edges of the sides.

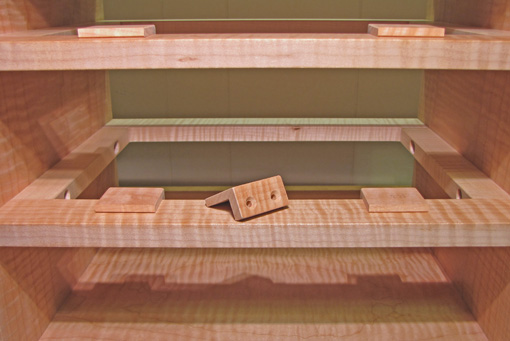
Closing stops can be installed at the front of the frame to contact the back surface of the drawer front below the drawer bottom. The strongest designs are those mortised into the frame. This generally requires the foresight to make the mortises before assembling the frame. (No comment.) They can also be glued, screwed, or even mortised to the frame near the end of construction, though less conveniently. To ease installation, it is helpful to design the stop with an abutting placement, such as against the back edge of the divider. The photo above shows a simple drawer stop design that hooks over the divider and is screwed to the back of it. The small undercut chamfer, visible at the front of the stop, facilitates fine trimming with a shoulder plane after assembly.

For all but the smallest drawers, two stops are best to create an unambiguous closure across the full width of the drawer. Since the drawer is then in a good, neutral position, it will be easy to open without jamming. I prefer the front face to be a hair inside the edge of the housing.

Alternatively, closing stops can be placed at the back of the case on the runners.

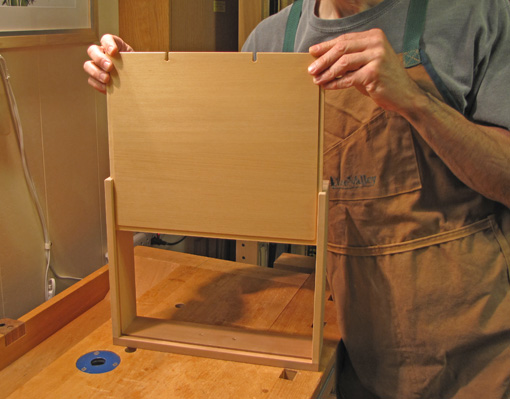
Outgoing stops are optional. A simple, effective design is a small piece of wood, screwed to the back of the drawer divider, which contacts the back of the drawer on its way out, yet can be rotated 90 degrees to let the back pass by to remove the drawer. (You know, to show your woodworking friends.)

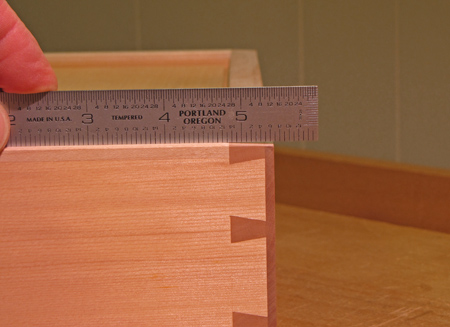
I like to bevel the bottom edge of the front of a flush fit drawer to prevent it from rubbing the bottom of the drawer frame. (The drawer is upside down in the photo below.) This way the drawer will run only on its sides. On very small drawers, it may look good to match this gap to the one at the top of the front.
The front is finished to match the outside of the piece. For the sides and back and bottom, think “less is more.” Personal preferences aside, there are a few points to keep in mind: avoid perpetually smelly oil finishes on the inside of the drawers or case, finish the bottoms before assembly, and avoid any film finish on the outside of the side pieces. A light coat of wax on the sides’ outer surfaces and bottom edges will help produce pleasant drawer action.

Next: getting a handle on it and closing thoughts for the series

Author:
• Thursday, September 10th, 2009

It is difficult to gather my thoughts and feelings on the occasion of James Krenov’s passing away yesterday. His teachings mean so much to me as they do to so many woodworkers.

James Krenov was pivotal in my coming to embrace the understanding that making fine things from wood, imbued with a personal touch, mattered in this world. I have liked making things in wood since youth, knowing that this was part of me, but beset with the refrain that it might be little more than self-indulgent puttering. Jim Krenov’s clear and independent spirit, beautifully communicated through his writings and his work, gave me the support to see the value in what I was trying to do.

So many times I go into the shop accompanied by Krenov’s voice, reminding me that the work is worth doing well because it can have meaning to me and to others, and creates a quiet joy that enriches our lives. It is about connecting with one’s soul and seeing the real value in the process and the product. I think that is truly happy woodworking.

There is a beautiful and profound life that harbors in the wood we love. There is also a special life in the little objects we make. For me, as for so many woodworkers, an important part of that vitality comes from the enduring spiritual contribution of James Krenov. I am very grateful. Farewell JK, long live your spirit.

Category: Ideas  | 8 Comments
Author:
• Tuesday, September 08th, 2009

Solid wood drawer bottoms are the primary topic of this discussion and are used in this project. However, plywood also deserves consideration as a good quality option. Stable, strong, and easy to prepare, thin hardwood plywood is readily available in many species and thicknesses with flatsawn and quartersawn face veneers. The laminate edges will not be visible except at the back. I do not think plywood bottoms, skillfully and tastefully employed, diminish the quality of a “high-end drawer” in modern furniture.

The thickness of a solid wood bottom should be commensurate with the overall size of the drawer, the load it is expected to bear, and the strength of the chosen species. The Port Orford cedar bottoms of these fairly small drawers are slightly over 5/16″ thick, while those for a chest of drawers might be ½” thick. Gluing up thin stock presents special issues which have been discussed in two earlier posts. Quartersawn wood is preferable because of its resistance to cupping.

The grain runs along the width so this dimension will be stable through the seasons, preserving the critical fit of the drawer width in its housing. The panel is raised on the outside (underneath) face, here with a simple square-edged field, to create 1/4″ thick tongues to fit in the grooves, keeping a small border of consistent width along the two sides and the front. Many woodworkers prefer a flat-beveled or coved panel. The bottom can be sized to leave a very tiny gap at the base of the grooves in the sides to avoid distorting the drawer when sliding the bottom in place.

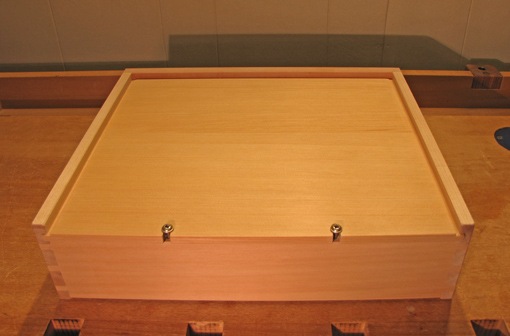
Now we must deal with seasonal changes in the front-to-back dimension (across the grain) of the drawer bottom. Calculate rather than guess the amounts. Unless you are working on the driest day of the year, the bottom must extend beyond the back of the drawer. To accommodate seasonal movement, screws pass through open-end slots in the bottom and thread into the back. Make the slots long enough and locate the screws to allow for the largest dimension on the most humid day, but don’t make the slots so long that they will be visible from the inside of the drawer on the driest day. It usually helps to have a thick drawer back and to locate the screws toward the outer surface of the drawer back. (Since I have experience messing up this last detail because I didn’t think it through, I feel compelled to warn you.) Here I used practical washer head screws, but you may prefer the look of a flat head screw in a tapered-rim slot.

I think it is best to lightly glue the front edge of the bottom into the groove in the drawer front (only!) so all of the movement “collects” at the rear of the drawer. I use hide glue for this since its reversibility will come in handy if a damaged bottom ever needs repair or replacement.

For drawers that are very shallow (front to back), it is often possible to simply cut the bottom flush, screw it to the back without slots, and make the groove in the front deep enough to accommodate all the movement that will collect at the front end.

Next: final trimming, drawer stops, finishing.

Category: Techniques  | Tags:  | Comments off
Author:
• Sunday, September 06th, 2009

[Note to Heartwood readers: the series on drawer making has a few more entries on the way.]

This is the time of year when NFL rosters get pared down to the final 53 players. It is often reported how veteran players attribute much of their success to the unspectacular but important training, preparation, and performance principles that promote survival in the extremely competitive league. These are not matters of specific football technique, but rather are work habits that allow their physical abilities and football skills to flourish.

Sure, I have relentlessly gleaned woodworking understanding and technique from countless sources over several decades. I love learning. Yet there are mundane shop work habits, borrowed or discovered, that I have come to value as equally important. Readers, let me share with you just some of the things about which I’ve had to “get my mind right.”

1. Know, don’t hope, what a process will yield. When bringing steel to wood while building a project, it should be clear to you what the result will be. Your hand may wander, your line may be a bit off, but there must be reliable intent and integrity in the process before you start. This allows the craftsperson to work with confidence and relaxation. For example, if you find yourself thinking, “Maybe if I feed the router this way, it might cut OK,” it’s time to step back and rethink.

2. Be neither blind to innovation nor saddled with doubt. Trial runs and testing are useful, especially for unfamiliar processes, but give yourself credit for what you already know. While there are almost always several ways to get a result, if you have learned a good, efficient method, go with it and get the job done.

3. When constructing multiple parts, it is often helpful to carry the process to completion on one part to see how early steps influence later results. This gives you a chance to modify steps to improve the final product. It often helps, therefore, to make an extra part.

4. Before leaving the shop for the day, note where you left off, perhaps write it down, so when you return you can resume work without hesitation. For example, “drawers fit, no more trimming.”

5. Put away tools when a job is done. Keep your bench and mind clear.

6. A process in one wood may not work well in a different species or even a different board of the same species. Remember, wood is a biological product, it varies. Making a mortise and tenon in bubinga feels different from making the same joint in pine.

7. Attempt to cut to the line while knowing what happens if you are off on one side or the other. Leaving large margins of safety because you’ll “make it exact later” is a way to never get good at woodworking. Go for it. If you make a mistake, relax.

8. Creating useful and beautiful things from wood is one of the fine things in life. Be grateful, be humble, give thanks.

Happy woodworking!

Category: Ideas  | Tags:  | 4 Comments