Tag-Archive for ◊ sanding ◊

Author:
• Friday, February 16th, 2018

3M sandpaper

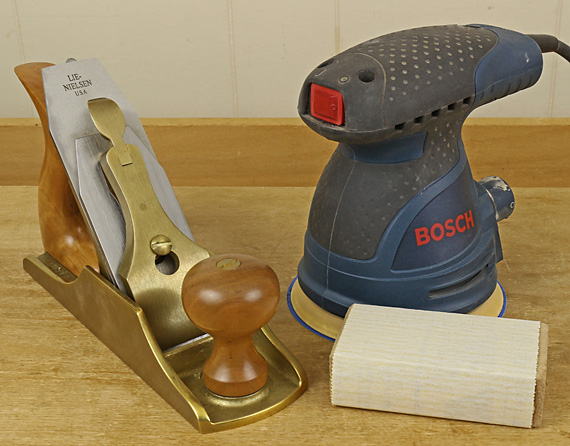
Sanding doesn’t get a lot of respect in the woodworking world, perhaps because it is a rather boring job, and hand planing seems, by contrast, so refined. Nonetheless, sanding is an important step in building many projects, so it pays to take advantage of technological advancements.

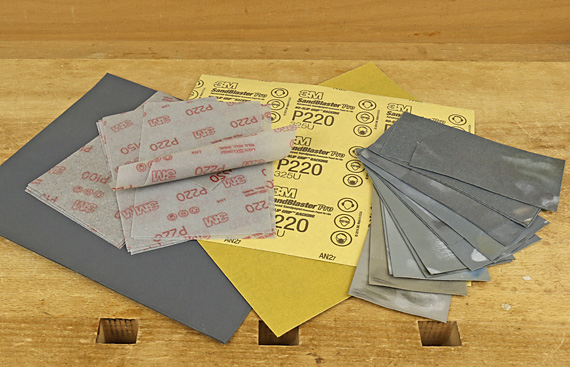
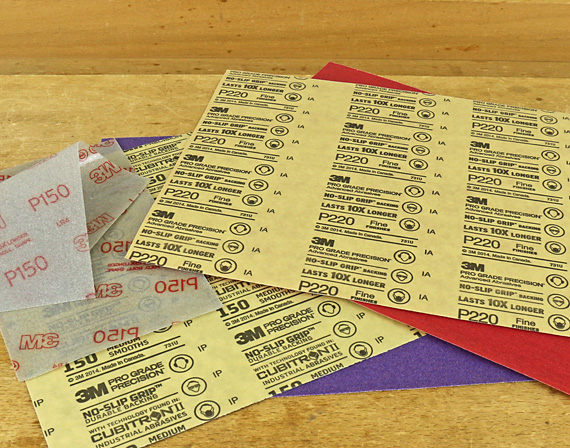
3M’s Pro Grade Precision sanding sheets seem to cut faster than any others that I have tried. I can really sense the sharpness of the “proprietary, precision-shaped ceramic mineral” abrasive biting the wood. Of course, this is not a controlled test, but it is enough to make me reach for these sheets first. 3M’s labeling is a bit confusing – this product is an upgrade from their “Pro Grade” paper, which uses aluminum oxide abrasive.

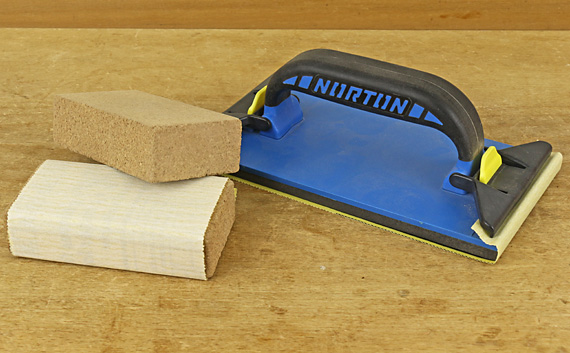
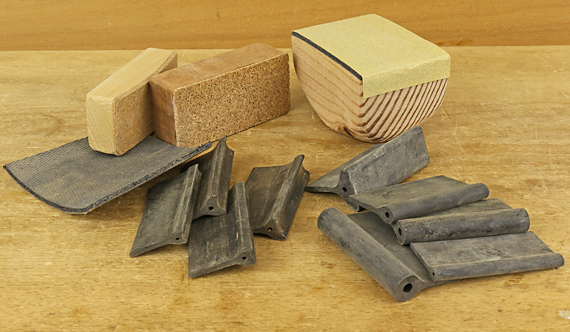
I had reported earlier that I didn’t find the grippy backing of 3M’s sanding sheets particularly helpful, but my experience since then has shown me different. The “No-Slip Grip” backing does grip rectangular cork blocks better than regular paper backing, and makes sanding easier. Even better, it holds very well in the slots of the shop-made, all-cork curved blocks that have become a staple among my tools for curved work. This backing is also significantly more durable than paper backing.

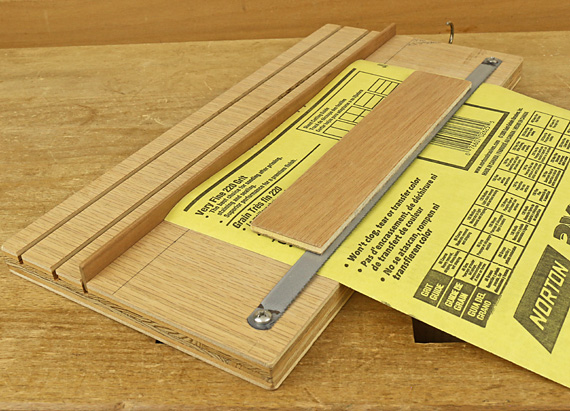
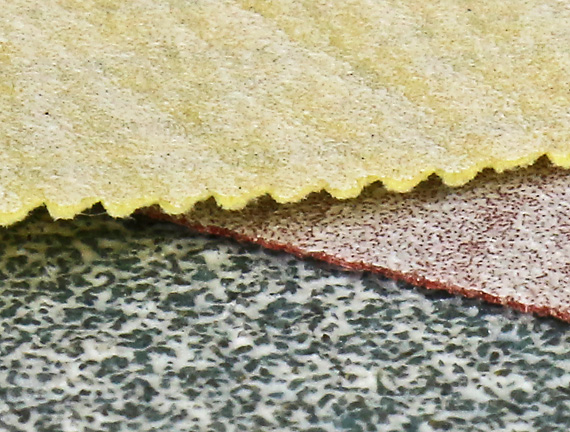
I continue to find 3M’s remarkable Ultra Flexible Sanding Sheets (on the left in the photo above) to be wonderful for working detailed curves. The durability of the film backing and the grit itself far exceed that of paper-backed sanding sheets for this work. They are available in 100, 150, 220, and 320-grit, and in 4 1/2″-wide, 7″-long sheets and 10 1/2-foot rolls.

3M sanding sponges

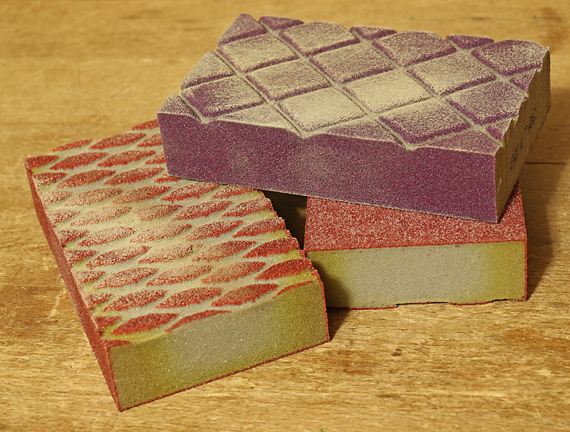
I previously reported that I hadn’t found any sanding sponges to be useful. I’m still not a big fan, but 3M’s Pro Grade Precision “ultra flexible, dust channeling” sponges are pretty good for smoothing in some sculptural work. An important distinction, sanding sponges do not afford the tactile control, nor do they have the moxie of rasps for shaping. They also break down too fast for their cost. Their main advantage is they are easy to hold as you smoosh them over irregular shapes. Of the two types shown, the larger diamond pattern has been more durable.

You can find all of these products at home center stores. As usual, I relate only my direct shop experience with tools, unsolicited and uncompensated. I just want to help you make things.

Category: Tools and Shop  | Tags:  | One Comment
Author:
• Sunday, September 11th, 2016

Bosch random orbit sanders

Here is most of the power sanding gear in my shop. Once again, I hope you will find a useful tip or two in here.

The gentler Bosch ROS20VS (5″ disc, 2.2 amps, 3/32″ diameter orbit) random orbit sander gets much more use than the larger Bosch 3725DVS (5″ disc, 3.3 amps, 3/16″ diameter orbit) because I am mostly using these tools to smooth surfaces, not to form them. As mentioned in the first post of this series, there are much better options, with and without sanding, for the later task.

In any case, these Bosch sanders perform very well at reasonable cost. The 6″ size has 44% more area, helpful for bigger jobs, but the 5″ is handier and suits the scale of most of my work. I always use these sanders hooked up to my Fein shop vac with the auto-start feature.

A crepe rubber stick (above, left) is a must for cleaning power sanding discs but also works well on hand sandpaper. Get a big one.

Norton ProSand discs

Norton’s new ProSand Multi-Air Cyclonic hook-and-loop discs (above, left and right) have superseded their 3X discs (center). Amazingly, the 246 laser-cut holes (I read that; I didn’t count them) give better dust extraction than the big holes in 3X and other brand discs. The ProSand discs also have more sanding area, an efficient ceramic abrasive, and are easier to apply because you do not have to align holes – just put the big one in the center.

sanding disc rack

This storage tree keeps the discs organized. It is nothing more than dowels set at a slight angle into a wood strip.

Ridgid EB4424

The Ridgid EB4424 combination oscillating spindle-belt sander, shown above in belt mode and below in spindle mode, may be the best thing Home Depot sells in their “tool corrals.” The designers thought of just about everything. This certainly is a sanding tool for shaping wood.

The oscillating action, which runs true, makes shaping smoother and more controlled, as grabbing is minimized, and leaves a smoother surface on the wood. Changeover between modes is fast and convenient. Belt tracking is easy to adjust and the setting is retained very well.

The most significant downside of this machine is the cheap table but it is not a deal breaker. Though it adjusts from 0° (shown) to 45° and has a serviceable miter slot (3/4″? Yea, sure.), it should be flatter and firmer. Dust collection with the Fein vac is surprisingly good for this type of sander.

I highly recommend this machine.

Ridgid EB4424 belt/spindle sander

By the way, those purple 3M flexible mesh sanding sheets found their way into the two photos above, at the left edges. I forgot I had them since 3M’s much better Ultra Flexible Sanding Sheets became available. (See the previous post.)

sanding belts and sleeves

Norton’s blue Norzon belts are incredible wood eaters. Most of the extra sleeves and belts get stored in this boot box.

Singley, Robo drum sanders

The Singley drum (above, left) uses ordinary sandpaper, cut to size and easily wrapped around and tucked into the drum. With this tool, drum sanding can be done economically in a wide range of grits. Many sizes are available.

The Robo sander, chucked in the drill press, works like a flush trim/end-bearing router bit but more gently and without the risk of tearout.

Shown beneath the Robo is the Veritas Drum-Sander Support System bearing. It is essentially a live center that sits on the drill press table, and whose point engages a dimple in a retrofit modified drum shaft. This trues and stabilizes the rotation of the drum.

This concludes the four-part series on sanding. As always, there is more than one good way to do just about everything in woodworking, but I hope this material has been helpful to you.

Category: Techniques  | Tags:  | 2 Comments
Author:
• Saturday, September 10th, 2016

This is just about all of the hand sanding gear I use in my shop. I present this in the hope that you will find a useful tip or two.

sanding blocks

A cork block, 1″ x 2″ x 3 7/8″, is the best tool I have found for hand sanding. It has just the right compressibility and resilience to produce a consistent and true sanded surface, and it feels comfortable in the hand. A piece of cork glued to a wooden block is a decent substitute but not as good. Almost all of the area of one-third of a standard 9″ x 11″ sandpaper sheet can be utilized by re-wrapping it just once.

The Norton pad gets less use but is handy for fine sanding large areas. It uses the same one-third sheet with little waste.

curved sanding blocks

Convex and concave rubber sanding grips are handy, though I more often use ad hoc blocks made from combinations of wood, cork or rubber sheet, and pink foam insulation. Some of these are worth preserving but some live for only a single fleeting employment.

sandpaper cutter

The sheet cutter makes it almost fun to size sandpaper. A hacksaw blade is screwed to a piece of plywood with enough slack to permit the sheet to easily fit under. A piece of thin plywood is glued to the blade to make it easy to press the blade firmly onto the back of the paper prior to tearing it. A slat is placed in one of the table-sawn kerfs that have been placed to yield the desired sizes of paper. By far most common are one-third sheets made by cutting across the narrow width of the full sheet to yield strips about 3 2/3″ wide.

sandpaper bucket

This little plastic bucket screwed to the wall is a good place to store partially used strips. Contrary to comments by some shop visitors, it is neither a garbage can nor a urinal.

Norton 3X sandpaper

I’ve used Norton 3X paper for years with excellent results. Norton has superseded it with ProSand, which they claim has more durable abrasive and backing paper, so I will gradually restock with that.

PSA sanding rolls

Once you get these 2 1/2″-wide, PSA-backed (sticky) rolls in the shop, all sorts of uses arise. They are great to quickly make impromptu sanding blocks and tools, such as those below. I also reload the Veritas shooting sander with them.

sanding sticks

These little shop-made sanding sticks solve vexing detail issues in almost every piece I make. Apply an oversized piece of PSA sandpaper to the squared end of a wooden tongue depressor, and then trim the excess with a utility knife. Of course, as needed, you can also create a V-point or other shape on the end. You’ll wonder how you ever managed without them.

sanding products

From left to right in the photo above:

The silicon carbide “wet-dry” paper is there for sanding between coats and sometimes for wet sanding of oil-varnish. I have 600, 1000, 1500, and 2000 in stock but rarely use the finer grits.

3M Ultra Flexible Sanding Sheets, available in 100, 150, 220, and 320 grits, really live up to their name. The grit stays on and the backing does not crease or tear. These are a far better option for contour work than sanding sponges, which I have always found to be useless. You can back up these sheets with whatever you want – contoured rubber or foam, a sponge, or just your hand.

3M has also recently introduced Sandblaster Pro sheets with a grippy back. So far, I have not found an advantage from them for woodworking but they are very handy to flatten tools when simply placed on a granite surface plate. They stay put without spray adhesive or water.

I use the MicroMesh set of 3″ x 6″ sheets for tool and hardware alterations, not on wood. The grit ranges from 1500 to 12,000! The sheets are cushioned and thus not a good choice for sharpening.

Next: power sanding gear.

Category: Techniques  | Tags:  | Comments off
Author:
• Thursday, September 08th, 2016

plane vs sand

Let’s consider the finished surface qualities produced by sanding compared with handplaning. Here there will be no blanket declarations, including none extolling the superiority of handplaning, and no simple catalog of species with recommendations to sand or plane.

The real answer is to experiment as part of planning your project. In each case, consider the look you want and the practicalities of the building process.

You have to assess the surface of the wood (the particular boards at hand, not just as a species) in combination with the applied finish. Just as it pays off to plan the applied finish at the start of a project, so too should the method of finishing surfacing the wood be planned. Winging it is usually not smart.

Here are examples from the shavings and dust of my shop. YMMV. This discussion pertains to the final surfacing of wood that has already been trued or shaped; we’re only dealing with the last few thousandths of an inch of wood.

By the way, for exposed parts in fine woodwork, I never finish with the surface from a random orbit sander, no matter how fine the disc paper. When sanding, I always finish with hand sanding. In fact, most of the time, I don’t use the ROS at all.

For figured big leaf maple, one of my favorites, with satin gel varnish, I can see no difference in the final look whether the wood surface is finished off with hand planing or fine hand sanding. Therefore, I do whichever is easier and that is usually sanding.

The same goes for figured bubinga with oil-varnish mix. Bubinga responds exceptionally well to scraping, so little sanding is required thereafter.

Claro walnut, another favorite, with oil-varnish, seems to look more clear and lively when handplaned. With brush-on varnish however, I cannot tell the difference between planing and sanding. For highly figured Claro, its visual impact often seems to override subtle differences between planing and sanding.

Curly cherry with gel varnish, the finish I like best for it, is finicky. It looses some of its pizzazz when sanded. Pearwood similarly looks exquisite straight from the smoothing plane and can well be left unfinished, but after two coats of water-base acrylic, it is hard to tell if the wood was planed or sanded.

Oak, red or white, flatsawn or quartered, plain or figured, with wiping varnish and the grain unfilled, usually looks about the same to me, sanded or planed. Oil-varnish is different.

Again I emphasize that I always experiment at the outset of a project with the actual wood and finishes that I am using for that project, and try to anticipate the practical issues that I will encounter in building the piece.

We ought to be practical. A curvy table leg creates most of its visual impact from its form, while it is the surface and figure of a cabinet door panel that we appreciate. Again, choose planing or sanding based on the overall look that you are after and the practicalities of building. Maybe there are fine facets on the leg that sanding would obscure and a spokeshave is the right tool to use, or maybe there are gradual curves that look good sanded.

Work with a smoothing plane is usually more pleasant than with sandpaper, but sometimes planing is just awkward, such as when finishing off a dovetailed case. And let’s face it, sometimes we just don’t want to spend more time at the sharpening bench.

There are also some special situations. For example, when fitting a drawer, a hand plane is the only tool to use on the sides. Choose the wood for the sides to allow easy planing and usually leave it unfinished.

One more thing: when finish planing difficult wood, there are almost always a few spots of tearout that just seem unavoidable, or maybe the blade developed a nick (especially some A2 blades) and left a little row of raised wood. I touch up these areas with a 0.020″-thick sharp scraper rather than with sandpaper. Nothing is perfect.

Next: sanding tools

Category: Techniques  | Tags:  | Comments off
Author:
• Saturday, September 03rd, 2016

sandpaper

Sanding does not get much respect among woodworkers. Hand planing uses more gratifying tools in a more pleasing process, and when suitably employed, leaves lively surfaces and is more efficient. This series of posts will attempt to put sanding in perspective in the world of fine woodworking and present practical information on tools and techniques.

James Krenov wrote in The Fine Art of Cabinetmaking, “To me, sanding is not a way to express sensitivity with wood, even less a sign of true skill,” yet he recognized a legitimate role for sanding, recommending, for example, scraping and sanding as the best way to finish rowed woods like padauk.

The first thing to clear up is whether you are sanding to shape wood or to produce a nice surface on wood. Are you forming a curve or smoothing the surface of an existing curve? Are you flattening a surface or just smoothing an already flat surface? Sanding is hardly ever the best way to shape or dimension wood unless you are using jigged machines such as a spindle sander or thicknessing sander.

True, sometimes you are both shaping and smoothing, such as when forming a light chamfer with a hand sanding block or running a figured panel through a drum sander. But generally speaking, it is important first to be clear about just what you are doing when sanding. In fact, most problems with sanding come from inadvertently mixing shaping and finishing.

For example, you have a fantastically figured board in the rough, or perhaps is flat from the planer but full of tearout. You are afraid to touch it with a handplane so you take out the random orbit sander, start with a 60-grit disc and work through to 320. Unfortunately, despite all efforts to evenly distribute the sanding, the final smooth surface is wavy, the outer edges are dipped, and there is no hope of using this as a reference surface for further work, such as for a drawer front.

There were lots of better options that would have produced and/or retained a true surface that would then require only fine sanding, which would not squander the flatness. Among them, for various stages, are: a spiral cutterhead on the planer, a thicknessing sander, a jack plane worked across the board, a toothed blade in the jack plane, a Veritas scraper plane, a micro-toothed blade in the scraper plane, and a hand scraper.

An equally unpromising plan is to take a curved table leg rough sawn off the bandsaw and hope to use a curved sanding block with coarse paper as the primary final shaping tool. You will not get the proper feedback to produce a true curve that comes instead from high quality rasps, spokeshaves, and curved planes. When the curves have been trued with some of those tools, then you can use the curved sanding block to just finish smooth.

The point is that sanding – by hand and with small and large machines – has its place but it pays to be mentally clear about exactly what you are trying to accomplish with it, and restrict it to that task.

In the next installment, let’s consider the finished surface qualities produced by sanding versus handplaning. Be prepared for some surprises.

Category: Techniques  | Tags:  | 2 Comments