Author:
• Tuesday, May 31st, 2011

Here is a two-part answer. Some reasons are clear to any woodworker, starting with the pleasure of working with a wonderfully beautiful and diverse material – wood. Craftsmen have a strong urge to simply make things, and, for some, there is the creative joy of producing original designs. There is also the primal appeal of skillfully working with one’s hands. Each woodworker has his own reasons.

However, I think for many of us, amateur and professional, there are satisfactions derived from woodworking which are especially meaningful because they are notably lacking in much of the modern world of work. Here I submit three such satisfactions. Can you relate?

1) Woodworking produces a product that you and others can see. Moreover, you can use and share it for a long, long time in the comfort of home.

2) A woodworker is responsible for, and controls, the process and the outcome. The limitations come from your skills and resources, not from “corporate.” Control and responsibility seem to be frustratingly unlinked in many occupations.

3) There’s no BS in woodworking: If you do good work, the result is a good product. If you do poor work, you and others will see it plainly. What you put in is what you get out; there are no “moral hazards.” Politicians probably should stay out of the shop, or at least leave it at the door.

Step into the shop, my fellow woodworkers, and enjoy the sawdust. If you’re reading this and considering getting started in the craft, consider the above.

Happy woodworking.

Category: Ideas  | 5 Comments
Author:
• Tuesday, May 24th, 2011

This continues the frame and panel construction. So far, the panel template has been made, and now we must position and size the grooves in the frame and coordinate this with the panel thickness.

Rout the grooves in the frame parts with a 3 or 4-wing slot cutter bit. Use the appropriate bearing diameter, which will ride the straight and curved parts, to create the desired depth of cut. Allow for seasonal movement when planning the depth of the grooves in the stiles. (A straight bit, standing the frame part on its side, would be fine to cut the grooves in a straight edge, and though passable for a shallow curve, it is not ideal.)

Position the template on the selected area of the panel stock and secure it with double-stick tape. The thickness of the panel stock will be determined by the frame thickness and the location of the groove. In sizing a frame and panel, remember that the strength is primarily in the frame.

For example, in a 5/8″ thick small door frame, it would be reasonable to use a 1/4″ wide groove, positioned in the middle of the frame width, and a 3/8+” thick panel, raised 1/8+”. This will leave the face of the panel about 1/32″ below the level of the frame which will allow for finish planing or sanding the frame after glue up. The panel, of course, is finished before glue up.

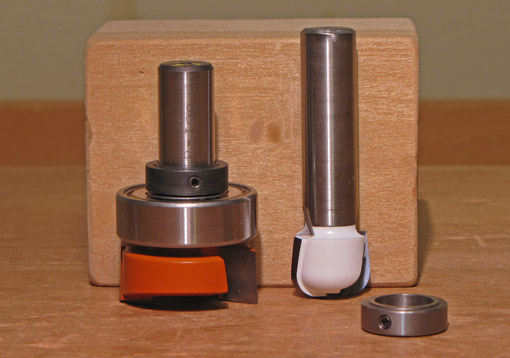
Raise the panel by hand-held routing with a square edge dado/planer bit or a short-radius bowl-and-tray bit which leave a smooth finish. These use a top bearing and have a short cutting length (1/4″ to ½”) to avoid the need for a template thicker than 3/4″. Examples of these types of bits are shown in the photo above. Adjust the depth of cut to yield the desired thickness in the panel edge. You are routing an outside curve, so go counter-clockwise (as viewed from above), cross grain first, and make the cut in two or more steps as needed. (I will not advocate climb cutting but I will do it for a final pass if the grain direction demands it.)

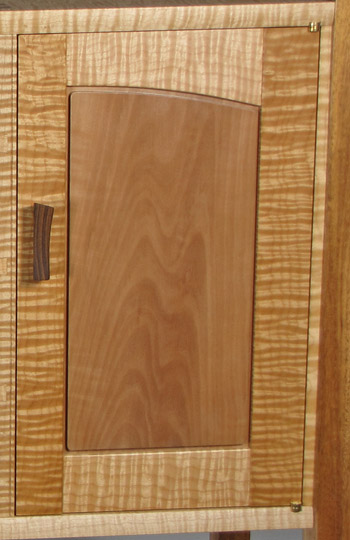
The result of the cut is shown in the photo in the previous post.

For a square-profile field, I round the corners. I pin the panel at the center of its width on the rails, from the back, with brass escutcheon pins and nip off the excess and file it flush. 

My method suits my designs – the beauty is in simplicity and the wood but with a degree of design flair. The frame members have plain edges and the field profile is simple. The curve in the rail can be created without a template or router, even freehand, because the panel template is made directly from the actual frame.

By contrast, curved-edge frame and panel work with a sticking profile on the edges of the frame and an elaborate profile around the field of the panel usually involves a pair of offset templates, one for the rail, another for the panel. Bearing-guided router bits create the rail edge and a fearsome horizontal raised panel bit creates the edge of the panel’s field.

In summary, this method is another approach to a traditional construction – the frame and panel – that is suited for clean, simple designs with the added interest of the curved edge. The method is direct and it works.

Category: Techniques  | 2 Comments
Author:
• Sunday, May 15th, 2011

A curved-edge frame and panel, especially an asymmetric curve, adds a nice flair to a piece. The curve is typically along one or both rails which are tenoned at both ends.

In general, for a frame and panel in my style of work, the panel is the star and the frame is the supporting cast. The panel is a highly figured, special piece of wood or at least contrasts with the frame. I find that a simple square profile or a very small radius cove bordering the raised field is the most effective way to display the beauty of the wood. An ogee or wide cove or bevel is a visual distraction from the effect I am trying to create.

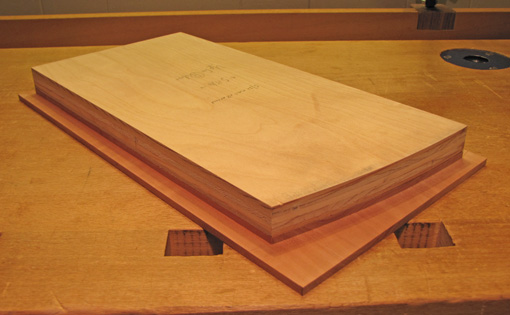
In making a curved-edge frame and panel, it can be challenging to match the curved edge of the raised field to the curve in the frame member. I will describe a simple, reliable method to create an even gap between the field and the frame. Basically, the frame is made first, then a template for the field is made using the dry-fit frame as a guide. The template is placed on the panel stock and a short pattern-routing bit creates the field. The photo above shows the template still on the panel stock after raising.

Start by making the curve in the rail according to your shop drawing. I do this by measuring the key points on the wood and drawing in the rest with an Acu-Arc adjustable curve, or by making a 1/8″ MDF template to transfer a layout line to the wood. [Tips for laying out curves.] Two parts can be made to match by clamping them together for the final fairing of their curves. For efficient production work, though not fundamentally necessary for this method, a plywood or MDF template can be made and used to guide a pattern or flush trim router bit.

Complete the mortise and tenon joinery for the frame. Dry assemble the frame and place it on top of a piece of 3/4″ MDF or plywood. Decide on a width from the inside edge of the frame to the edge of the field. Find a small washer with a rim width that matches that measurement. Trace onto the sheet stock with a pencil point held against the inner rim of the washer while pushing the outer edge of the washer along the contour of the frame.

Carefully cut to the curved line and fair the edge, keeping it square to the face. Use your eye to match its curve to that of the frame, creating an even width between the template edge and the edge of the rail; make minor alterations as necessary. Then cut the opposite end of the template. If you are building during either extreme of the annual range of humidity, alter the width of the template along the stile edges to anticipate the seasonal movement. For example, if you are building at a very dry time, slightly reduce the width (crossgrain) of the field because it will only be larger at other times of the year.

The template can be used to help in your selection of the panel wood. Draw around its edge onto the proposed wood to see exactly how the panel will look. The template can be used from both sides for two symmetrically oriented panels such as on a pair of doors.

All of this makes for a very direct way to control the fit and appearance of the panel.

The next post will discuss using the template to make the panel.

Category: Techniques  | One Comment
Author:
• Saturday, May 14th, 2011

Wood comes from trees, simple enough, but sometimes the trees or logs have a surprising history or the wood has been processed to dramatically alter its properties. Surfing the internet for wood sources is much more fun than cruising the TV menu, so here’s a resource list that I hope you’ll find interesting and perhaps will inspire a new project. Following the list are several resources for general information about wood. Enjoy!

Ancientwood, Ltd unearths 50,000 year old, enormous kauri logs in New Zealand, then processes them into workable honey-colored lumber with an exotic, opalescent appearance. Greener Logs retrieves sunken exotic tropical timber from waters in Central America and sells this old-growth lumber, including big-leaf mahogany (Swietenia macrophylla) via Greener Lumber, located in Missouri.

Blue Moon Exotic Wood in Ithaca, New York operates an exotic woods plantation in Palau in the South Pacific where they sustainably harvest Cuban mahogany (Swietenia mahogani). I once got my hands on a small chunk of this species and still recall its remarkable working properties, sometimes described as like slicing cold butter. It is, of course, expensive, but I don’t think I can much longer resist giving this stuff a try when the right project comes around. Another source for Cuban mahogany, among other species, is Urban Forest Recycling who salvages removed trees in the Florida Keys.

Northwest Timber in Oregon buys and mills salvaged logs, notably my favorites Claro walnut and Western big-leaf maple. I really think Lewis gets his wood from heaven and you might agree after perusing his online store!

You can buy directly online from the above dealers and from Pure Timber (below).

Normal wood is subjected to special processing by the following companies to produce amazing new possibilities for the woodworker. Pure Timber in Washington puts solid wood of many species through an amazing proprietary process that yields wood so flexible it can be tied into a knot. The shape stabilizes after it dries. You can buy lumber ready to bend to your imagination. Seasonwood in Canada offers a special heat treatment which produces a controlled darkening of any species of wood. The process also makes the wood much more stable. WoodSure in Oregon infuses wood with acrylic resin to produce dimensionally stable, super-durable wood. With the addition of dyes, they can also produce dramatic figure effects.

To explore innovative materials that you might want to incorporate into your projects, take a look at the Inventables website, especially the “wood” section. You can order samples of the materials from them.

For general information about wood and specific species:

  • Forest Products Laboratory’s Wood Handbook, a pdf download of the whole 508 page book.
  • FPL’s Tech Sheets give extensive information on many species. Look on the right side of the page under “Tech Sheets.”
  • The Wood Database has lots of information on many species of wood. 
  • Same for the Purdue Cooperative Extension – go to “Hardwood Lumber and Veneer Species” on the drop-down list.
  • Hobbit House has a zillion pictures of lots of species.
  • Woodfinder is a search engine for where to buy specific woods and wood products.
  • An article by John English in Woodshop News: “Is it an endangered species and who’s making the call?”
Category: Resources  | Comments off
Author:
• Sunday, May 01st, 2011

Myth: Woodworking is easy. If you simply follow [whatever clever procedure], you can do it quickly and it will come out perfect every time.

Reality: As with doing anything well, woodworking takes a lot of skill, few procedures go lickety-split, and there is a degree of uncertainty in making any piece.

Where is this myth promulgated? Look at several issues of most woodworking magazines: “made easy,” “perfect every time,” “quick, fast,” and similar catch lines are rampant. TV and, of course, ads also seem to thrive on this approach. Perhaps this sells but it must discourage many woodworkers who find a different reality when they get into the shop.

Also, I wonder why, in conversation with fellow woodworkers, I more often hear how a particular technique is so easy and “no problem,” than about the likely reality of uncertainty, trials, and mistakes that preceded such ease. I guess this is understandable since most people like to talk about their successes more than their failures. I’m sure I’m guilty of this here in the blog.

High quality woodworking requires artistry, imagination, engineering, knowledge, physical coordination, and patience. Building a piece involves many subtractive processes and without constant awareness, errors are prone to accumulate. Different woods require alterations in technique and often hold surprises. So, maybe it’s just me, but I think woodworking is not easy.

As for “quick,” sure, to get things done and to make money, work in any field has to move along efficiently. However, speed comes only after study and experience; without those, quick usually means poor results.

Perfect every time? Even if one employs highly systematic procedures, even with machinery, there is a host of gremlins poised to thwart perfection in woodworking. Among these is variability in the wood itself, tool sharpness, and tool calibration. Excellence certainly is an achievable goal, but perfection is not a realistic expectation to hold out to students of woodworking – and we’re all students.

I learn more from the hype-free literature and discussions that are out there, where I can appreciate the difficulties as well as the successes of woodworking. That’s the real stuff that makes for happy woodworking.

Category: Ideas  | 6 Comments
Author:
• Friday, April 29th, 2011

Myth: a well-tuned handplane is the best choice for final wood surfacing prior to applying the finish

Reality: Sometimes yes, but it depends.

Disclaimer: Because I am the writer, “reality” is through my eyes. Yours may differ. I recognize an element of subjectivity in issues such as this. Nonetheless, the “myth – reality” approach has a nice jolt to it, and this blog is about woodworking, not metaphysics. (I work wood. Therefore, I am?)

The method to produce the most desirable surface on the wood prior to finishing depends on the wood, the finish that will be applied, and the physical circumstances of the piece.

This is best demonstrated by a set of examples.

A dense, hard, small-pore wood such as bubinga, with either an oil or a film finish such as varnish, will look every bit as good with fine hand sanding as with the most careful planing. A flat surface could be completed with planing or finished off with sanding, while rasps, scrapers and sandpaper could be used for a curvy leg. All will look equally good when finished.

On the other hand, Port Orford cedar looks resplendent directly from a sharp smoothing plane, with a clarity that sanding cannot match. I like this beautifully fragrant wood without any finish.

What about curly big-leaf maple, one of my favorites? A well-tuned smoothing plane with a high cutting angle can handle it but I feel that sanding, finishing by hand with 320 or 400 grit, produces an equally beautiful appearance when the piece is finished with gel varnish, my preference for big-leaf. I use whichever method is easier for the circumstances.

Curly cherry is a difficult one. After experimenting with various samples, I am convinced that sanding muddies the figure, which looks inferior to the clarity produced by planing, and this effect persists even with a thin film finish such as padded shellac or wipe-on varnish. The same is generally true, though less so, for curly pearwood with a thin water-base acrylic finish.

Mahogany? I find that hand sanding and planing yield surfaces that look the same under shellac or varnish. This wood is so often rowey that I usually find it easier to complete the surface preparation with sandpaper. Oaks? Both methods seem to work equally well in most cases. Claro walnut? It depends on the figure and the choice of finish but I plane when I can since it does seem to preserve clarity when an oil finish is used.

There are other considerations, such as the peaceful, dust-free experience of planing. Planing is usually faster than sanding, maintains the trueness of a surface more reliably, and usually produces crisper edges. On the other hand, edge tools are often impractical for contoured work, yet we can use rasps, scrapers, and sandpaper to sensitively produce the desired shapes.

The point is that it depends! In making choices for surfacing, the woodworker has to consider the wood, the intended finish, and the circumstances of the piece, and may need to do some experimenting. You must be observant and make choices based on your concept of the piece, not on purist generalizations. Trust your perceptiveness and judgement, more than what anyone, including me, tells you.
Category: Ideas  | Comments off
Author:
• Monday, April 11th, 2011

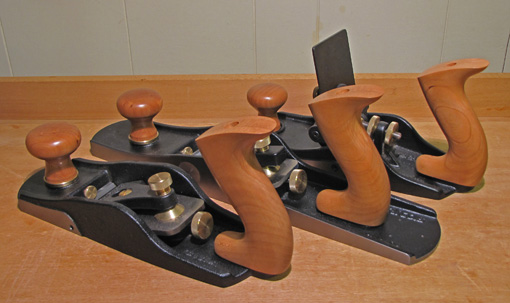
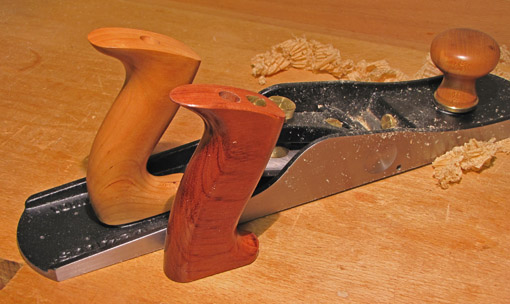
Veritas Tools, the manufacturing arm of Lee Valley, makes excellent tools, delivers outstanding customer service, and has added numerous innovative products to the woodworking world. However, the totes (rear handles) on their planes are another matter. Maybe some woodworkers like them, but I, like many others, can only wonder, “What were they thinking?” I feel that the Veritas tote is graceless and unfriendly to the hand, especially for a long session of planing.

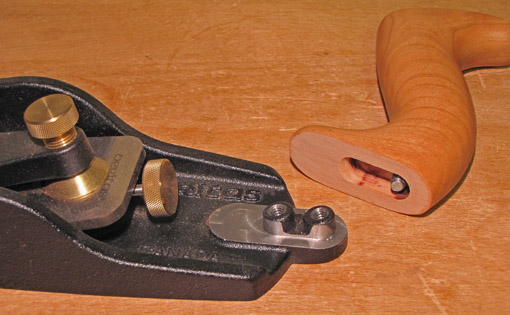
After experimenting with options to accommodate Veritas’ two-bolt mounting system, which I wrote about here, I decided it was better to stick to furniture and leave this job to an expert, especially after getting in touch with Bill Rittner, who already was producing handles for vintage Stanley planes. I came to realize that making excellent plane handles is harder than it first seems.

Bill and I corresponded for months as I tested his prototypes and gave feedback while Bill sweated every nuance of a comfortable and functional tote and knob for these planes. His handles have subtle shaping that really matters to a craftsman. Furthermore, he came up with a simple, effective solution for the Veritas mounting system that permits a more curvy, friendly handle than the OEM.

Bill’s toolmaking skill and insight was evident throughout the development process, just as it is in the final product. Wow! The handles feel great right away and just as superb after a long session of planing. They install with zero fuss and lock down as snug and solid as you could want. And don’t they look great?! I’ve got them on my Veritas bevel-up smoother, low-angle jack, and large scraping plane. Even the finish is just right – silky smooth but not slippery or glossy.

Ahh, relief at last. Now I enjoy my Veritas planes without misgivings. What else can I say? Dump those OEM clunkers but don’t go it alone. Contact Bill at rbent.ct@gmail.com and have him make a set for you. I think you will be very pleased.

[As usual, this review is unsolicited and unpaid.]

Addendum 2/3/2012: Bill’s great plane handles are available from his Hardware City Tools website

Author:
• Wednesday, March 23rd, 2011

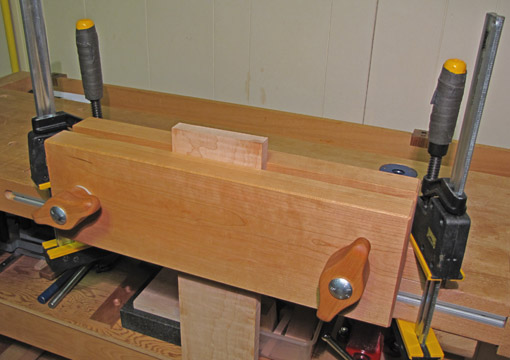
For sawing dovetails, as well as various other tasks, this vise raises the work piece to a more comfortable height than does the typical bench front vise. It was first described by Joseph Moxon, the seventeenth century author of The Art of Joinery. Credit for its revival and refinement goes to Chris Schwarz, editor of Popular Woodworking, who published a modern adaptation of Moxon’s text along with extensive new analysis. Chris published plans for a vise in the December 2010 PW. Stephen Shepherd’s insights and the variations produced by web authors such as Derek Cohen have added to our shared knowledge. What a wonderful example of the vibrancy of current woodworking!

That said, I’ll toss in my two cents: I built my version of the vise and would like to share it with readers.

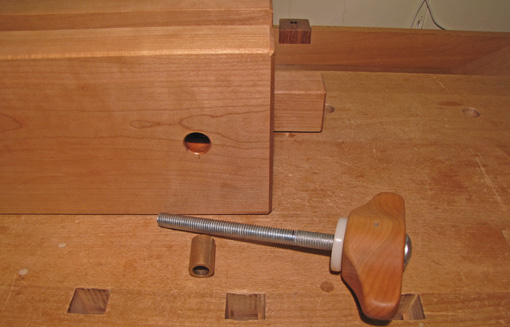
I used an 8/4 cherry board that had been hanging around the shop far too long and $22 of hardware available locally. The vise jaws are 1 3/4″ thick, 6″ high, and 19 1/4″ wide, with a clamping capacity of 14 1/8″ between the bolts. The ½” diameter 8″ carriage bolts are set in functionally shaped handles. Each is secured with a cross pin (finishing nail) passing through a hole drilled in the shaft of the bolt. The handle shape facilitates a one finger spin of the lightly waxed bolt as well as a solid grip to sock the jaws tight. Clamping thickness capacity is at least 2 ½”.

In the front jaw, for smooth operation and to protect the wood, each bolt is supported in a ½” ID, 3/4″ OD, 1 1/8″ long oiled bronze bushing which sits in a stepped hole. To prevent erosion of the bushing, the first 1 1/2″ of the bolt threads is filled with epoxy and the sharp edges of the threads were eased with a file. A 1/4″ thick, ½” ID, 1 5/8″ OD nylon washer, sanded flat, placed between the handle and the front jaw, protects the wood.

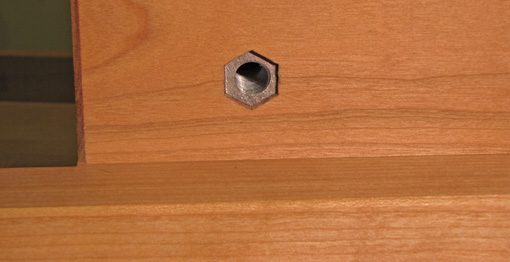
To receive the bolt in the rear jaw, a 2″ long coupling nut was hacksawed to about 1 3/16″ and set from the back side into a stepped hole chiseled to a matching hexagon. This gives more support than a regular hex nut. A wood screw that meets it from the side prevents any chance of the nut twisting in its housing.

The rear cleat, about 1 3/4″ square in section, extends to each side 2 1/4″ beyond the jaws and allows for convenient clamping to the bench. Thanks to Derek Cohen for this idea. I chamfered the edges and finished the wood with one coat of oil-varnish.

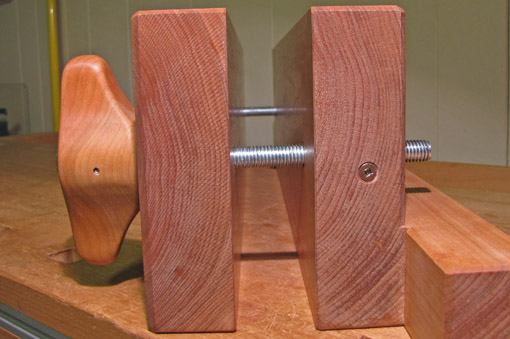
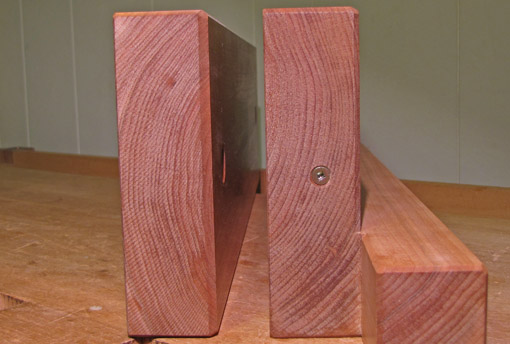
One more detail. Quartersawn wood would have been ideal but I used flatsawn wood because that is all I had available in this thickness. It will inevitably cup and reverse through the seasons. I wanted to avoid a vise that in some seasons would grip the wood only at the central part of the jaw faces and thus make the work piece prone to slipping. I arranged the growth rings as shown in the first photo below and not like the photo beneath it.

Here’s why. I built the vise during the approximate midrange of the yearly humidity cycle in my shop. I left the inner surface of each jaw very slightly concave across its width. As the driest months come along, the inner surface of the front jaw will become more concave while the mating surface of the rear jaw will become flat, then slightly convex. Thus, the grip will be maintained at the limits of the width of the jaws. As the humid months come along, the rear jaw’s inner surface will become more concave (than now) while that of the front jaw will become flat, then slightly convex, again maintaining a good grip of the work piece. Too punctilious you say? Well, the pieces were going to be given some arrangement and I preferred giving it some thought rather than just guessing, and this is one simple solution.


The vise now has had test runs in the shop and I like it a lot. It feels more ergonomic for use with a Western dovetail saw than with a Japanese saw due to differences in the handle angles, but it is good for both.