Author:
• Saturday, August 15th, 2009

For the sides and back, it is best to use straight-grained quartersawn stock for the sake of dimensional stability. This wood will usually have a plain appearance and offer a contrast to the drawer front. Light-colored species are typical, such as hard maple or yellow poplar.

The thickness of the sides varies according to the size of the drawer and the load it is expected to carry. I prefer sides to be a bit chunkier than those favored by many craftsmen. For the small drawers in this project, I made the sides 7/16 inch thick. The backs are a fat 9/16 inch, not much less than the front, to allow for stronger joints at the back corners and to create a more balanced drawer as it is withdrawn.

It is helpful to select parts so the outer surfaces of the sides can be planed front to back after assembly. The height of each side is ripped to that of the drawer front where it will be joined. I set the table saw fence using the front as a gauge. The length of the drawer should allow for safe clearance at the back of the case, considering any anticipated shrinkage of the case during the dry season, as well as for a small projection of the bottom past the back of the drawer. The length of the back piece exactly equals that of the precisely-made front, maybe plus a hair, but never shorter.

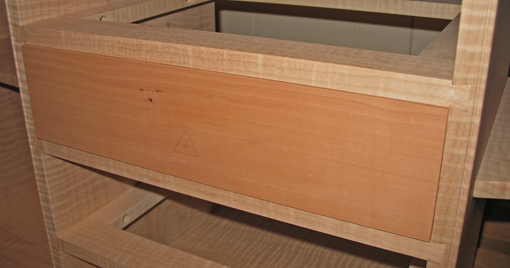
Triangle marks are invaluable to keep parts organized. A number inside the triangle section is helpful when constructing multiple drawers.

Because I used Port Orford cedar, a rather soft wood, in this project, I was concerned that the bearing surfaces would wear over time. If the sides of a drawer are too thin or too soft, drawer slips, a traditional solution, effectively widen the bearing surface as well as prevent the groove for the bottom from weakening a thin side.

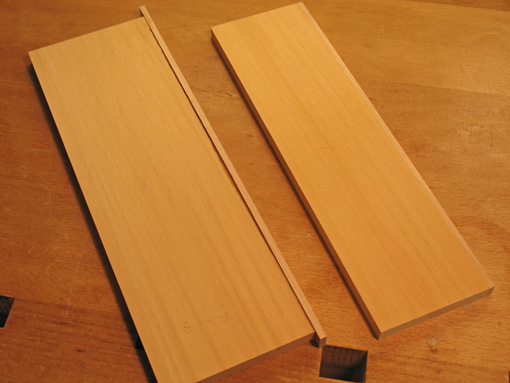
In this project, I wanted to try a different, perhaps cleaner-looking solution, so I glued 3/16 thick strips of hard maple to the bottom edges of the drawer sides and planed them flush. In retrospect, I can’t say this was any easier than making drawer slips, but it worked out well.
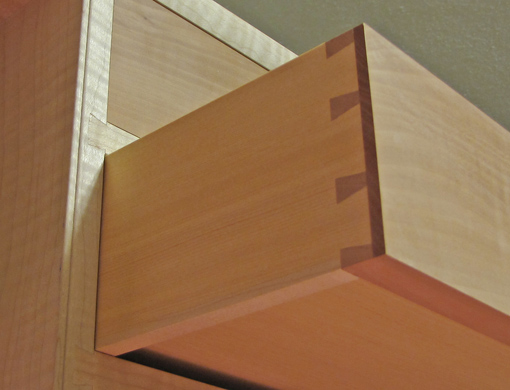
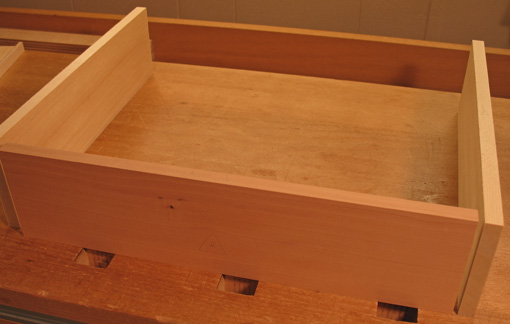
Join the sides to the front and back using whatever dovetailing method you prefer. The bottom edges are the references. Here’s a key point: set your cutting gauge to produce a pin depth that is slightly less than the thickness of the sides. Don’t go crazy measuring these tiny amounts; they’re not critical. Call it less than a 32nd. Later, after assembly, the sides therefore will be proud of the front and back. They will be planed flush to the end grain of the pins as you reap your reward for the care you invested in fitting the front to the case. Beyond that, only minimal, judicious planing, if any, may be required to achieve the sweet fit that you seek.

Next: several pointers on dovetailing as it pertains to drawers, and a different method for dovetailing the back to the sides.
Category: Techniques  | Tags:  | 5 Comments
Author:
• Monday, August 10th, 2009

The first, most critical step in making this type of drawer is sizing the front. The drawers in this project are about 14 inches wide, 3-4 inches high, and 12 inches deep. For the fronts, stock is face jointed and thicknessed to about ½ inch. “False fronts” will be applied later to bring the final thickness to about 11/16 inch. (The methods described here are applicable whether false fronts or customary half-blind dovetails are used.) Each piece is ripped to a hair less than the height of its housing and crosscut to slightly larger, about 1/32 inch, than the housing width.

Unplug the machinery. The following hand planing is best done with a shooting board. [Here is my shooting board and how I use it for end grain on any size board and for long grain edges on small boards.]

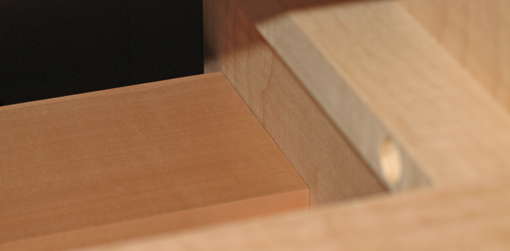
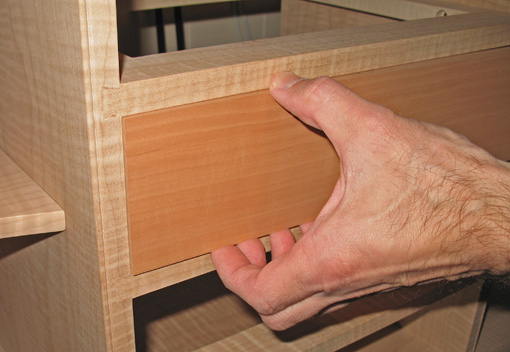
First, the bottom reference edge of the drawer front is planed straight and square and identified with a mark. Then the left end is shot to match the left side of the opening. Progress is tested by offering up the piece to the housing, resting it on its bottom, and checking the left edge. (Photo, above.)

Now it’s time to get very careful. This step is probably the most important point in your drawer’s success. Bit by bit, the right end of the drawer front is shot so it just barely makes it into the width of the housing. It should be snug! 

Finally, the top edge is planed so it comfortably fits in the height of the opening and is parallel to the upper edge of the opening. By keeping this gap small, 1/32-1/64 inch, it is easy to detect any deviation from parallel by eye. Note that the top and bottom edges of the drawer front are not necessarily exactly parallel to each other at this point because the piece has been fit directly to its opening.

This is incremental work. It is nice if the drawer opening is a perfect rectangle but this is not assumed. Any deviations are accounted for by fitting each drawer front to match its opening. With this method, errors do not compound as the project progresses. The drawer front prepared in this way is now the reference for constructing the entire drawer.

I do not make the height a snug fit as is sometimes taught. I believe that is a waste of effort since the finished solid wood drawer must not fit tight in height because it will bind when the humidity rises. The “air tight” drawer, in my opinion, makes no sense; it won’t work. I also do not shoot the front to produce tapered edges for fitting in its opening, because I want to work with square reference edges when I cut the joinery.

Once you have thoughtfully prepared the case and fit the drawer front accurately, there is not much left from here on that is at high risk of going wrong, as long as you are patient.

Next: making and joining the sides and back.

Category: Techniques  | Tags:  | 6 Comments
Author:
• Sunday, August 02nd, 2009

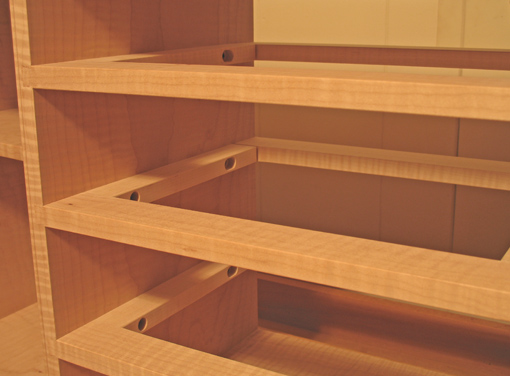
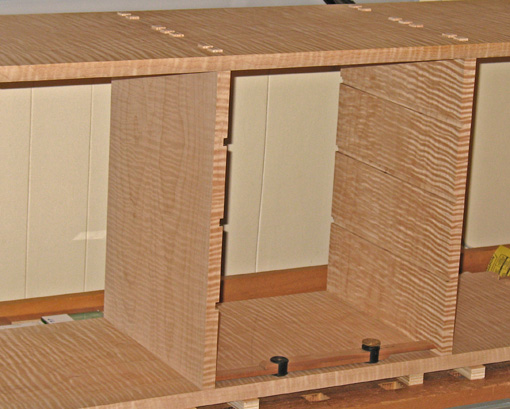
Thoughtful planning and careful workmanship in constructing the case that will house the drawers will pay off later. The web frame construction in this solid wood design, only one of many ways to create a drawer case, will serve to illustrate some key principles. In this project, each runner is set in a dado in the vertical partition which forms the side of the drawer housing. A tenon at the front of each runner is glued into a mortise in the front divider. The runner is screwed to the partition near the front and is slot-screwed near its back end. The rear end of the runner has a tenon which is fitted without glue into a mortise in the back divider. This arrangement allows the case sides to move unrestrictedly with seasonal moisture content changes.

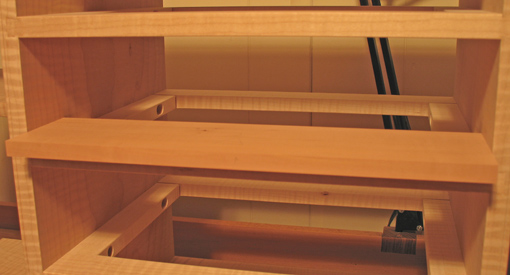
Whatever the form of case construction there are some important points to monitor. The width of the drawer housing should slightly widen toward the back of the case. This allows the drawer to be pushed in and pulled out smoothly without binding. Ideally, as the drawer is pulled out almost to its limit, the sides will gently tighten against the housing. It is futile to measure this tiny widening with a tape or rule. Instead, cut a piece of scrap or use a pinch rod setting so it just fits the width (or gently binds) at the front of the housing. Then slide it toward the back where you want it to “release” and slide freely. The clearance is perhaps 1/64 inch; I don’t measure it. At least ensure that the housing does not narrow toward the back.

In the photos below, getting a bit ahead of ourselves here, I’m showing how a fitted drawer front laid flat is snug against the sides at the front but has clearance at the rear of the case. (Fitting the front is covered later in the series.)

It is easier than it might seem to achieve this sort of tolerance. For this project, I cut the joints, then dry fitted the vertical partitions and performed the testing process as described above. Then I disassembled the case and simply hand planed away some thickness on the inside surfaces of the partitions according to the indications of the testing. I reassembled the case and retested. After the case refinement was completed, I ran the dadoes and constructed the web frames.

A few more things require attention. The surface on which the drawer rides should be free of twist. This is mainly controlled by cutting the dadoes for the runners symmetrically in each partition. The front to back consistency of the height of the housing is less important but the height should not decrease toward the back. The front opening ideally should have four 90 degree corners, but don’t worry, small errors can be compensated when sizing the drawer front.

These same general principles can be applied to fitting solid wood drawers into other case designs, such as frame and panel, plywood, and veneered constructions, though the planning steps required to implement them will be different. For this series, I will stay focused on one example of a solid wood project.

Next: how fitting the drawer front is the key step.

Category: Techniques  | Tags:  | 8 Comments
Author:
• Sunday, July 26th, 2009

There are so many ways to make drawers that a book would be the right medium for a comprehensive discussion of the topic. This introduction begins a series of posts, not likely to be contiguous, which will focus on one method for high quality, fairly small size drawers suited for a craftsman’s best projects.

Sometimes I wonder why we woodworkers bother with the niceties of fine drawers. I still warmly remember the hectic weeks with a newborn baby in a new house when I stole any minutes I could to build a large tool cabinet for my new shop. Six drawers, nothing too pretty: rabbeted plywood, bottoms running side-hung in dadoes, glue, screws, and feeling tired but happy. Now more than two decades, college expenses, and a lot of woodworking later, they still run smoothly. It would be nice if everything worked this well.

Nonetheless, at the other end of the aesthetic spectrum it is certainly possible to combine function with beauty. A logical process, with special attention paid to the critical junctures, will produce enduring, exquisite drawers. This series is based on traditional methods, but I will feature some modifications that I use because they make sense.

This is not the only way to make fancy drawers, nor do I propose it as the “best” way because that judgement depends on function and aesthetics which are ultimately the provinces of each craftsman for each project. For making high-end drawers, as with almost all of my woodworking, I employ machines and hand tools, though the latter predominate and certainly are used for the precision steps.

The next post in the series will address the fine points of case construction with regard to drawer fitting.

Category: Techniques  | Tags:  | 6 Comments
Author:
• Saturday, July 11th, 2009

And the winners are . . . end mills! Here’s why.

I do most of my mortising with my trusty Elu 3338 plunge router, currently available as the DeWalt 625, in conjunction with various jigs, most involving a template guide riding in a slot. In the past, I used solid carbide upcut spiral router bits with generally good results, though I often encountered two problems.

First, 1/4″ and 3/8″ spiral bits are usually sold with cutting lengths of 1″ and 1 1/4″, respectively. I often want to make mortises deeper than that. Second, 1/4″ and 5/16″ diameter bits, especially some rare, long-length, HSS versions, will sometimes vibrate in the cut and produce steps on the mortise walls. Even a 3/8″ bit may be made with a surprisingly thin web at the core of the spiral which can cause the bit to flutter when cutting dense woods.

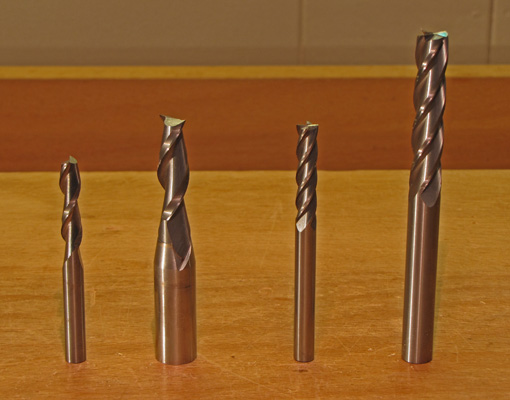
I like standard, four-flute, center-cutting, single end mills in uncoated solid carbide with a plain shank and a 30-degree helix. These are available in longer overall lengths with longer cutting lengths than router bits, thus allowing deeper mortising. I find the cutting action of these four-flute end mills has less vibration and is smoother and more balanced than that of router bits. This results in cleaner mortises. Furthermore, these end mills are generally less expensive than comparable router bits.

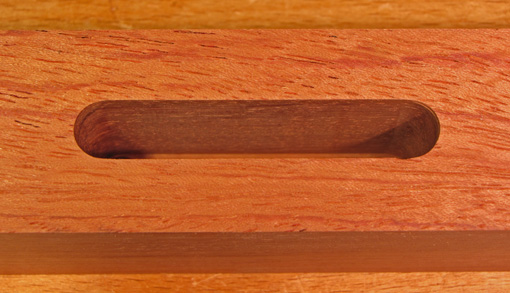
The photo at top shows, from left to right, 1/4″ and 3/8″ upcut, solid carbide router bits, and 1/4″ and 3/8″ end mills. The 3/8″ end mill is 4″ long with a cutting length of 1 3/4″. The router bits tend to strain in the cut whereas the end mills purr like a sports car. The mortise pictured below is 3/8″ wide, 2 3/8″ long, 1 1/2″ deep and was cut in bubinga, a dense wood, with the bit at the right in the top photo. The walls are very clean and true.

The disadvantage of an end mill is that the cutting diameter equals the shank diameter. Therefore, I usually mortise with a 1/4″ or 3/8″ end mill using a router collet of the same size for each. A 5/16″ end mill can be used with a shank adapter though I prefer to avoid these adapters. When mortising with end mills, just as with router bits, it is good practice to cut the mortise in small depth increments, always listening to and feeling the feedback from the machine and adjusting your technique accordingly.

Sources for end mills are industrial supply houses such as MSC, Enco, McMaster-Carr, and Grizzly. It will take a while to go through their catalog algorithms or directly study their catalog pages but these are good ways to learn about this type of tooling. The upgrade has been worth it for me.

Category: Tools and Shop  | 16 Comments
Author:
• Saturday, June 27th, 2009

What can someone who just likes making things out of wood humbly learn from a musical genius like Beethoven? I remember reading many years ago a quote by Beethoven that struck me with its depiction of his invincible creativity:

I carry my thoughts about me for a long time, often a very long time, before I write them down… I change many things, discard, and try again until I am satisfied. Then, however, there begins in my head the development in every direction, and, inasmuch as I know exactly what I want, the fundamental idea never deserts me, – it arises before me, grows, – I see and hear the picture in all its extent and dimensions stand before my mind like a cast, and there remains nothing for me but the labor of writing it down…

“my ideas…sound, and roar and storm about me until I have set them down in notes.”

What does this have to do with our little world of saws, planes, and wood? I feel that the really difficult, critical aspects of making a woodworking project are consistency and veracity in design and workmanship – the long line. Success comes from keeping sight of the “fundamental idea,” which one hopes and believes is a good one, through the many steps of a project, while bringing forth the commensurate breadth and depth of technique to render it.

This applies to not only a big project or a tour de force of design and technique, but as well to simple, modest work done satisfyingly well. David Pye, in The Nature and Art of Workmanship, states “Regulated workmanship means workmanship where the achievement appears to correspond exactly with the idea”. The force and clarity of the idea must drive its fulfillment. This is not an easy task.

There’s no delusion of grandeur here; this woodworker is not a speck of a Beethoven. Nevertheless, I do like to make things out of wood, to have an idea and make it be there.

Yea, that’s happy woodworking. Best wishes for your ideas.

Category: Ideas  | 4 Comments
Author:
• Friday, June 19th, 2009

What follows are thoughts conjured up while, or recovered from, sweeping the shop floor. Maybe you can relate.

  • Why are so many home shops relegated to the basements? You love woodworking, bring it up to ground level. It is more important than the TV, which somehow seems to always get its own room with a window.
  • Perhaps like many readers here, I started making things from wood because the material is easy to cut, firm enough to be structural, and seems so friendly and harmless, only later discovering its variety and beauty. I would probably like making things from any material, but I cannot resist making things out of wood.
  • We woodworkers are too often deferential to speculative examination of historical work to decide technical issues when the answer may be found with modern, orderly testing and inquiry.
  • Making a one-of-a-kind piece is far more mentally taxing than the easy rhythm of knowing you have previously worked through an entire process, and thus can be fully confident of an outcome that is always in sight. However, new designs are exciting and edifying.
  • I think I may, at some point, acquire “enough” clamps. I am sure, however, that I will never have enough wood.
  • “Dead on”, “dead flat”, and the like, mean to me that the manufacturer doesn’t want to tell you its tolerances. And if a tool needs to be “dead on” (no such thing), shouldn’t I want to know the tolerances?
  • Fine quality wood craftsmanship is financially undervalued. Woodworkers need to better communicate the value of our product. It would be nice if our creations spoke for themselves but it is not enough.
  • Isn’t it exciting that this is the best time in history to obtain high quality woodworking hand tools? What a difference from, say, 20 years ago. And it keeps getting better.

Happy woodworking! And thanks for reading.

Category: Ideas  | 8 Comments
Author:
• Friday, June 12th, 2009

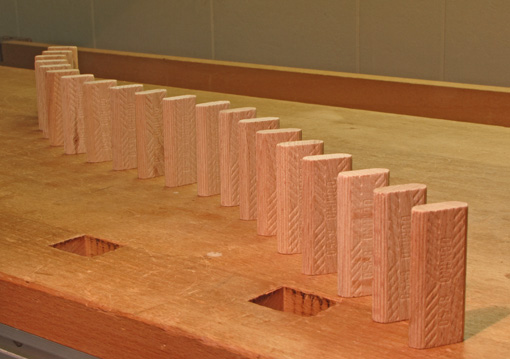
Since buying the Festool Domino joiner about a year ago, I have developed some notions from the viewpoint of one who values hand tool woodworking. Machines, especially one this innovative, can change the way you work, but not automatically for the better. This tool is an invention to facilitate joinery. The principles of good joinery were not reinvented and should not be abandoned for the lure of a new gadget, even one this good.

Am I glad I bought the tool? Yes. Would I use this to join the legs and aprons of a dining table? No, the tenons are too short and do not give me enough options, such as haunched tenons. Does the Domino replace traditional mortise and tenon joinery? Not a chance.

Here are some impressions from working with the Domino:

  • Holding the work and registering the Domino fences on the work surfaces are critical to success with this tool. The plunge must be parallel to the face of a frame member or perpendicular to the surface of a leg.
  • Use the thickest, longest, and most dominos that reasonably fit.
  • When assembling, apply glue on all surfaces to ensure wetting – generous on the mortise walls, light on at least first half of the portion of the domino that will be buried in single mortise.
  • Lightly chamfer the entering edges of the domino to help distribute the glue on the mortise walls and prevent it from being scraped off.
  • The surfaces of the dominos seem somewhat burnished. Consider lightly sanding them to improve glue wetting, but not to remove thickness.
  • Consider putting a bit less of the domino in the long grain member and more in the cross grain member to make it act like a longer tenon. Adjust the mortise depths accordingly.
  • It would be helpful if Festool made additional dominos sized for the full width cut (i.e. mortise length) which is 9.5mm (3/8″) wider than the domino. You could make your own. (Hey, Festool…)
  • Longer dominos would be better but that would involve a different machine design.
  • The dominos fit very tightly in the narrowest mortise length (13.7mm + bit diameter). If you do not have room or do not want to use one of the longer mortises, you can get a slight play by sanding off some of the width of the domino. I use a horizontal belt sander to do this quickly.
  • On the earlier version of the machine with the metal registration pins (which I own), it would be better if the pins could fully retract when you do not want to use them, especially when they happen to be close to the edge of the work piece.

Bottom line: this is a good tool, but to make good projects you still have to be a good woodworker.

Much has been written about the Festool Domino joiner including reviews here and here, helpful discussions at the Festool Owner’s Group, and an excellent supplemental manual.

Category: Tools and Shop  | 5 Comments