Author:
• Saturday, December 14th, 2013

IMG_1116_edited-2

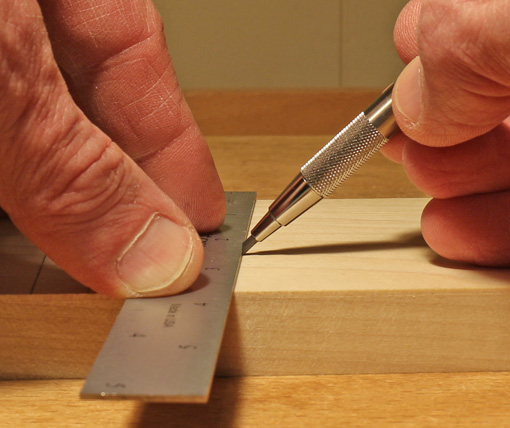
The 0.5 HB, despite limitations, is convenient and versatile to perform most layout work. However, as in most matters of woodworking, it is valuable to have a range of options to suit the tool to the task.

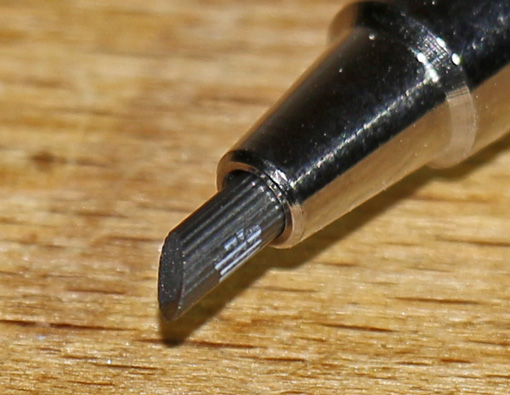
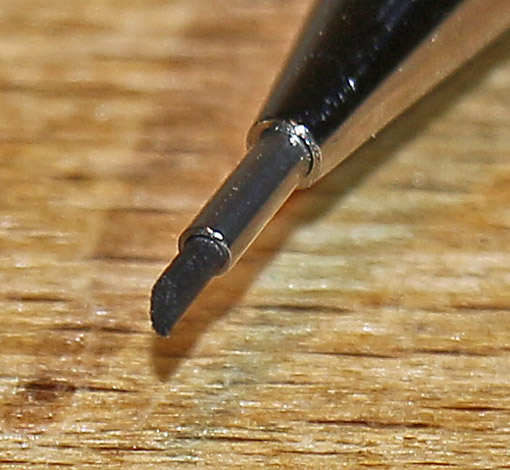
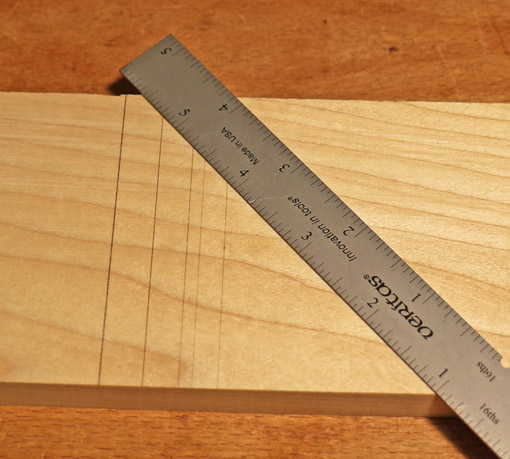
In the photo above, the line on the left was made with 0.5 HB, the next with a worn chisel point 2.0 mm 2H, and the three on the right with fresher chisel points.

What about the flat carpenter’s pencil? It won’t roll away while you are building on a roof but I do not like them for furniture making layout. The lead is too soft in the widely available regular ones, and though harder lead is available, I find them generally too coarse. A chisel point can be made with a knife, and renewed with sandpaper, but the process is slower and messier than the 2.0 mm and 0.9 mm 2H.

This is just personal preference and you may find you like them. Another option for sharpening the carpenter’s pencil is the clever Keson sharpener, which uses two blades in succession. Other sharpeners that bring the flat pencil to a rounded point are a good example of defeating a design with “improvements.”

Since only the timid and fools don’t make mistakes, those who use pencils must use erasers. The pink eraser on the end of a wooden pencil is adequate for spot use but it tends to smudge. The refillable white eraser on the end of the Pentel Twist-Erase is much better.

However, I like to make big, head-slapping mistakes so I keep two types of separate erasers available. A kneaded eraser is convenient in that it does not produce crumbs, and it lasts a long time, but often it cannot fully remove lines on wood. Its surface is refreshed by folding and kneading. More thorough is a white “plastic” eraser, such as the Staedtler Mars. It does produce crumbs but this serves to keep its surface clean and thus prevent smudges on the wood.

Finally, you might like this short video of great insight drawn from the humble pencil.

Category: Tools and Shop  | 2 Comments
Author:
• Saturday, December 14th, 2013

IMG_1098_edited-2

Lines made with pencils are a ubiquitous and essential part of woodworking, so it pays to take a close look at pencils, points, and how they are used.

The basic hexagonal wood pencil with HB (#2) lead, such as the classic yellow Dixon Ticonderoga is a handy workhorse for general non-critical layout and labeling. I stay away from round pencils and the annoyingly flexible cheap ones made from composite material.

The point wears quickly on the ol’ #2, so consider using a 2H art/drafting pencil. The harder lead retains a point better so it draws a finer line for a longer time. I find that pencils harder than 2H tend to dent many woods, or make lines that are too light.

For dark woods, I prefer a white pencil, though some like red. Colored pencils are softer than regular ones so must be sharpened more frequently. The Sanford/Prismacolor Verithin #734 seems to be the most durable white pencil.

A battery-powered sharpener at the front of the drawer under my bench top is fast and handy for these wooden pencils.

For a more consistently fine line, a 0.5 mm mechanical pencil is useful. The ratcheting style allows the point to be easily advanced with one hand, a significant advantage when the other hand is holding a square in place. My favorite is the Pentel Twist-Erase. It has a bulky rubbery grip and a robust eraser that is not hidden by a cap and has plenty of spare length. (It is the black pencil at the top left in the opening photo.)

For these pencils, I find HB lead to be the most practical. There is little advantage to the harder 2H since the line will always be about 0.5 wide anyway.

Unless the 0.5 mm lead is extended and held vertically against the layout tool, which is not always possible or desirable, one is not quite sure exactly what distal point on the lead will actually contact the wood, and thus how far from the tool the line will be drawn. This can make it difficult to accurately meet a previously drawn line or mark. Sometimes it helps to place the pencil point on the mark and then slide the layout tool up to it.

0.3 mm pencils make finer, more accurately placed lines, but I gave up using them a while ago because the lead is so prone to breaking, even Pentel Hi-Polymer. I have also found colored 0.5 lead to be too fragile.

The way to step up to greater accuracy when you need it is to use a chisel point. For this, I use 2.0 mm 2H lead in a drafting “lead holder.” (It is the silver pencil at the lower right in the opening photo.) Here is a close up of the point:

IMG_1104_edited-2

For tighter quarters, 0.9 mm 2H in a slim Pentel P209 drafting pencil is useful. (Below, and it is the yellow mechanical pencil at the top right in the opening photo.)

IMG_1115_edited-2

The chisel point is created with a single pass of 2-3 inches on 400 grit sandpaper with the pencil held at about a 45° angle. Use the location of the clip to consistently orient the pencil – I always keep it down and to the right.

The flat side of the chisel point is placed against the edge of the square to make a very fine line that is placed with near marking-knife precision. In situations where the pencil cannot be held at such a steep angle, the rounded side of the chisel point can be held against the tool or other layout edge.

IMG_1124_edited-2

A chisel edge can be made with a wood pencil but I find this is messier, slower, and lacks the same feel of precision.

Next: comparison of lines and more on the subject.

Category: Tools and Shop  | One Comment
Author:
• Tuesday, December 10th, 2013

IMG_1094_edited-2

The review of router tables and lifts in the Fine Woodworking Tools and Shops issue (#237, Winter 2014) prompted me to again think about the subject. I have to admit, after reading about all the nifty gadgets, I was tempted to complicate matters and foul up my happily working simple system, which is described here, here, and here.

Naaah.

I recently added a T-track system instead of F-clamps to lock the fence in place, and a while ago upgraded to heavy-duty locking casters, but otherwise the setup is the same. There is no removable plate, no router lift, no above-table height adjuster, no fence microadjuster, no miter gauge track, no above-table bit removal, and no insert rings. No shoes, no shirt, no problems.

So, how does this home grown model “Easy 2” stack up against the models reviewed in FW? Let’s look:

Price: At a total cost of about $180, which includes the extra Bosch base, the Easy 2 is $470 less than the “Best Value” and $920 less than the “Best Overall” system in the review.

Flatness: The E2 has an intended crown of .003″ over the full length of the table, and, owing to the lack of an insert ring, a deviation of less than .001″ in the critical area around the bit opening. This beats all the models tested with the possible exception of the Festool, which has a .002″ dip. I agree with the author that a slight crown is preferable to a dip. I disagree, however, that a dip as high as .030″ is acceptable for quality work.

The Big Easy achieves this fine accuracy by employing the wonderful flatness tolerance of stock MDF plus shims. Here is the undercarriage of the table with supports across the width of the table near the router base, along with blue tape shims, aka “microadjustments.”

IMG_1092_edited-2

Fence: The E2’s continuous fence is flat and square within .001″. A split-fence attachment is easily installed and removed with finger knobs.

Here is a rear view of the fence locking system:

IMG_1096_edited-2

Dust collection: With simple fittings available from Rockler, the E2 is probably as efficient as all of the tested models except the two with enclosures.

Bit height adjustment: The Bosch microadjustment dial easily allows at least .004″ adjustments with no discernible backlash using a dial that can be zeroed out at any time. Each of the easily visible increments on the black dial is equal to the thickness of a typical sheet of paper.

IMG_1097_edited-2

I do not have a device to measure vertical alignment as described in the article, but this is not likely to be a significant issue because the router base, which has been flattened on a granite surface plate using sandpaper, attaches directly to the MDF that is manufactured to excellent tolerances of flatness and thickness.

It is necessary to squat to reach under the table to attach the router motor and to make height adjustments. I do not mind a bit, but for those who prefer to avoid the latter, Bosch makes the router base usable with a simple hex key to allow height adjustments from above.

My intent is not to disparage the fine products reviewed in the article, but rather to demonstrate that there is a different, simpler way for those who might prefer. This router table system works – it allows me to build what I want.

IMG_1095_edited-2

[By the way, I disavow the detail in the plan drawing of the shop on page 58-59 of the same issue, which shows the woodworker’s router table with an insert plate and an insert ring. He also doesn’t own a two-wheel grinder and he wouldn’t lay a plane on its side. Nice shop though.]

Author:
• Friday, November 29th, 2013

IMG_1091_edited-2

Fellow craftspeople, shop dwellers, makers of things, maybe you can relate to this.

Tuesday afternoon was fun time at 13 years old. School let out at noon, and not long after, my friend and I would meet up at our fishing stream to catch sunfish, crappies, and perch. There was little art to it, just basic tackle, night crawlers, and red and white plastic bobbers. It was a decent way to spend youthful time.

My pal and I intermittently conjured ourselves to be real fishermen with serious skills, and more exotically, fly fishermen. We even earnestly tied a fair number of flies using some authentic materials, but with no real intent (or ability) to put them to use.

However, this kid stuff led me to borrow a book from the library that resonated so deeply with me that I never forgot it. A few years ago, while reminiscing about this, I used the internet along with a vague recollection of an oddity about the author’s name to locate a copy of Fly Fishing For Trout, by Richard Salmon, published in 1952.

As a young teen, it was my first encounter with the intricacies of how someone does something truly well, along with the driving passion. It stood in inspirational contrast to my naive efforts at fishing. I marveled at the author’s melding of scientific knowledge, meticulous attention to detail, and deep experience into superbly expert fishing skills. He described details of fish anatomy and physiology, subtleties of stream conditions, and nuances of equipment, all in the context of studied experience. This was serious stuff, even intimidating.

Perusing my copy now, I also appreciate the author’s peaceful, trusting tenor, and, nostalgically, the lack of today’s widespread ostentation.

I sensed then – and understand now – that this book reflected a deep desire in me – to simply do something very well. It is a joy for the soul to unboundedly immerse the mind, heart and hand in a meaningful pursuit.

No, I never took up fly fishing, but it sure is good to be in the woodshop.

From Richard Salmon, page 81: “For in fishing as in anything else, you must, if you are going to get results, have your heart in your work. The more joyous I am on a stream, the more enthusiastic, the heavier my creel. But to be happy and enthusiastic, I must believe in the fishing tools my hands control – must believe that I can work naturally, carefully, and well.”

Category: Ideas  | 2 Comments
Author:
• Wednesday, November 20th, 2013

IMG_1079_edited-2

Or a block plane? Answer: It’s out on the bench almost every time I’m working there. I don’t always know ahead of time what I’m going to use it for, but I know I am going to use it for something, and I know it will get the job done.

Really, this Bad Axe Hybrid Dovetail/Small Tenon saw is the most versatile backsaw I have ever used. The amazing aspect is not only how many tasks it can do, but how well it does them. It cuts wonderfully smoothly. For example, it is now my favorite saw for tenon shoulder cuts – a crucial crosscut, but it also does a nice job for small tenon cheeks – a rip cut.

Here are the specs of my saw, which I have been using for about three months: 12″ long, 0.020″ saw plate, 14 ppi, “hybrid” filing, depth under the back 2 1/2″ at the heel, tapering to 2 3/8″ at the toe. The hybrid filing is about 10° (negative) rake and 12.5° fleam. Remember ladies and gentlemen, BATW makes exquisite handles in a variety of woods in five sizes to fit your hand. As I have discussed in other posts, I also very much like the hang of BA saws.

This is the saw I recommend if you are working with small to moderate size projects and want to own only one backsaw that must be as versatile as possible but that will never be displaced by more specialized backsaws as you expand your tool kit. If you want to further specialize, Mark Harrell has a great offer to facilitate this (see the ninth paragraph down in the linked page).

There is a “soul” in these Bad Axe saws that I feel is very special. These tools improve my work.

There are excellent saw maintenance tutorials and learning materials on the BATW site. Mark also offers hands-on saw sharpening and maintenance seminars at BATW HQ that will doubtlessly take your skills to the way beyond.

Category: Tools and Shop  | One Comment
Author:
• Tuesday, November 19th, 2013

IMG_1081_edited-2

One of the most difficult aspects of learning and refining craftsmanship is understanding and sensing when something is just enough and not too much.

Consider sharpening a plane blade: sharper is better, at least within a practical range. However, the camber in the edge is a subtle quality – too little and too much are both detrimental to function. The craftsman must understand the purpose of camber for the particular type of plane at hand, as well as have a visual and tactile sense of when the amount is good.

In drawer fitting, proper preparation of the carcass is essential to good results. For this, we must go beyond the simplistic idea that it should be as square as possible, if for no other reason than achieving perfectly square is impossible, and thus we must understand how to bias the imperfection.

It will be much easier to fit a fine drawer with a nice action if the carcass interior is a bit wider at the back than at the front. It must never narrow in width toward the back. Different carcass types – solid wood, frame and panel, a table with drawer guides, etc. – will dictate different ways to create this adjustment, but there is always a way.

We are faced with the matter of “a little bit.” It is sweet for a drawer, especially a smaller one, to have an easy pull to start, then tighten against the sides of the opening as it is almost fully withdrawn. Conversely, it is a sour drawer that gets pinched at the back as it is almost fully pushed in, while the front is excessively loose in its opening. It just doesn’t seem happy to be there.

In building a small jewelry chest of drawers with a solid wood carcass with an opening about 16″ wide and 11″ deep, I incorporated the necessary tweak by shooting the end grain of the top and bottom pieces slightly out of square. I would not normally measure the amount. Instead, I work by feel and eye to get a sense of just enough width that will allow the drawer to move unencumbered in its housing after an initial struggle to enter it.

“But Rob,” you say, “enough is enough already! How much?”

OK, OK, I measured it using shims. The sides are each out of square by about 0.007″ over the 11″ depth, for a total difference between the front and back interior width of just under 1/64″.

More important, I think that will be just enough but not too much.

IMG_1085_edited-2

Pictured above: a direct comparison between the front and back widths.

Category: Techniques  | 4 Comments
Author:
• Saturday, November 09th, 2013

IMG_1072_edited-2

The teeth of a traditional woodworking float, very much unlike a rasp, span the full width of the tool. The cutting surface looks somewhat like a super-wide ripsaw. Iwasaki floats share some characteristics with traditional floats but have important differences in design.

These modern floats are remarkably smooth cutting and leave an amazingly smooth surface on the wood. They have almost no tendency to “catch” on the wood. They also allow great control to produce a true surface, such as in making fine adjustments to tenon cheeks. Aside from very hard steel and very sharp teeth, these floats have interesting features that contribute to their wonderful working properties. 

IMG_1073_edited-2

As you can see from the photos, unlike a traditional float, each tooth row is discontinuous across its width. Furthermore, each row is curved so that most of the cutting edges are presented to the wood at a skew to the length of the tool. Each gap in the row is followed by a cutting edge just behind it. In this way, these tools act similarly to a segmented spiral cutterhead in a thickness planer, which is also very smooth cutting and produces small shavings and tearout-free surfaces. 

This also helps reduce clogging in the floats. The wood that does accumulate in the grooves is easily cleared by tapping the tool or, more thoroughly, by brushing.

Click on the thumbnail (below) to see the macro photograph and note that below the leading faces of the teeth is a small curvilinear bump. This acts as a chipbreaker, further facilitating a smooth cut without tearout.

IMG_1071_edited-1

It is easy to get the feel of using these tools – use a firm but gentle approach to the wood. However, keep in mind that a skew is built in to the cutting edge. Since the tool is “pre-skewed,” your natural tendency to skew it as you would a rasp might work against you. If you use a skewed stroke, the actual presentation to the wood of one side of the tooth line is being less skewed and may tend to catch. The other side is being more skewed, and the tooth line may tend to slice along its length. This is more intuitive than it sounds and you will quickly work out an effective approach with the tool for the particular task at hand.

I’ve been using the 200 mm fine flat model for a few years now, and recently bought the coarse 10″ flat model. Even this, the coarsest grade, leaves a nice fine surface on the wood. The chamfer in the enlarged photo (below) is directly from this float.

IMG_1076_edited-2

Iwasaki floats come in coarse, medium, fine, and extra fine grades, and flat, half-round, round, curved, and plane maker’s models. Woodcraft, Lee Valley, The Best Things, and Highland Hardware have good, though different, selections. They’re a good buy.

Author:
• Tuesday, October 22nd, 2013

Learning and laughing, I had a great time at WIA. Here are a few snapshots with preceding captions. A few closing thoughts follow the photos.

I spent much of the weekend hanging out with Mark Harrell of Bad Axe Tool Works, here demonstrating one of his superb backsaws. Looking on are Vic Tesolin of Lee Valley and Al Flink, a student of Mark’s who became my saw filing teacher for an afternoon. In the world of saws, BATW is playing chess while most are playing checkers.

IMG_0111_edited-2


The same goes for shooting boards and Vogt Tool Works. Tico has added to his line of inclined shooting boards with models designed specifically for new shooting planes available from Lee Valley and Lie-Nielsen. If you don’t already own a Vogt shooting board, you owe it to yourself to check out Tico’s products.

IMG_0118_edited-2


When Matt Vanderlist talks, woodworkers listen.

IMG_0115_edited-2


Speaking of great communicators, I asked Marc Spagnuolo to look as cool as possible for this photo. Yes, I know, that’s like asking Kareem Abdul Jabbar to look tall. The Wood Whisperer met my request with his ready sense of humor.

IMG_0117_edited-2


Popular Woodworking magazine Editor Megan Fitzpatrick and I, your devoted scribe, made a deal, or so I thought, to look as sappy as possible for this shot. Megan, no doubt quickly bringing to mind some Shakespearean plot, opted to appear quite levelheaded, while I succeeded rather spectacularly with the original plan – don’t you think?

IMG_0120_edited-2


I will not reveal what Chris Schwarz did moments before this shot, but only say that he switched the anatomical focus of his jocularity from his customary posterior to anterior just in time for the photo. (No, he’s not adjusting the square on his shirt.) Can you tell that Deneb Puchalski and Tom Lie-Nielsen are covering for Chris with forced laughter?

Seriously, it is hard to appreciate the beauty of the Lost Art Press books until you handle them in person. The same is so for the grace and functionality of Lie-Nielsen tools.

IMG_0124_edited-2


Recognize the guy in the middle?

IMG_0125_edited-2


Ron Hock of Hock Tools has done so much for woodworkers for many years.

IMG_0119_edited-2


Woodworkers are similarly grateful for the contributions of Joel Moskowitz of Tools for Working Wood and Gramercy Tools, here chatting with Fred West.

IMG_0123_edited-2

It was wonderful to be around so many people who love what they do, in this case, woodworking. The joy was palpable and contagious, while the learning flowed naturally. The direct link between action and result inherent in the craft of woodworking punishes pretension, so the down-to-earth nature endemic among woodworkers comes as no surprise.

I am grateful for the many conversations I was able to have with sincere, masterful makers. Some that I especially savored, such as with Mark Harrell of Bad Axe Tool Works, and Robin Lee of Lee Valley Tools, were alone worth the airfare. Thank you also to the many people whom I met who kindly mentioned their appreciation of my writings.

Special thanks to the Popular Woodworking crew for putting on a wonderful event!

Category: Resources  | One Comment