It is not surprising that setting the depth of cut in a hand plane can be difficult to learn. After all, we are dealing with differences of as little as a thou or two with a smoothing plane, and even a heavy cut with a jack plane should have a balanced, efficient setting.
Ultimately, the best gauge of the proper blade projection is the performance of the plane. You sense the bite of the blade, observe the shavings, and make adjustments.
Nonetheless, you want a good initial setting before the plane is brought to the workpiece to avoid lots of trial and error adjustments after starting to plane. Both the left-right balance and the overall depth of cut must be set. These initial adjustments can be made in two ways: visual and tactile.
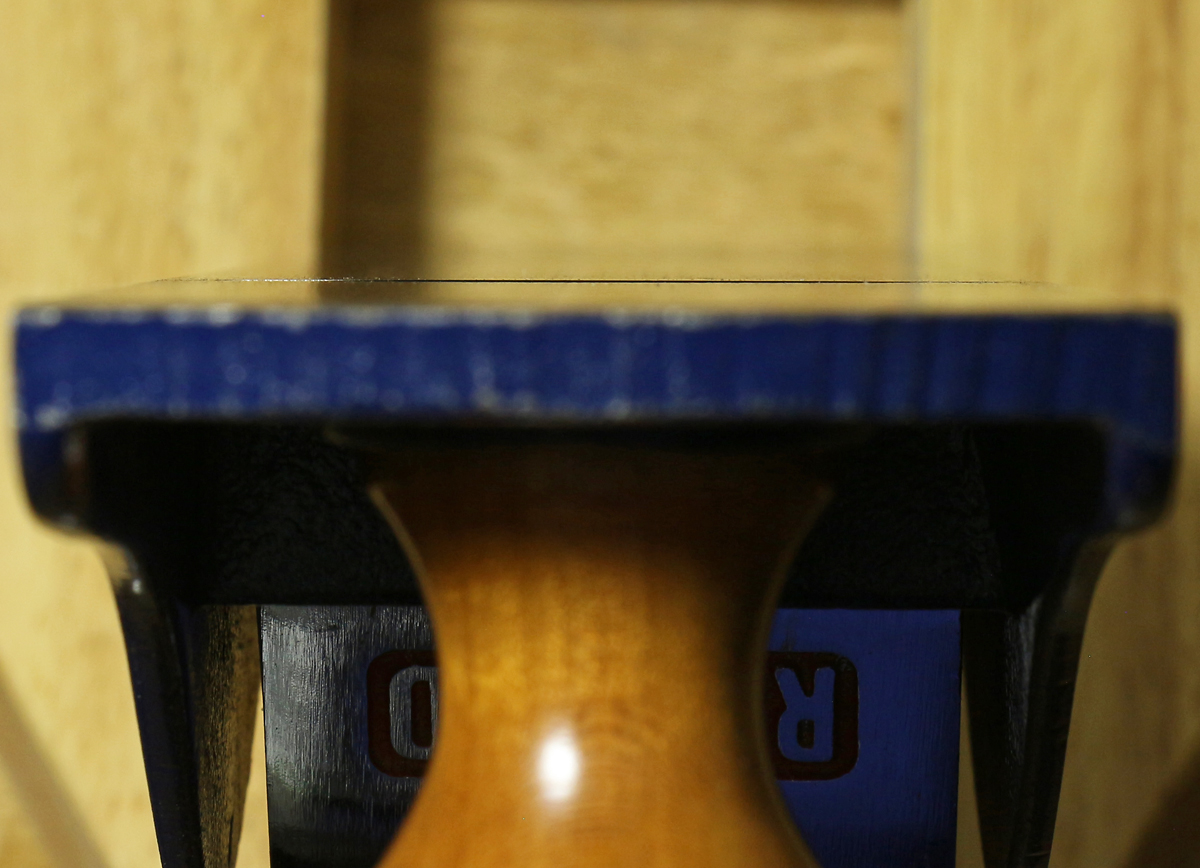
To see the blade projection, sight down from the front of the sole at a very low angle with a lamp positioned in front of your forehead. The light will be diffusely reflected from the sole (metal or wood) but not from the protruding blade, which thus appears black. Subtly shift your viewing angle to see the thin black strip of the blade. (As a further optional visual aid, note that light will probably also be reflected from a neatly filed tiny wall at the back of the throat at the extreme sides of the mouth where the curve of the blade camber reveals it.)
The photo at top shows a moderately cambered jack plane blade projection. Click on it to see a larger version.
Adjust the blade for lateral balance with the lever, Norris style adjuster, or hammer, depending on the type of plane. Usually, this is easier to observe and manage with a substantial overall blade projection, which you can then back off to a shallow cutting depth. For a smoothing plane, I make this depth almost nothing and then increase it as needed when I start planing. For jack plane work, I usually go directly to a more aggressive cutting depth.
For tactile confirmation of the visual adjustment or instead of it, use a small block of wood about 5/32″ thick as shown here. I learned this method from David Charlesworth. I prefer to use the edge, not the corner, of the block to pull shavings from each side and then from the center of the blade.
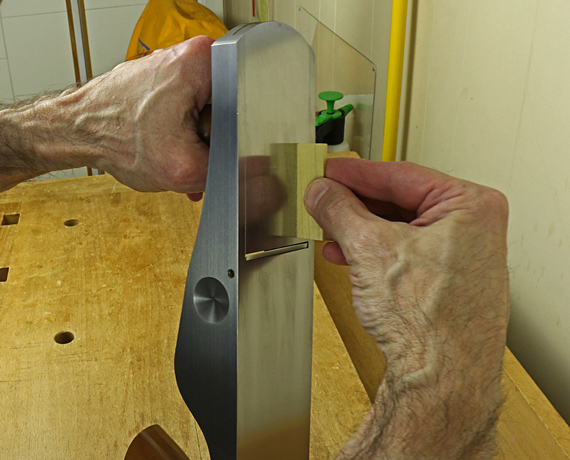
As with the visual method, get the lateral balance correct first, then go for a good overall depth of cut. The difference with the tactile method, however, is that it is easier to start with a minimal depth of cut to make the lateral adjustment. The assessment is made by feeling the pull of the cutting edge as it takes a shaving from the little block of wood.
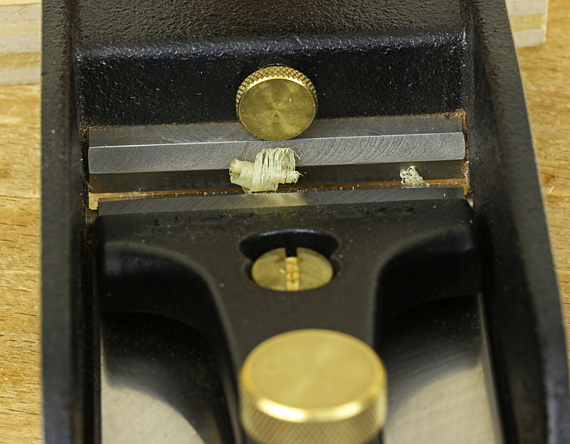
Below is an example of the result. Note that this is to illustrate the principle. In practice, I do not usually bother to turn the plane over to look at the tiny shavings. The assessment is done by feel. You can see that this blade has a nice small camber but the lateral adjustment is not correct. The cutting edge pulled almost nothing on the left side in the photo.
For smoothing plane work, I’m more likely to use the tactile method because it directly gauges precise small adjustments that may be hard to see. For jack plane work with a moderately cambered blade, I’m more likely to use the visual method because the more prominent blade silhouette makes an adequate adjustment fast and easy.
For planes with a straight-edged blade, such as a rabbet block plane, the same methods apply but you are trying to get an even blade projection across the full width of the mouth.

For smoothing I set the blade very light, less than .006″. However with my jack plane I’m never certain how thick a shaving to take. Much more than this it seems I’m either struggling to take a clean shaving or fighting tear-out in rising grain. What thickness shavings do you typically remove with a jack plane.
I know it’s the surface that counts, but with a thin setting it can take a lot of strokes to remove 1/8 in or 1/4 from a 10″ wide board. I’m just looking for a reference to check my experiences against.
Thanks,
Dan
Hi Dan,
For final finish smoothing, think: sharp, very little camber, and thin shavings. Depending on the wood, the shavings are likely to be in the range of one or two thou in say, walnut or cherry. But pay attention to the resultant surface more than the shavings.
If you are trying to remove bulk thickness by hand, my first suggestion is to read this:
http://www.rpwoodwork.com/blog/2009/04/26/which-machine-first-and-why/
If you still want to remove bulk thickness (e.g. 1/8″ – 1/4″) by hand, don’t worry about the surface quality at the start. Consider starting with a scrub plane, which has a very large blade camber that takes very thick shavings. Work diagonally across the grain. It works fast but leaves a rough surface with tearout. No problem, that will disappear later in the process.
Then work the surface with the jack plane, again diagonally. Take thick shavings at first – as thick as you want to get the job done faster. Just leave enough material to later get past the tearout and roughness. Then decrease to thinner shavings as you approach the finished dimension. This will give a better surface and better accuracy in dimension and flatness.
After you’ve done a few boards this way, go out and buy a DW735. Better yet, add a Shelix cutterhead. Or consider the new Rikon helical planer. Life is short; you’ve got things to build.
Rob
Rob,
Thanks for the response. I have a scrub plane,three to be truthful. I do use one of them, but I have trouble,walking away from a good tool deal. I am looking for a number to confirm my own work methods of using the jack plane. I recently surfaced a 3′ by 5′ walnut counter top the wood had lots,of figure and rising grain. Most of the work was completed with my Veritas low angle jack with medium toothing blade.
I have an Inca 510 jointer planer I purchased for a small kings ransom in 1981. It works fine but I have another large walnut bookshelf project and I bought a DW735 for the additional width. No Shelix cutter head but I bought the almost unused head and spare cutters from another woodworker who did the Shelix upgrade. Now I have four “new” sets of blades. You’re right life is too short and getting shorter.
Thanks,
Dan
Hi Rob,
I set my initial setting with the visual method as you describe, and then adjust the lateral by trial and error on an 3/4 inch edge of scrap. I like your method using a small block on edge. I will try that, looks quick and very accurate. Thank you again for the detailed explanations and really good pictures.
Pascal.
Rob,
I experimented a bit today and cane up with some answers and thought others may be interested in the results.
I first reshaped the camber on the blade of my scrub plane to a 6″ radius. previously it was at about 3″ to 4″ radius which I found to be too extreme. With this blade properly sharpened I could reliably take shavings of 0.025″ thickness, however 0.020″ was notably easier and more practical for me. I can take shavings of 0.035″, however this was more effort than I was comfortable with and the blade tended to back up up even with considerable tension on the “screw” on the locking lever – Stanley No. 40.
With a Stanley No.5 blade sharpened with moderate camber, I could take shavings 0.012″ to 0.015″ in oak or walnut without undo effort. In other words the bench didn’t walk all over the shop.
I set up the No. 4 smoother with sharp blade and virtually no camber, shavings of 0.002 to 0.003″.
The corrected camber on the scrub plane was the missing element for me. With the setups described I feel much more confident in hand planing to reduce stock thickness.
Thanks for your tips – they led me to look closely at the scrub plane setup. I have previously been disappointed with the scrub plane results. The wood looked like a plowed field and way too much tear out to correct with the jack plane and smoother. I may push the camber radius to 8″ or 9″ to see how that goes.
Great, Dan, I’m glad you are finding your preferences.
For the record, the scrub planes made by Lie-Nielsen and Veritas (Lee Valley) both come with blades that have a 3″-radius camber. I use the same Ulmia wooden scrub plane that I bought at least 30 years ago. The plane Ulmia/E. C. Emmerich currently makes, available from Lee Valley, looks just the same, including the shape of the blade. I checked my blade against a circle drafting template – the radius is 1 1/4″. That plane has served me well, and I’ve never made a significant change in the camber because it does what I want it to do.
It is all a matter of what works for you, in the woods you are using, in the tasks you are doing, to make the things you want.
Rob
Hey Rob,
I’m searching for this kind of in-depth article on Jack Plane. Thanks for this information and sharing your idea.
Can you tell me, how I set my planes blade that won’t lose the edge?
Off to share.
That’s easy, Tom. Don’t let the blade touch any wood and the edge will last indefinitely.
Rob