
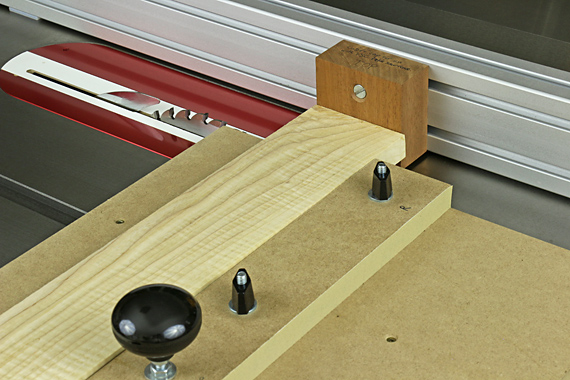
This simple jig makes it easy to produce highly accurate tenon shoulders on the table saw. Admittedly, it is a nicety, not a necessity, but I have been delighted with the consistently excellent results from it.
The special feature is that both edges of the fence are used, in turn, to register the work piece. This allows you to work from a single reference edge of the rail. This is hand-tool style – you do not assume the two edges of the rail are exactly parallel. Yes, they probably are, close enough at least, but I like potential errors to cancel whenever I can. Setting up a jig like this means I only have to be dead on once – when I make the jig.
This means that the edges of the fence must be absolutely parallel to each other. They are, within a thou.
Also, a sled is a generally more accurate way to crosscut on the table saw because the work piece does move against any surface. Of course, the miter slot must be accurately parallel to the blade for this jig, or for any device that slides in the miter slot, to work well.
Making the jig
The overall dimensions of the jig are 21″ x 14″.

Trim the UHMW strip to a snug fit in the miter slot, and then attach it to the 3/4″ MDF base of the sled using screws entering through the top. Locate the runner so that there is a little bit of the base extending to the right beyond the blade. Then, trim the right edge of the sled by sliding the base in the miter slot. The other three edges of the base are not critical; cut them only for a neat appearance.
The fence is 3/4″ MDF, 2 1/2″ wide. Stable, quartersawn hardwood is probably a better choice of material because it is easier to trim straight and square, but I got lucky when ripping this piece of MDF so I used it. Using 1/4″-20 flat-head bolts through the bottom of the base, attach the fence square to the right edge of the base. T nuts make it easier to tune the angle now, or later if needed.
Neatly add PSA 220-grit sand paper to both working edges of the fence. The big knob in the middle helps in maneuvering the sled.
In use
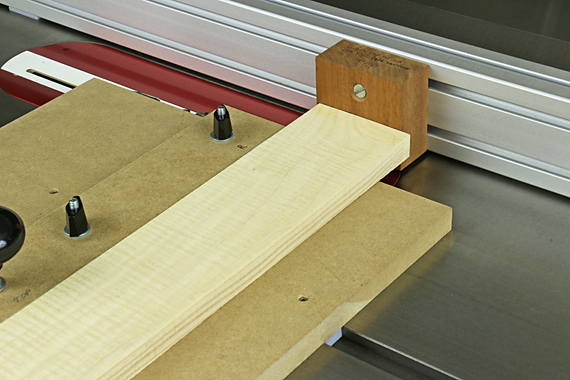
A stop block is easily added to my VSC table saw fence. Mark the reference of edge of the rail. Adjust the blade height. Remember to readjust the blade height if you are making a tenon that is not centered on width of the rail.
Cut one shoulder . . .
and then the other, using the same reference edge of the rail.
You also can make the little “connecting” (edge) shoulders with this jig on the table saw. However, errors can creep in. When the rail is held on its long edge, it can register differently against the stop block than when it is held on its face. This will result in the end shoulder(s) not aligning with the face (main) shoulders. So, I often prefer to do these by hand, which is easy.
As always, there’s more than one good way to get the job done.

Neat jig! This exactly solves a problem I am faced with.
I have 3 stretchers to tenon which have live edge on one side. My usual method for tenoning involves registering the stretchers from both edges… which in this case is very unreliable (not to mention safety concerns).
I’m gonna build this jig for sure!
On thought for people who wants to build it that you didn’t mention; it is probably a good idea (but not always… because space can be a consideration) to position the jig so that it rides on the side where the blade (whichever it’s width) is at a constant position. This means at right for me (I have a right-tilt table saw). This way, you can use the jig with any blade (even a dado stack) and still keep the bottom of the cut supported for less tearout.
Thanks for the comment, Ben. I’m glad the jig will be helpful for you.
Excellent point about building the jig to ride on the side of the saw that has the base of the arbor. (For my saw, that is the left side.)
Rob
Rob, you mention T-nuts in the article but I’m not sure where they are on the jig. Are they facing downward into the fence? Also, do you make the cheek cuts using a vertical tenoning jig, or through some other method? Thanks.
Steve,
The T nuts are the four black plastic wing nuts that secure the fence to the base. I’m not sure what the official name for them is.
You can use this jig for the shoulders no matter how you make the cheek cuts, by hand or machine. If I’m in machine mode, I like the bandsaw for cutting tenon cheeks, but probably more often cut them by hand. If I’m cutting the cheeks with the bandsaw, I like to mimic the hand tool sequence by cutting the cheeks first, and then the shoulders with this jig.
Rob
Rob, ah, I gotcha. When I hear T-nuts I think this: https://www.amazon.com/T-Nuts/b?ie=UTF8&node=16410131
Steve
Steve,
Yea, makes sense to think of those when reading “T nuts.” I really wasn’t sure what to call the things I used, and could not find a consensus online. “Plastic wing nut” is about the best I could find. The somewhat redundant “plastic wing nut with threaded insert” is an alternative.
Anyway, thanks for reading and thanks for the comment.
Rob
Hi Rob,
Now that you’ve had it for a while, are you still happy with your VSC table saw fence? I have a PM66 which is a great saw with a very pedestrian fence.
Keep well,
Rob
Rob,
Yes, very happy with the VSC fence. I think it is much better than the Biesemeyer-style fence that came with my SawStop table saw.
http://www.rpwoodwork.com/blog/2016/12/18/very-super-cool-table-saw-fence/
Still highly recommend it.
Rob
Hi Rob,
That is neat! Of course, most times a board will have a tenon on both ends. If you flipped it over, still using the same reference edge, than both your faces would need to be parallel, no? If not the cuts on the second shoulders might not be perpendicular to the face (though easily remedied by a chisel). If you rotated the piece and used the other edge as the reference face for the opposite end, than your shoulders might not be parallel, which would probably be worse than any outcome with the flipping over method. Stupid furniture making.
-Eric
Eric,
I think I understand what you’re saying but I’m not sure.
In any case, the key point of this jig is that it allows you to use a single reference EDGE to cut all four shoulders of a rail that has a tenon at each end.
The reference FACE is necessarily, in all cases, the face that the blade is cutting at the time. Strictly speaking, yes, the faces of the rail should be in parallel planes, as they would be coming off the thickness planer. In any case, if they are a bit out of parallel, then all the shoulders might not be perfectly vertical. That is true of any table saw tenon jig. However, because shoulders are typically on the order of 3/16″ tall, the error would be miniscule, and, as you point out, easily remedied with a chisel.
Rob