Archive for ◊ August, 2013 ◊

Author:
• Monday, August 26th, 2013

IMG_0829_edited-2

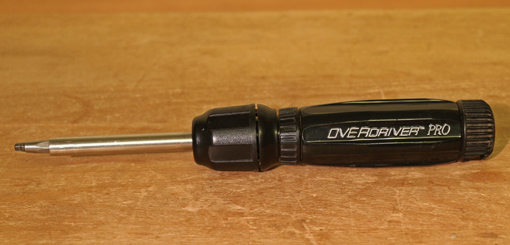
This is the best screwdriver I have ever used. Made by Spec Tools, the Overdriver Pro has been in service in my shop for 23 years.

Similar to many drivers, the magnetic shaft accepts 1/4″ hex bits, which makes it a versatile space and money saver, and it has a ratchet mechanism to reduce hand fatigue and speed the work, though this one is exceptionally smooth and quiet. There is room to store several bits inside the handle.

What makes this tool unique and great is its patented 4:1 on-demand gear ratio. When you want low speed with high torque, use it like a regular driver with a 1:1 gear. When you want high speed with low torque, use your second hand to grip the large collar at the top of the shaft to actuate the 4:1 mechanism, making it easy to exceed 400 RPM. The smaller collar at the base of the handle reverses the ratchet direction.

None of this would matter if it was flimsily built, but this tool is very well made and tough. It has seen plenty of use in all sorts of DIY work in addition to the woodshop. The handle is hard plastic that gives a surprisingly good grip and is very durable, but can be a little rough in sweaty hands. There is no lock setting on the ratchet mechanism, which I would sometimes find convenient when making a final torque adjustment on a screw and want to back off a little.

The model pictured above has been replaced by the OD-2001 – same tool, different color. It and the RGO-5412, which has a friendlier looking handle containing some firm rubber, are the company’s pro model straight drivers. They cost more but are worth it.

This screwdriver does not seem to be sold by many stores so I thought readers would like to know about it. Spec Tools is located in eastern Massachusetts, and you can order from their site.

This review is unsolicited and uncompensated.

Addendum: I would like readers to know that after I posted this review, the nice people at Spec Tools sent me a package of a few tools, which they insisted I keep with no expectations on their part. I did not solicit, hope for, or at all anticipate this, nor did I subsequently change the content of the post. It is not why I wrote the review. Therefore, I have kept the tools.

Author:
• Saturday, August 24th, 2013

IMG_0831_edited-2

Woodworkers estimate a 90° angle all the time in their work.

For example, as you follow the line when rip sawing by hand, you estimate by eye and feel the position of the saw square to the surface of the board.  Similarly, the initial placement of the tenon saw in the vertical plane, as the cut begins, is done by estimation. When chopping the baseline of dovetails, you estimate a 90° angle for the chisel, even if you then choose to slightly deviate from it to undercut.

I wondered, how accurate can we be with this kind of estimation? After doing some simple trials with a magnetic angle gauge, my conclusion is: amazingly accurate.

I placed the gauge in a position out of my view on the sawplate of my Bad Axe hybrid dovetail/small tenon saw, an exquisitely balanced, multi-purpose backsaw. I placed the saw, as if to start a cut, on a board’s straight edge, which was exactly parallel to the workbench surface. When I sensed the saw was vertically square to the wood, I asked an assistant to read the gauge.

Initially, the weight of the gauge on the right side of the saw tended to confuse me (a woodworking Heisenberg Uncertainty Principle?) but I was able to recalibrate my senses after several trials. As long as I paid attention to my senses of sight and feel, not allowing unnecessary thought to interfere, I was usually within 0.5° of 90°, despite the hindrance of the heavy gauge. I feel sure I could be even more consistent without the annoyance of the test gauge.

A 0.5° error would cause a deviation of only 0.009″ over the length of a 1 inch cut. A 0.25° angular error corresponds to a 0.004″ deviation – the thickness of a sheet of copy paper.

Of course, the initial estimation is validated or corrected as you saw, following the layout line on the face of the work piece. However, well begun is half done, and even as the sawing proceeds, I believe that a lot of ease in accuracy can come from retaining the sense of the saw’s initial placement.

The ability to estimate square is enhanced by awareness of peripheral vision references, close and far, such as the edges of the work piece, the horizontal top of the workbench, the vertical wall behind the bench, and even the front and back edges of the bench being parallel to the wall behind it. It is equally important to feel the balance of the saw in your hand.

Intuitively estimating square is one way of speeding up woodworking and getting into a working rhythm. I have not found it helpful to employ tricks such as observing the reflection of the work piece edges in the sawplate to determine perpendicularity. In addition to being unnecessary, it requires too much distracting shifting of the eyes and head.

Other experiments can be tried, such as crosscutting a board square by eye, or drilling a hole. The accuracy of the results may surprise you.

This is not a case against proper layout lines, and certainly it is not for setting up a jointer fence. The point is that in the course of our woodworking, we are routinely estimating square, and we can be pretty darn good at it.

Developing trust in your senses is one of the joys of craftsmanship!

Category: Techniques  | Comments off
Author:
• Tuesday, August 13th, 2013

IMG_0787_edited-2

It pays to have a wide repertoire of options to hold wood in place while working on it. Here is a very simple, albeit unoriginal, device that can be used in conjunction with many of the other methods discussed elsewhere on this blog.

The idea for these planing stops came to me from a version made by Veritas. The adjustable feature of the Veritas is nifty, but I have an inhibition about forcefully pushing my planes toward large pieces of metal, even aluminum. The shop-made version is super-simple, super-cheap, and wooden.

IMG_0796_edited-2

These are made from 15″ x 1 3/4″ x 7/32″ poplar with 1 /1/2″-long pieces of 3/4″ dowel attached with brass screws, deeply countersunk. I spaced the dowels to accommodate the holes in my workbench. If I had great forethought several years ago when boring those holes, each pair in both directions would be separated by a constant distance. As it is, I had to make three planing stops, each with a different dowel spacing, to make full use of the hole patterns. This is not a problem because I want to have a few stops in any case.

The low profile of these stops allows their use with thin workpieces but is still sufficient to secure thicker boards.

For planing along the length of a board, two dogs usually suffice to secure the wood. However, vigorous planing with the scrub or jack, working diagonally or directly across the board, tends to dislodge it. A third stop is very helpful in these cases. Similar situations often arise in random orbit sanding, routing, and carving. Workpieces that have curved edges, live-edge boards, finished drawers, and wide panels also can thwart the simple two-dog work holding system.

The photos above are at the right side of the bench with the tail vise and wooden bench dogs. (The blue Record holdfast hole is not involved in this system.)

Below is the hole pattern on the left side of the bench. Following are some of many possible configurations of planing stops, Veritas Bench Pups, and bench end stops.

IMG_0790_edited-2

Here the planing stop is set up as a simple end stop, assisted by a single Pup:

IMG_0789_edited-2

Here, Pups in the front vise and the two stops at the end of the bench work with the planing stop:

IMG_0794_edited-2

Yet another variation, to put work further outward:

IMG_0791_edited-2

With all of this gear, something can probably be worked out to manage just about any work piece on the bench top:

IMG_0792_edited-2

Addendum:

Before settling on this version, I experimented building an adjustable version using different types of screws with the heads projecting from the tops of the dowels. The heads would then run in a T-slot in the stop piece. This would make the dowel positions adjustable like the Veritas version.

It became too finicky for my taste, especially since I wanted to keep the stops less than 1/4″ thick so they could be used for panels and other thin work pieces. The adjustable design can be done using a thicker stop piece. Readers may want to give it a try, but I like the thin and simple version.