Holding short, wide boards or intermediate assemblies such as drawers and cabinet doors can be awkward on traditional-style workbenches. Attempting to solve these problems, I have been gradually altering my bench to incorporate two helpful products made by Veritas: Bench Pups and Bench Anchors. This involves drilling 3/4″ holes in the bench top with considerable forethought. As with any redesign of a basic tool, true success can be declared only after a long time of use encountering a wide variety of jobs. So, I have tried to research and anticipate well and, so far, so good.
A Bench Pup is a 2 3/8″ long, round, brass bench dog that fits in a 3/4″ hole. A Bench Anchor is essentially a portable 1/2-13 threaded insert that is secured in a 3/4″ hole by means of an expansion system. While the function of the Pup is simple and obvious, the Anchors allow an unlimited variety of stops, boards, and accessories to be secured to bench surfaces. I also added two shop-made dogs on the side of my bench.
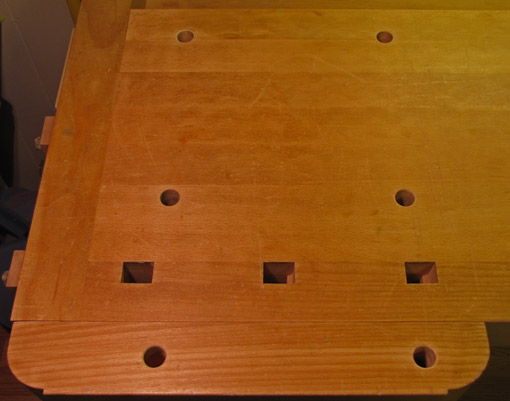
Let’s start at the left side of the bench. I wanted a planing stop but not the typical wide slide-up stop at the left end of the bench. The problem for me with that design is that the front vise gets in the way of my left hip when planing. Furthermore, the vise handle is at just the right height to bump into parts that I’d rather not have bumped. This causes me to crane over the work piece, creating lower back stress. So, the first two holes were placed in the bench top near the right end of the front vise. There the Anchors can be placed and a ½” board with countersunk holes can be secured into them with flat head bolts.
The next step is to permit those two holes to do double duty working with the front vise. Two more holes are placed in the bench top, each equidistant from the vise face with one of the first two holes. Then two more holes are placed in the vise chop, equidistant from the face and each in line with one of the pairs in the bench top.

I wanted the holes in the bench top to go fully through to allow access to the Pups and especially the Anchors from underneath. Now, it would have been nifty to arrange the four holes in the top at the corners of a perfect square which would allow one hole spacing to be used in auxiliary boards, but the constraints of my bench and vise hardware did not allow this.
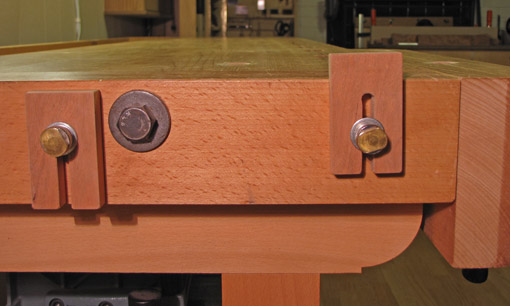
Two shop-made slide-up dogs were added to the left end of the bench. These are secured with 1/4-20 finger bolts that enter threaded inserts planted in the side of the bench.

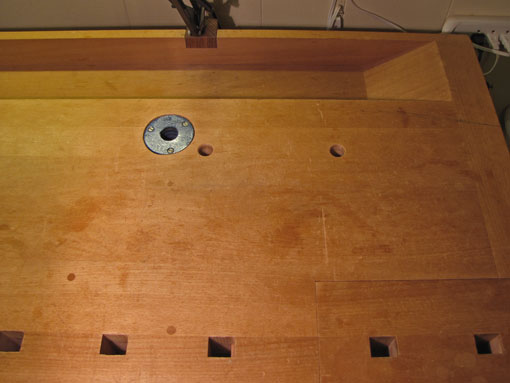
Now to the right side of the bench. Two holes were placed parallel to the row of square bench dog holes, one slightly to the right of the closing point of the tail vise, and the other about 7″ to the left of the first.

With these alterations to the workbench, I tried to make each hole contribute as much versatility as possible. The next post will show a few of the possibilities for holding work with this system.
The reason I titled this “More workbench upgrades” is to reference an article that I wrote for Popular Woodworking magazine, November 2007 (#165), pages 57-61, “Upgrade Your Workbench,” which readers may find helpful for more ideas on the most important tool in the shop. Back issues are available on the PW site and a short video relating to the article is also on the site.
The little hole drilled into the face of the Bench Pup allows one to lever it up with a small screwdriver or hex key. Thanks to Alejandro Balbis! – who contributed this tip to the December 2009 Popular Woodworking.


hi rob- great post.
i have also made some swiss cheese on my bench top and find the bench pups and dogs very useful..
i’ll curious to see how you’ve incorporated the anchors…they’re on my wish list so it’ll be great to see what you’ve come up with…i use the bench pups for my main bench surface and use the bench dogs for the holes in my face vise. they’re the longer version lee valley offers..when i want to remove them i can just push them up from the bottom with a pencil…the pups are a little short for there but the little holes for prying them up makes sense…does it work alright? i noticed that tip as well and wondered about it…
i’ve recently purchased one of the wonder pups and am using it in a sharpening bench i’m currently working on…also, the veritas surface clamps and hold fasts are a great match for this system…all still using the 3/4″ holes…work holding is becoming easier with the help of these great jigs form veritas and my vises are getting used less and less all of the time!
keep well.
tom
Except for the round vs. square dog-hole debate, is there anything different you would incorporate into a new bench being built, with these implements in mind?
Expansion anchors! One of those fine “Now why didn’t I think of that” moments. Looking forward to trying that one.
Tom,
Thanks. I made the hole in the face of the Bench Pup (based on the tip in Pop Wood referenced above) 1/8″ diameter x about 3/16″ deep. A #0 Phillips or a small hex key lifts out the Pup nicely, even if it is slightly below the bench top surface.
I agree, Veritas’ workbench helpers are wonderful.
I’ll get the next post up within a few days.
Rob
Torch02,
Oh, that’s a big question! Off hand, I guess I’d still go for the classic Euro bench, such as Lie-Nielsen makes, with a twin screw front vise. I’d add holes for the Veritas Pups and Anchors.
I think I might go for a steel vise (with wood facing and dog) on the right side of the bench instead of the usual tail vise, unless I could be sure the tail vise would resist sagging, which is unlikely. I wouldn’t want a wagon vise since I can’t hand saw tenons in that.
And I like my rig discussed in the PW article and video instead of a conventional deadman.
But this is so much a matter of personal preference. Try out some different bench styles if you can.
Rob
Jeff, I have those moments too, a lot.
Rob
Hey Rob,
What’s the dog hole with the washer used for (to the left of the two dog holes you mention)? I think I’ve seen one on Garrett Hack’s workbench as well. Is it to protect the dog hole and where do you get such a thing?
Thanks,
Charlton
Hi Carlton,
That hole with the blue metal collar in the bottom photo is used for a Record-Marples #146 holdfast. I installed it over 25 years ago. The inner rim of the collar engages corrugations in the stem of the holdfast. I think the tool is no longer manufactured but it is really not much of a loss in my opinion.
Today, I would not install it even if one could be found.
Instead, I suggest use simple 3/4″ holes and one or two Gramercy holdfasts. The same 3/4″ holes can be used for the Veritas accessories.
I do not like the metal collar in the bench top. Though the Record holdfast does grip well, is not as quick to use as a good forged holdfast like the Gramercy, which I have and use.
http://www.toolsforworkingwood.com//Merchant/merchant.mvc?Screen=PROD&Store_Code=toolshop&Product_Code=MS-HOLDFAST.XX&Category_Code=CGT
Thanks for reading, and I hope this helps you set up your bench just the way you like it.
Rob