Archive for ◊ April, 2013 ◊

Author:
• Thursday, April 25th, 2013

IMG_0991_edited-2

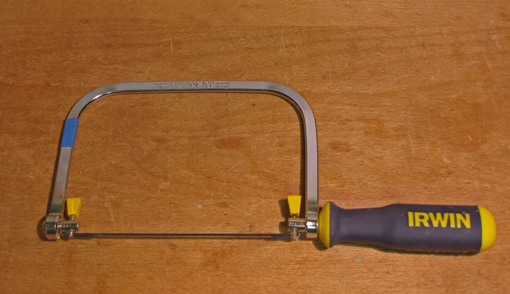
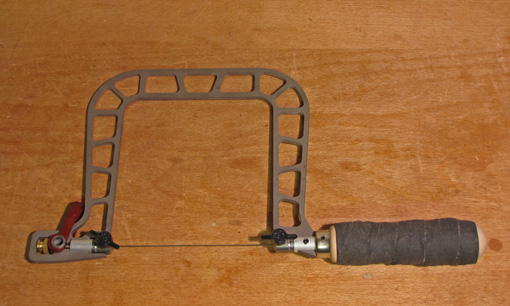
This coping saw frame is an old one made by Eclipse in England. The handle, threaded stem, proximal blade anchor, and the yellow tabs are transplants from an otherwise poorly designed $8 Irwin saw. The handle’s rounded triangular cross section and comfortable grippy material make it less fatiguing to use than the wooden original.

Small frame-type saws like these lack the robust rigidity of their larger cousins and thus perform better cutting on the pull stroke, which also happens to be more natural and efficient when it is used vertically.

I like Olson CP304 blades for general work (.020″ thick, .125″ wide, 15 tpi). The CP301 blades are slimmer (.018″ thick, .094″ wide, 18 tpi skip tooth) and may fit into the kerf of some dovetail saws when used for removing waste, though the total set of these blades varies from about .002″ to .008″ in the ones I measured. CP307 (32 tpi) are handy for the inevitable metal cutting that woodworkers do.

In addition to “serious” work, the coping saw is great for very young kids who tend to dig in and stall with heavier handsaws. The coping saw seems to avoid this because the blade is under steady tension, helped along by the pull stroke. The blades, of course, are inexpensive.

Clamp the wood firmly for the little woodworker, who should use two hands on the saw. You will be the only one who cares if the cut is straight. Even at younger than four years old, my son and daughter played in the shop with me, sawing little wood pieces, building little things, and making big memories.

IMG_0990_edited-2

Knew Concepts takes coping and fret saws to vastly higher levels. I have an earlier model 5″ titanium frame fret saw. This style is currently available in aluminum, in addition to the newer “bird cage” titanium model. They also make a similar coping saw.

These saws are amazingly light and rigid, plus offer a convenient cam lever tensioning mechanism and indexed blade tilt adjustment.

This saw is excellent for inlay work using #2/0 blades (28 tpi skip). Again, the pull stroke setup is best. I wrapped the handle in black friction tape.

It is by far the best saw I have used to remove dovetail waste. You can get very close to the baseline using a single cut. This makes chiseling the remaining waste faster and, with less push back of the chisel, more accurate. The fret saw blade easily fits into the kerf made by most dovetail saws, and can be redirected sideways within one stroke.

After experimenting, I found #3 blades (Pegas brand) to be the best for this task (.0118″ thick, .038″ wide, 19 tpi skip) – faster, narrower, and cleaner than the #5 (.0145″ thick, .043″ wide, 16.5 tpi skip).

Knew Concepts saws are examples of tools for which we might otherwise have complacently accepted the limits of the standard designs.

Next: miscellaneous saws that solve problems.

Author:
• Monday, April 22nd, 2013

IMG_0993_edited-2

Why part 6? Parts 1-5 were posted in 2010, and cover the main Western and Japanese handsaws and joinery/backsaws that I use. I have since added the Bad Axe dovetail saw to that group and it has risen to the head of the class. This post will cover bowsaws. Part 7 will cover coping and fret saws. Part 8 will cover miscellaneous accessory saws. 18 saws isn’t a lot, right? Right.

The Woodjoy bowsaw, pictured above, is my bandsaw without a motor. Glenn Livingston produces this thoughtfully designed and beautifully made saw along with other excellent tools. It is a very sturdy tool with about 16″ between the stiles. The toggle system easily permits half turns, which is important in properly setting the blade tension.

The “Turbo-Cut” blade, listed at 400mm (15 3/4″) long but with a comfortable 13 1/2″ of tooth line, has super-hard (>Rc 70) Japanese-style teeth, 15 tpi. The pattern, which could be considered a modified ikeda-me, is seven three-bevel crosscut teeth followed by a pair of special rakers that have their end bevels cut in the opposite direction from those of the crosscut teeth. It crosscuts fast, and seems to rip even faster.

The blade is about 5/16″ wide, .024″ thick, with the teeth widely set to a .048″ kerf. This makes it surprisingly maneuverable following curves, though the cut is fairly rough across the grain.

For power, comfort, and accuracy, I prefer to use this saw with a horizontal push cut, and the frame is plenty rigid enough for that. Some may prefer a horizontal pull cut, or a vertical push cut, though the latter may be difficult at typical workbench height.

IMG_0994_edited-2

This is a fairly heavy saw, so here is how I hold it for cutting curves. I grip the handle with my dominant right hand, similar to holding a straight-handle dovetail saw, and align it with my right shoulder. This reliably steers the saw while my left hand provides passive support near the end of the rail. The saw works best when you let it do the work and use as much of the blade length as you can with every stroke.

This saw could quite reasonably be used in a hand-tool-only shop in place of a bandsaw for roughing out curved table legs and other heavy curved work. It has the moxie and the control to easily handle 8/4 maple.

I like this size saw for curved work. Woodjoy also makes larger sizes, and Turbo-Cut blades are also available in 1 1/4″ width.

I bought the bowsaw pictured below more than 30 years ago. It was made in Denmark by JPBO but, as far as I know, is no longer available. This is the model of saw that was preferred by the late great teacher Tage Frid. He used it with a horizontal push stroke for joinery and crosscutting, and vertically for ripping stock.

IMG_0992_edited-2

Not long after buying it, I replaced the original blade with one labeled “The K and P Saw, Western Germany,” also no longer available. An excellent blade, it is tapered in thickness from the teeth to the back, so it can be prepared with very little set. The blade is about 19″ long and has 10 tpi, which I file rip. Frid advocated a rip filing for both ripping and crosscutting.

This saw is surprisingly light yet rigid, probably due to the width and orientation of the frame members – unlike most bowsaws, the wide dimension of the rail is horizontal. The toggle system is less refined than on the Woodjoy saw, but half turns are still possible by loosening and reinserting the toggle stick in the opposite direction, then retightening it.

I find I get the best control and endurance by holding it by the lower part of the fairly wide stile.

IMG_0997_edited-2

This saw does not get a lot of use in my shop now but it is still handy to have for various ripping tasks. I find it is especially accurate and comfortable for cutting tenons, though I’m in the habit of using the ryoba for that.

Because I like using my bandsaw so much (“the hand tool with a motor“), I also don’t frequently use the Woodjoy bowsaw. Nonetheless, I still want both of these hand tools in my shop – they give me options and they’re ready when I want them.

Next: the fret saw and the humble coping saw.

Category: Tools and Shop  | Tags:  | Comments off
Author:
• Sunday, April 21st, 2013

Some topics have been explored in greater depth on the Heartwood blog as series of from three to ten posts. This has been a popular feature of the blog and will continue. The shorter series are the length of short magazine articles and the longer ones would constitute book chapters.

For the convenience of readers, each of the more than a dozen series written over the past four years is now directly accessible in its entirety via a link list that can be found by clicking on the Series Topics link just below the autumn scene header photo.

Comments are closed on posts older than thirty days, which includes virtually all of the posts in the catalogued series, to limit the incessant flow of spam. However, please feel free to email me with questions.

As always, thanks for reading, and happy woodworking to you.

Rob

Category: Resources  | Comments off
Author:
• Thursday, April 11th, 2013

IMG_0986_edited-2

Measured drawings are an important step in bringing a woodworking project to fruition. However, like sharp woodworking tools, the drawing is not an end in itself, but a means to getting the project done well and efficiently.

For practicality, I make most drawings to reduced scale on 11″ x 17″ paper at my drawing board in the shop. I use mock-ups to sense the real size of the piece, space relationships, and the look of key features. I generally find it necessary to make full-scale drawings only of certain small key elements such as joinery or a critical curve, rarely of the whole piece.

Sometimes it is necessary to go further with full-scale drawings to deal with construction problems that are too difficult to reliably work out at reduced scale. So, if necessary, I will take the extra trouble to make big drawings. I try to keep it simple though.

Such drawings are too big for my small drawing board and 11″ x 17″ paper. A big portable drafting board with a sliding parallel straightedge is an option, but I use an inexpensive ad hoc setup.

I simply use an adequate size piece of on-hand  3/4″ MDF with one clean straight edge – the factory edge is usually good enough – and clamp it to the workbench under an adjustable-arm lamp. 16 lb. drafting vellum, available at art supply stores in rolls from 18″ to 42″ wide, takes pencil and erasures well. Tape down the corners with #2080 blue tape.

The photo above shows a modest setup with 18″ wide paper cut to about 29″ long. This is just what I need for the project at hand – I’m only drawing one view of part of the piece to work out a particular problem.

An inexpensive T square works well enough. The blade should be reasonably straight but it is not critical for the joint to be a perfect 90°. You also can make your own. The T square works in conjunction with a large plastic drafting triangle. A graduated rule or even a tape measure will handle long measurements.

I prefer 0.5mm 2H lead in a mechanical pencil. Always at the ready are kneaded and white plastic erasers, an eraser shield, and a drafting brush. For drawing fair curves, I use the Acu Arc, my favorite, and French curves.

So, without too much equipment, expense, and hassle, I can break out of the 11″ x 17″ world when necessary. It can be freeing and clarifying to draw and solve problems at full size.

Category: Techniques  | 3 Comments
Author:
• Wednesday, April 03rd, 2013

IMG_0972_edited-2

Having covered the design and construction of the sharpening station in the previous four posts, I will now discuss how I use the system. This is not meant to detail my sharpening techniques, but, in general, I want to get an excellent edge on the tools as efficiently as possible so I can get back to working wood.

First, I gather the dull tools and assess their requirements. Then I make a trip to the bathroom to fill the pump spray bottle, get water to fill the Tormek tray if I will be using it, and do any emptying required on my part since failing to attend to this last necessity will surely interrupt the rhythm of a sharpening session.

At this point, the entire operation is independent of a water source. I get the Shapton stones out from their dry storage and select the shopmade angle gauges needed after consulting my recipe chart. I bump the bridge into a fixed position, then secure the first stone in place with a tap on the wedge from the tool to be sharpened, and then give it a little spray of water. I lean the other stones on the left wall of the basin with their bottoms facing outward. I store the tools on the right side of the sharpening bench or, if there are several, on the left end of the workbench on top of the Tormek cover.

IMG_0973_edited-2

Grinding on the Tormek is done first if needed, but most sessions involve only honing secondary bevels. I work through the succession of stones, spray clean each when done, and lean it against the basin wall. Depending on the number and types of tools being sharpened, I may go through all the tools with each grit, or bring one blade through the whole process. In any case, I avoid letting wet steel sit for long because corrosion can start quickly, especially in O-1 steel.

Some blades, such as a smoothing plane iron, get a light stropping with diamond paste on leather.

Before leaving the bench, I reflatten each stone on the bridge with the Shapton diamond plate (trying to forget what I paid for it, even when it was cheaper than now), then rinse and pat dry the stones, and store them leaning against the wall or the outside of the sharpening box. Later, I return them to their boxes.

Just about all of the mess and water is contained in the basin, which can be emptied now or later. Since I generally like a tidy shop, I wipe away any errant mess on the sharpening bench with a rag or paper towels.

I oil the tools as soon as possible. Most important, I get back to working wood with sharp tools as soon as possible!

Once again, I emphasize that this is the setup and system that works quite well for me. I have presented it in hopes that readers will find it helpful for anything from gleaning a few tips to using the entire design. In any case, as I always emphasize, craft is necessarily personal, and each woodworker must find what works best for him or her.