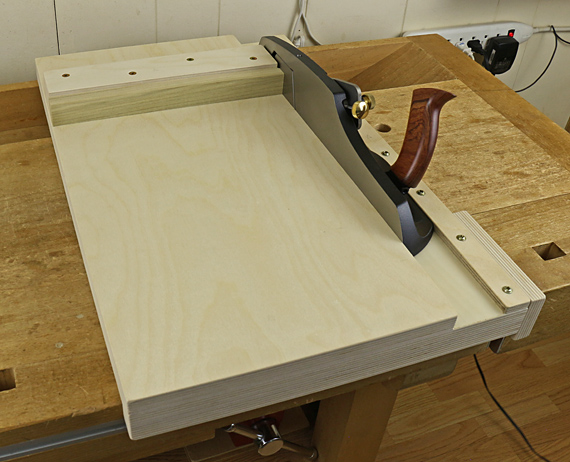
Here are the details of the shooting board I use. It is designed for use with the Veritas shooting plane, as well as to fit my workbench, the work I typically do, and my personal physical characteristics (I’m right handed).
It is constructed primarily from 18mm 13-ply birch plywood. The base and thus the overall dimensions are 22 3/4″ x 14 1/2″. The platform upon which the workpiece rests is 11 1/4″ wide, and is glued and screwed to the base.
The right side of the platform was planed accurately straight before installation. The tiny rabbet, which is the basis for how a shooting board works, is created with the first few passes of the plane that “break it in.”
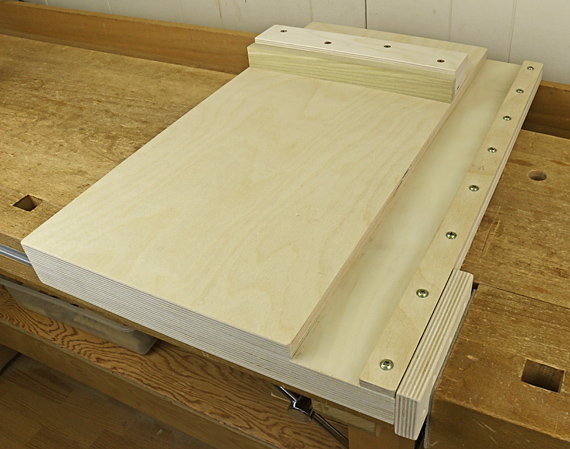
The cleat at the front, glued and screwed, hooks onto the front of the workbench. The cleat on the right side fits into the tail vise. Together, they give the shooting board rock-solid stability in all directions while in use.
The channel for the plane is about 2 1/8″ wide, and lined on the bottom with 3/64″ PSA UHMW plastic. The 9mm 7-ply birch strip, 1 7/32″ wide, on the right side of the channel is adjusted to create a snug fit for the Veritas shooting plane, and firmly secured with pan-head screws placed at 3″ intervals. It is not glued, so it can be adjusted if needed. The inside wall of the strip is waxed.
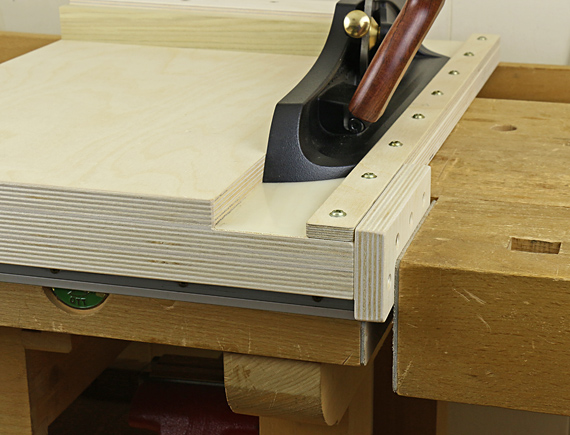
The fence block is 2 1/4″ wide, made from two glued layers of the 18mm plywood. It is glued and screwed square to the sole of the plane nestled in the channel. The 3/4″-thick (or 7/8″) poplar replaceable subfence is attached with two 3″ x 1/4″ lag screws that enter from the back of the fence block, accompanied by heavy washers. The pass-through holes in the fence block for the lag screws are actually small slots that allow for some lateral adjustment of the subfence. You may want to use a third lag screw to ensure the subfence is snug against the fence block.
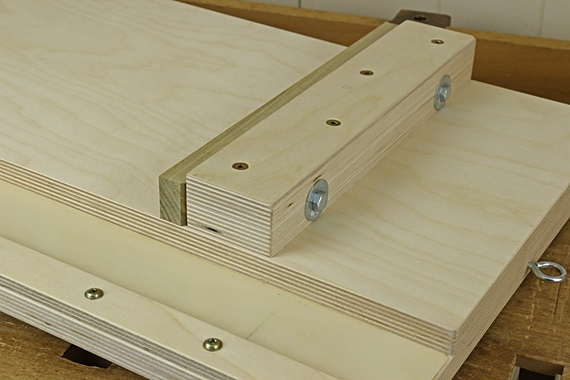
There are three ways to tune the 90° angle of the subfence. You can use whatever suits you; that is a big advantage of this design. Remember, we are using the in-place sole of the plane as a reference, not the channel edge itself.
First, when you create the subfence itself, you can easily plane it as needed – it’s friendly poplar. Then, when you attach the fence you have the chance to put very thin shim(s) between it and the fence block. Now, if you placed the fence block dead on and use a perfectly thicknessed subfence, you should not need to do this, but it is good to have the option! Finally, when in use, you can put a piece of tape or a shaving between the workpiece and the subfence to fine tune the working angle.
For angles other than 90°, you can make and attach a different subfence.
The front of the subfence is 7 3/8″ from the back edge of the shooting board. This gives more than enough length to fully support the 5 1/2″ toe of the Veritas shooting plane. I prefer the plane to have full registration against the channel edge all the way through the cut. There are many shooting board designs with the fence at the end, which causes the plane to lose full registration before the cut is completed.
Also, the 7 3/8″ works out to make the front of the fence not too far away from me, so I don’t have to lean forward too much, while still allowing the base of the shooting board to reach across the tool trough to get full support from the rear wall of the trough. This also results in enough platform depth to accommodate the vast majority of workpiece widths that I use.
The 11 1/4″ fence is long enough to firmly register almost all the work I do. You may want to make your shooting board wider. For any board longer than 20″ or so, I stack a couple of pieces of plywood under the left side of it to prevent it from tipping up at the working end.
The screw eye allows you to store the shooting board on the shop wall, away from abuse.
Remember:
- sharp!
- dynamic stability in use
- low-tech micro-adjustment
- and . . . the grippy glove on the left hand
I put a lot of forethought into this design, gathering ideas from many other designs. It has worked out very well for me. I hope it helps you with your work.
Addendum:
A plane such as the Lie-Nielsen #9 or a bench plane on its side can be gripped directly above and just behind the cutting edge. For these planes, a snug enclosed channel in the shooting board, such as shown here, is still very helpful but not essential. For the Veritas (or Lie-Nielsen) shooting plane where the grip is far behind the cutting edge, a snug channel is, in my opinion, a practical necessity. The grip location in these planes makes it too easy to get off track in the shooting stroke. Both systems work but I have come to prefer what I have detailed here for you.

Rob,
First, thanks so much for the time and effort you put into your post. I very much enjoy reading everything you post. One question in your write-up you mention a tiny rabbit the is created with the first few passes. Where is this rabbit. Thanks,
Jack
Thank you for sharing the details of your shooting board. It will be very helpful when I build mine.
Jack, that tiny rabbet is created by the blade depth as the plane runs against the straight edge (the right side) of the platform. It is created with the first pass or two with a new shooting board.
Using a sharp blade and conservative blade depth, run the plane in the channel. The blade cuts into the left wall of the channel (i.e. the side of the platform) but, of course, leaves intact (forever) the lower part of the wall upon which the side of the plane is running. Thus the “rabbet” is only a few thou deep.
Good luck with your shooting board, Pascal.
Rob
Thanks for the clarification Rob.
Hi Rob,
Long time reader, great post! I just rebuilt my own shooting board and feel that I will be putting an eyelet on my shooting board shortly. I had one question about your subfence. Do you change the subfence to match the thickness of the wood that you are shooting? If so, I neglected that sort of variability on my own shooting board and will likely be following your idea for that adjustability.
Thank you,
David
David, the subfence is replaceable/interchangeable depending on wear/workpiece thickness/angle. That’s a big advantage of the two-part fence.
The other advantage of the two part fence is being able to screw and glue down the fence block to create an absolutely rigid compound fence.
The subfence that I have in there now is about 1 1/8 tall and accommodates the vast majority of my work with the shooting board.
It is even possible to put in a bulkier subfence if you want, and use longer lag screws to secure it. Again, the two-part fence design makes these options possible and easy.
Rob
Hi Rob-
Thanks for the post.
I recently made 2 shooting boards. One is a “sloped” shooting board for smaller end grain and a larger one which I use for larger pieces and edge shooting.
Otherwise, they are similar to yours. two great takeaways from your post are the sub fence and the hook for hanging the shooting board. Great ideas!
Thanks again for all your sage suggestions.
— Steve.
Glad to hear the info is helpful, Steve.
Rob
Rob,
Thanks for all the info on a shooting board here – I have been looking around and think I am going to follow your lead here and build one for use with a Lie-Nielsen #9 I have had for almost 25-30 years.
Great, Matt. Note the addendum at the end of the post. The enclosed channel is helpful but not essential for a plane like the #9 that can be gripped directly above and just behind the cutting edge. If you do decide to make the enclosed channel, first check that the top of the sidewall of your #9 is parallel to the sole. If not, it should be easy to file it to make it so. This will ensure that the plane runs consistently in the channel without wobble.
Rob
Hi Rob,
For shooting case mitres, do you have a donkeys ear attachment you prefer? Or do you create a 45° ramp along the channel the plane rides in, to present it to the material at 45°? Let me know thanks, I need to build an attachment to shoot some case mitres this week!
Brad
Hi Brad,
I’m afraid I cannot be much help for this because I don’t like mitered corners except in frames. Just my taste; nothing wrong with them.
Only from playing with miter setups can I offer a couple suggestions. Designs that have the plane blade running on a horizontal surface with the workpiece slanted downward make it difficult to keep the surface being cut in good contact with the blade. Gravity is working against you.
The classic donkey ear with the workpiece on a downward slope is the better way, especially for shorter workpieces. Gravity is working with you to keep the surface being cut in good contact with the blade, which is critical for any type of shooting. (That’s why I’ve long suggested using a grippy glove on your left hand for all shooting.)
There are lots of designs for donkey ears on the internet. Note that the backstop fence is integral to the donkey ear attachment. You’re using the original fence on the shooting board only to square up the donkey ear to the plane track.
Hope this helps a bit.
Rob
Rob:
I just came across your site and appreciate the value of the information you put out. If you have the time to answer I have few questions:
1. Upgrade for the Tormak. I noticed that you have the 600 grid diamond wheel. I have the original SG-250 Grindstone. Even with the Stone Grader and Diamond Tipped Truing Tool this wheel cuts very slowly. The diamond wheel will stay true does it cut significantly faster? I’ll look doing your retrofit on the leather honing wheel.
2. Thanks for the tip on the set of 1:4 french curves. I too like to use gentle curves and to help with this I use a Dress Makers curve like this one:
https://www.amazon.com/Dritz-832-Styling-Design-Ruler/dp/B001BDEOVG/ref=asc_df_B001BDEOVG/?tag=hyprod-20&linkCode=df0&hvadid=193987317966&hvpos=&hvnetw=g&hvrand=9739545858794083819&hvpone=&hvptwo=&hvqmt=&hvdev=c&hvdvcmdl=&hvlocint=&hvlocphy=9030504&hvtargid=pla-309833519466&psc=1
3. I’m considering buying a veritas shooting plans. If I do I’ll build another shooting board. I like your plan but have a couple of questions about it. You incorporate a low friction base for the plane to ride on. Did you do anything to reinforce the little lip on the edge of the plywood after the plane cuts the ‘break in’ rabbet. I’ve tried a hard wood edging that can work in the same way as your sacrificial poplar stop.
Thanks,
Peter
Hi Peter,
I am so glad you are finding the site helpful.
To answer your questions:
1. The replacement wheel on my Tormek is a CBN wheel. Detailed information is here: http://www.rpwoodwork.com/blog/2017/08/01/cbn-wheel-for-the-tormek-grinder/
2. The dressmakers curves are interesting and may be more useful than most French curves for gradual curves. I like the adjustable Acu Arc curves when the French curves don’t work out. http://www.rpwoodwork.com/blog/2010/11/17/laying-out-curves/
3. I like the Veritas shooting plane. http://www.rpwoodwork.com/blog/2019/11/21/planes-for-shooting/
The “break-in rabbet” is very shallow – in theory only the thickness of a shaving or the depth of the blade projection. No reinforcement is needed. The sole of the plane rides on the remaining plywood, which consists of end grain, side grain, and glue, and thus is quite durable.
The poplar end stop serves a different function as can be seen.
I hope this is helpful. Thanks for reading.
Rob