Archive for ◊ November, 2013 ◊

Author:
• Friday, November 29th, 2013

IMG_1091_edited-2

Fellow craftspeople, shop dwellers, makers of things, maybe you can relate to this.

Tuesday afternoon was fun time at 13 years old. School let out at noon, and not long after, my friend and I would meet up at our fishing stream to catch sunfish, crappies, and perch. There was little art to it, just basic tackle, night crawlers, and red and white plastic bobbers. It was a decent way to spend youthful time.

My pal and I intermittently conjured ourselves to be real fishermen with serious skills, and more exotically, fly fishermen. We even earnestly tied a fair number of flies using some authentic materials, but with no real intent (or ability) to put them to use.

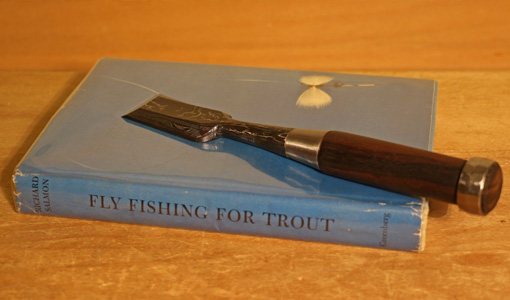
However, this kid stuff led me to borrow a book from the library that resonated so deeply with me that I never forgot it. A few years ago, while reminiscing about this, I used the internet along with a vague recollection of an oddity about the author’s name to locate a copy of Fly Fishing For Trout, by Richard Salmon, published in 1952.

As a young teen, it was my first encounter with the intricacies of how someone does something truly well, along with the driving passion. It stood in inspirational contrast to my naive efforts at fishing. I marveled at the author’s melding of scientific knowledge, meticulous attention to detail, and deep experience into superbly expert fishing skills. He described details of fish anatomy and physiology, subtleties of stream conditions, and nuances of equipment, all in the context of studied experience. This was serious stuff, even intimidating.

Perusing my copy now, I also appreciate the author’s peaceful, trusting tenor, and, nostalgically, the lack of today’s widespread ostentation.

I sensed then – and understand now – that this book reflected a deep desire in me – to simply do something very well. It is a joy for the soul to unboundedly immerse the mind, heart and hand in a meaningful pursuit.

No, I never took up fly fishing, but it sure is good to be in the woodshop.

From Richard Salmon, page 81: “For in fishing as in anything else, you must, if you are going to get results, have your heart in your work. The more joyous I am on a stream, the more enthusiastic, the heavier my creel. But to be happy and enthusiastic, I must believe in the fishing tools my hands control – must believe that I can work naturally, carefully, and well.”

Category: Ideas  | 2 Comments
Author:
• Wednesday, November 20th, 2013

IMG_1079_edited-2

Or a block plane? Answer: It’s out on the bench almost every time I’m working there. I don’t always know ahead of time what I’m going to use it for, but I know I am going to use it for something, and I know it will get the job done.

Really, this Bad Axe Hybrid Dovetail/Small Tenon saw is the most versatile backsaw I have ever used. The amazing aspect is not only how many tasks it can do, but how well it does them. It cuts wonderfully smoothly. For example, it is now my favorite saw for tenon shoulder cuts – a crucial crosscut, but it also does a nice job for small tenon cheeks – a rip cut.

Here are the specs of my saw, which I have been using for about three months: 12″ long, 0.020″ saw plate, 14 ppi, “hybrid” filing, depth under the back 2 1/2″ at the heel, tapering to 2 3/8″ at the toe. The hybrid filing is about 10° (negative) rake and 12.5° fleam. Remember ladies and gentlemen, BATW makes exquisite handles in a variety of woods in five sizes to fit your hand. As I have discussed in other posts, I also very much like the hang of BA saws.

This is the saw I recommend if you are working with small to moderate size projects and want to own only one backsaw that must be as versatile as possible but that will never be displaced by more specialized backsaws as you expand your tool kit. If you want to further specialize, Mark Harrell has a great offer to facilitate this (see the ninth paragraph down in the linked page).

There is a “soul” in these Bad Axe saws that I feel is very special. These tools improve my work.

There are excellent saw maintenance tutorials and learning materials on the BATW site. Mark also offers hands-on saw sharpening and maintenance seminars at BATW HQ that will doubtlessly take your skills to the way beyond.

Category: Tools and Shop  | One Comment
Author:
• Tuesday, November 19th, 2013

IMG_1081_edited-2

One of the most difficult aspects of learning and refining craftsmanship is understanding and sensing when something is just enough and not too much.

Consider sharpening a plane blade: sharper is better, at least within a practical range. However, the camber in the edge is a subtle quality – too little and too much are both detrimental to function. The craftsman must understand the purpose of camber for the particular type of plane at hand, as well as have a visual and tactile sense of when the amount is good.

In drawer fitting, proper preparation of the carcass is essential to good results. For this, we must go beyond the simplistic idea that it should be as square as possible, if for no other reason than achieving perfectly square is impossible, and thus we must understand how to bias the imperfection.

It will be much easier to fit a fine drawer with a nice action if the carcass interior is a bit wider at the back than at the front. It must never narrow in width toward the back. Different carcass types – solid wood, frame and panel, a table with drawer guides, etc. – will dictate different ways to create this adjustment, but there is always a way.

We are faced with the matter of “a little bit.” It is sweet for a drawer, especially a smaller one, to have an easy pull to start, then tighten against the sides of the opening as it is almost fully withdrawn. Conversely, it is a sour drawer that gets pinched at the back as it is almost fully pushed in, while the front is excessively loose in its opening. It just doesn’t seem happy to be there.

In building a small jewelry chest of drawers with a solid wood carcass with an opening about 16″ wide and 11″ deep, I incorporated the necessary tweak by shooting the end grain of the top and bottom pieces slightly out of square. I would not normally measure the amount. Instead, I work by feel and eye to get a sense of just enough width that will allow the drawer to move unencumbered in its housing after an initial struggle to enter it.

“But Rob,” you say, “enough is enough already! How much?”

OK, OK, I measured it using shims. The sides are each out of square by about 0.007″ over the 11″ depth, for a total difference between the front and back interior width of just under 1/64″.

More important, I think that will be just enough but not too much.

IMG_1085_edited-2

Pictured above: a direct comparison between the front and back widths.

Category: Techniques  | 4 Comments
Author:
• Saturday, November 09th, 2013

IMG_1072_edited-2

The teeth of a traditional woodworking float, very much unlike a rasp, span the full width of the tool. The cutting surface looks somewhat like a super-wide ripsaw. Iwasaki floats share some characteristics with traditional floats but have important differences in design.

These modern floats are remarkably smooth cutting and leave an amazingly smooth surface on the wood. They have almost no tendency to “catch” on the wood. They also allow great control to produce a true surface, such as in making fine adjustments to tenon cheeks. Aside from very hard steel and very sharp teeth, these floats have interesting features that contribute to their wonderful working properties. 

IMG_1073_edited-2

As you can see from the photos, unlike a traditional float, each tooth row is discontinuous across its width. Furthermore, each row is curved so that most of the cutting edges are presented to the wood at a skew to the length of the tool. Each gap in the row is followed by a cutting edge just behind it. In this way, these tools act similarly to a segmented spiral cutterhead in a thickness planer, which is also very smooth cutting and produces small shavings and tearout-free surfaces. 

This also helps reduce clogging in the floats. The wood that does accumulate in the grooves is easily cleared by tapping the tool or, more thoroughly, by brushing.

Click on the thumbnail (below) to see the macro photograph and note that below the leading faces of the teeth is a small curvilinear bump. This acts as a chipbreaker, further facilitating a smooth cut without tearout.

IMG_1071_edited-1

It is easy to get the feel of using these tools – use a firm but gentle approach to the wood. However, keep in mind that a skew is built in to the cutting edge. Since the tool is “pre-skewed,” your natural tendency to skew it as you would a rasp might work against you. If you use a skewed stroke, the actual presentation to the wood of one side of the tooth line is being less skewed and may tend to catch. The other side is being more skewed, and the tooth line may tend to slice along its length. This is more intuitive than it sounds and you will quickly work out an effective approach with the tool for the particular task at hand.

I’ve been using the 200 mm fine flat model for a few years now, and recently bought the coarse 10″ flat model. Even this, the coarsest grade, leaves a nice fine surface on the wood. The chamfer in the enlarged photo (below) is directly from this float.

IMG_1076_edited-2

Iwasaki floats come in coarse, medium, fine, and extra fine grades, and flat, half-round, round, curved, and plane maker’s models. Woodcraft, Lee Valley, The Best Things, and Highland Hardware have good, though different, selections. They’re a good buy.