Archive for the Category ◊ Tools and Shop ◊

Author:
• Saturday, December 31st, 2011

This installment includes questions from readers about the Shelix cutterhead, choosing a plane for shooting, and building a set of tools and skills. Also, several readers have noticed and asked about the tool cabinet in my shop.

I’ve been looking at the Byrd Shelix and can’t decide if I should get it for my 8″ jointer or my DW735 13″ planer. I can’t afford it for both.

The Shelix for the planer is the better option for almost all shops. Here’s why. The main purpose of the jointer is to produce a flat surface and an edge square to it. It does not really need to produce very good surface quality on the face of the board. The jointed face, even if it has tearout and missed areas, will register on the planer bed as the Shelix makes opposite face flat and parallel with excellent surface quality. Once that is done, the board is flipped over and the jointed face is cleaned up with the Shelix.

Tearout is rarely a significant problem when jointing the edge of the board. Even if there are some defects, they should disappear when the edge is handplaned, such as for an edge joint. Jointer defects can also be ripped away on the table saw after you have ripped the second edge parallel.

A segmented cutterhead is not a bad idea for a jointer, but the point is that it is far more valuable on a thickness planer.

By the way, hand planing to flatten the first face of a board too wide for your jointer is not so hard once it is realized that you do not need a perfect surface. You just need a hit-or-miss surface, however ugly, that registers on the planer bed without rocking. Then do the flip procedure as described above.

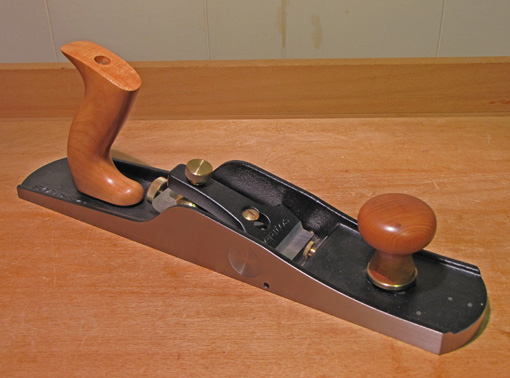
I recently bought Tico’s shooting board (the Super Chute 2.0). I didn’t want to buy a dedicated plane for shooting and thought a low-angle #5 would be a good choice. I also have a #4, #7, and a block plane.

A LA #5 would work very well and I think would be the best choice of the planes you have. For a plane for shooting, you want a lot of concentrated mass and a thick bevel-up blade which is supported close to its cutting edge. A #7 BU plane has more mass but may get a bit awkward on a shooting board of that size. A 6″ block plane is too small and light. Even the #4 is too light.

A dedicated heavy miter plane is the best choice if you can afford it, such as the Lie-Nielsen #9, which I use with the “hot dog” handle, or the new beast #51. However, even a bevel-down jack or jointer can be used successfully. Most important, use a very sharp blade. Add shooting to your repertoire and watch your capabilities grow.

A woodworker building his set of tools and skills asks: I’d like to add a new tool to my small collection of chisels, saw, marking gauge, and squares. You suggest buying a jack plane first but I already own a #5 and a small power thickness planer. Should I buy a second plane or a pair of rip and crosscut saws. Also, can you recommend a book for learning the basics of woodworking?

Because the jack plane is so versatile, I suggest that you not buy another plane for your next tool. More planes can come later. Instead, you would probably benefit most from buying saws for joinery. If your next project is a table, using mortise and tenon joinery, get a ripcut tenon saw for the cheeks and a crosscut carcase saw for the shoulders. If your next project is a box, get a ripcut dovetail saw to cut the dovetails and a coping saw to remove most of the waste.
Of course, you will need saws to prepare the stock. You will also need gauges, chisels, and so forth. Do not try to accumulate all the tools at once. It is better to choose a type of project that you would like to build now – stick and board construction such as tables, or case construction such as boxes or chests – and get the tools for that. In time, you will acquire more tools. Buy the best you can afford. It can be very frustrating to outgrow cheaper tools as your skills improve. It is much better to have fewer excellent tools than lots of cheap tools.

Start with manageable projects. A small, simply designed project that is well executed will be more satisfying and more instructive than getting overwhelmed with a project that gets out of control.

I suggest Peter Korn’s book, Woodworking Basics, as a very good place to start.

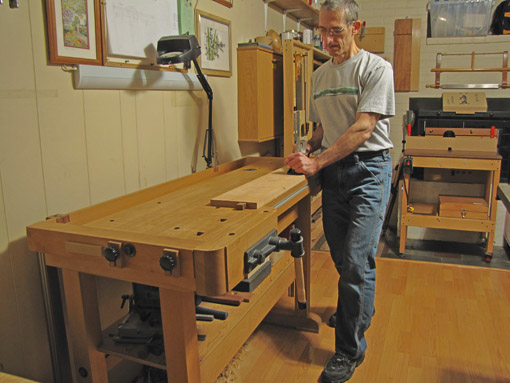
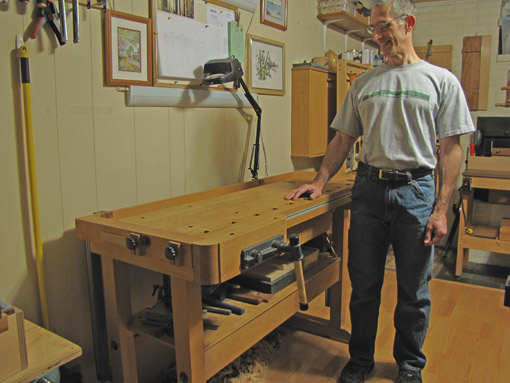
Regarding my tool cabinet, I will soon post about that. I’ve been using it for 25 years, and, though there are a few things about the dimensions that I would make different, the basic design has served me well.

Dear readers, I thank you for reading and for your questions. May 2012 bring you many happy hours in the shop!

Rob
Category: Tools and Shop  | 4 Comments
Author:
• Sunday, December 11th, 2011

A key question for any woodworker acquiring a basic set of tools is which handplane to buy first. As with all tool questions, the answer depends on the type of work you will do and your available money. Furthermore, these issues always involve a large dose of opinion because there are multiple ways to get jobs done in woodworking. 

For general furniture making, I suggest first get a jack plane. If you have a lot of money and can make a strong commitment to woodworking, go ahead and get a top quality set of these six planes: smoothing, jack, jointer, block, shoulder, and miter. For such a set of Lie-Nielsens, the cost would approach $2000 and, though surely worth it for an avid woodworker, is hardly a likely leap for a novice. Yet, you must start somewhere, and an incremental acquisition of tools, with adjustments based on the work you decide to do, is a reasonable path.

A jack plane is an excellent tool for stock preparation and can perform well, though admittedly not ideal, for smoothing, jointing, and shooting. As an only plane, a smoother would be deficient in truing work, and it would be very awkward to use a jointer for finish smoothing. Later, when you get the full set of planes, the jack will still be very useful. I originally used my Record jack for all those tasks and gradually got more planes. With a full complement of planes, I still use it more than any of the others and I also have a bevel-up jack.

The options are: buy a new Lie-Nielsen or other high quality plane, fix up a high quality vintage plane, fix up a mediocre new or old plane, or make your own wooden plane. With the exception of the first option or two, it is best to get a good aftermarket blade such as a Hock. The edge durability of A2 steel makes it a good choice for a jack. Keep in mind that the potential of a fixer upper will be limited by its inherent qualities such as the frog design, weight of the casting, and the adjustment mechanisms. 

Bevel-down and bevel-up both work. For either, it is helpful to have one or two extra blades sharpened to different angles and cambers to accommodate different work. You can shoot with a BD plane (I did for years) though for this a BU design has the advantage of a heavy blade that is supported very close to its cutting edge. A BU plane makes it easy to change to a blade sharpened to a higher angle for figured woods, but a back bevel can similarly be used on a spare blade for a BD plane. I find BU blades harder to sharpen, primarily because of the wear created in use on the flat side of the blade. To choose for an only plane, I’d go with the BD, but this is my bias. The bigger issues are quality, tool preparation, and skill.

Please don’t buy a block plane as your first plane, as is often recommended! While useful, it is far more limited than the jack. It is a one-handed tool used mostly for chamfering and small trimming work that can often be done with a sanding block. You cannot prepare stock with it, true surfaces and edges, or use it as a smoother. Step up to the big leagues right from the start and get the jack.

Even woodworkers who do almost all machine work will benefit from a jack plane. For most hand-machine blended woodworking, you could do quite well with a jack plane to joint the faces and edges of boards and a portable thickness planer to get the brute work done. Add saws, chisels, marking tools, clamps, sharpening equipment, and, of course, a workbench and you’re in business. Get a bandsaw soon.

Go make something – anything – and enjoy it!

Category: Tools and Shop  | 4 Comments
Author:
• Monday, November 21st, 2011

Here is a practical way to choose the height of the workbench that you are planning to buy or build: First, consider the tasks you will commonly perform at the bench. One height will not be ideal for all of them. So, prioritize them, and then try out heights for the major tasks.

I think this method is better than a formula. The most commonly quoted of these states that the top of the workbench should be at the level of your palm when you stand with your arm straight down with your hand extended forward, or simply at the level of your wrist. That might work for you but it might not. I know it does not work for me.

I dissuade you from using a simple formula because this is a personal matter like many aspects of craft. It is not only your height and arm length, but also your back, neck, eyes, posture, and style of work that come into play. The best way to integrate all these factors is to simply try out different heights. Here’s how.

First consider your tasks. As an example, here is my list.

Very common jobs, at which I often spend a long time: planing, sawing dovetails and tenons (sometimes using an auxiliary vise), chopping joinery (often while seated), shooting, scraping, sanding, and finishing.

Shorter duration or less frequent tasks: marking out, paring, sawing with the bench hook, and assembly.

Machine work at the bench: mortising with the router, Domino and biscuit joinery, and using a benchtop drill press and portable electric drill.

Maybe you do lots of carving or inlay, maybe you do all your joinery with machine jigs and the bench is mostly for fitting and sanding, or maybe you prepare all of your stock by hand, and so forth. Remember too, that workbenches are not saw horses; ripping and crosscutting stock to size with handsaws require much lower support.

The next step is to use a sturdy table, Workmate, or a friend’s workbench along with some clamps, and stack/remove 3/4″ or ½” plywood or MDF on it to create various heights to try out the tasks on your list. Pay attention to:

  • your posture – neck, shoulders, back, core, knees
  • reach
  • range of eyesight
  • how you tire
  • any physical limitations you may have.

Find what feels right for you. Your most common and long duration tasks should govern your final choice of height, along with some accounting for the other tasks.

If you are getting a new bench, you get to choose, of course. However, you can easily raise an existing bench by attaching blocks at the bottom. While lowering a bench is a bigger job, it can be done because you’re a woodworker.

There are other approaches. Adjustable height benches and plans to make your own are available which could be used as a primary or secondary bench. Japanese woodworkers do much of their work on the floor and on an angled heavy beam.

In summary, I suggest forget the formulas and trust yourself. You will, after all, be spending a lot of hopefully happy hours at the bench.

This is what works for me, but who cares, find what works for you!

Category: Tools and Shop  | 2 Comments
Author:
• Thursday, November 03rd, 2011

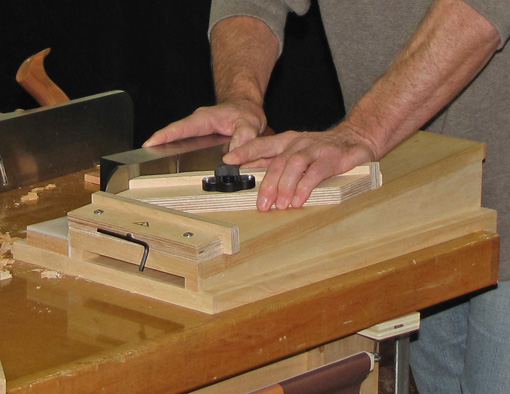
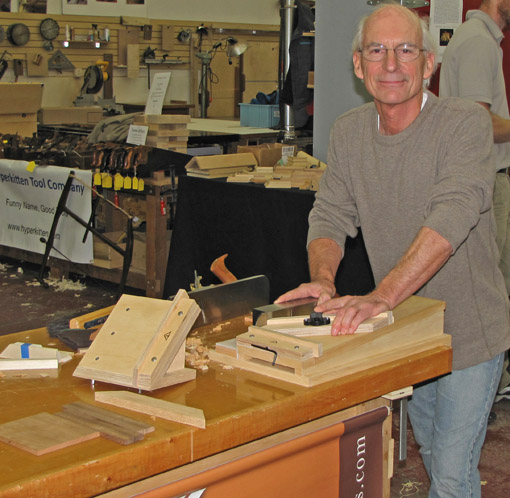
This is the best shooting board I have ever used. I believe it is probably the best available anywhere. Tico Vogt made it and he can make one for you – the Super Chute 2.0. A shooting board is an extremely useful, almost magical, tool that can greatly elevate your control of woodworking processes. After watching Tico develop and improve his version of this tool, I finally had a chance to use it last week at a Lie-Nielsen Hand Tool Event at the Connecticut Valley School of Woodworking.

That’s Tico in the photos using his Super Chute 2.0.

It was like slicing baloney with a sled on an ice track. Tico showed me the tool’s incredible quality details and nuances that only could come from a seasoned woodworker who knows from experience what really works in the shop. To elaborate on all of them here would make this post too long, but I will point out a few highlights.

The plane rides on a track of super-slick UHMW plastic. Importantly, the work piece sits on an angled bed which facilitates a strong stroke with the plane and distributes wear and cutting resistance over a greater width of the blade than a flat bed would. The 90̊ and instantly-installed 45̊ fences register in eccentric bushings which make their angles micro adjustable. The fences are also laterally adjustable to completely eliminate end grain spelching. To my mind, these user-controlled features respect the skill and intelligence of the craftsman using the tool. A donkey ear miter attachment that installs easily is also available.

Tico uses CNC technology and sources components manufactured with a high degree of sophistication to a produce a product with quality evident throughout. No, it’s not cheap; excellence never is. This is Lie-Nielsen-type quality in a shooting board.

A plane such as L-N’s sweet #9 makes shooting all the more of a pleasure but don’t feel you must have a dedicated miter plane to start shooting. A well-tuned and well-sharpened jack plane, bevel-up or bevel-down, can shoot very effectively. Shooting is a gateway technique, easily learned, that will allow you to produce precise ends on components of casework. It is a must for making precision high-end drawers with hand tools.

This review is unsolicited and uncompensated. I just think the Super Chute 2.0 is a heckuva tool.

Author:
• Tuesday, October 25th, 2011

Using a straightedge is easy, right? Yes, but it does pay to use a technique that is both practical and consistent with the tolerance to which want to work.

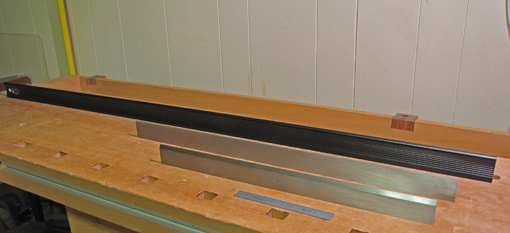
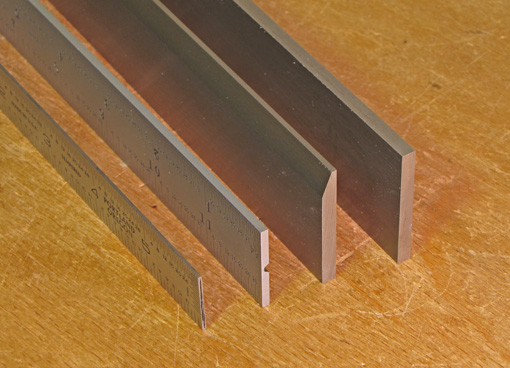
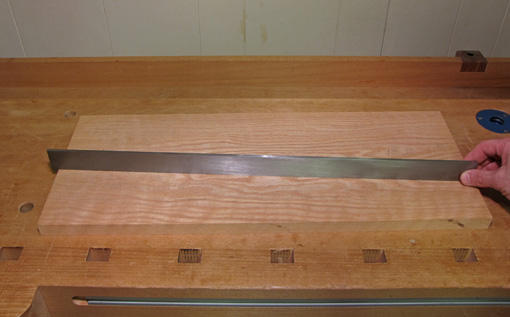
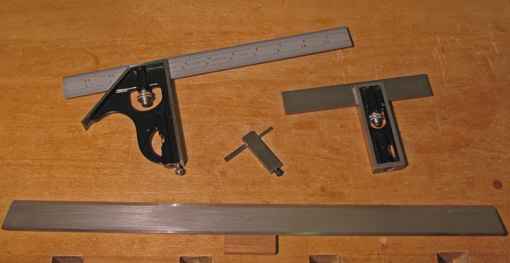
Pictured above are, from front to back, a 6″ Bridge City rule, the 18″ beveled Starrett #385, the 24″ unbeveled Starrett #380, and a Lee Valley 50″ aluminum straightedge. The photo below shows the thicknesses, from left to right, of the 6″ rule, a Starrett combination square blade, the #385, and the #380. The Lee Valley is about 7/16″ thick at its base. 

Let’s look at three techniques for using a straightedge and consider some of the related features of different straightedges.

1. Eyes won’t lie

This is the way a straightedge is usually thought to be used. You simply hold the tool against the surface and look for gaps against a light. Done properly, this allows the eye to easily detect gaps of 0.0005″ (half a thou) or less.

It is helpful to use a diffuse, linear background light, such as a fluorescent bulb, and a thin edge against the work, such as a beveled edge. If a wider edge is used, ensure that your line of sight is parallel to the surface. A false impression of accuracy will result if the light under a gap is blocked from view simply because there is an angle between your line of sight and the width of the tool’s edge.

This technique can be awkward and tiring because you have to hold the tool and the work up to the light, or bend and maneuver to view a stationary surface. It is good for testing a plane sole or other small, very precise work. The #385 or an accurate small rule are good choices. Avoid tipping the straightedge which can introduce errors caused by any slight bow of the tool along the length of its face.

2. Shim it, shim it again

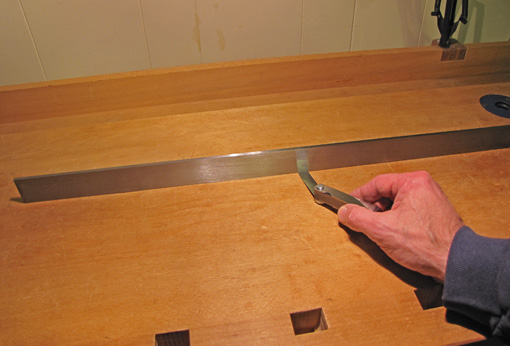
Here you lay the straightedge on the surface and use feeler gauges to seek out gaps. Look for hollows near the middle of the tool, but also press down near an end to check for gaps at the opposite end created by a bump somewhere in the middle.

A good way to work to a specific tolerance, say 0.001″ for a plane sole that you are lapping, is to put a leaf gauge under a wide-edged straightedge, and then gently pull the leaf to see if it drags the straightedge or slips through freely. The former indicates you are within tolerance (as long as there was no previous rocking of the straightedge), the later indicates a gap. Decide how large and where you can tolerate errors.

This technique is also handy to test a tablesaw top or jointer bed which you cannot lift and where bending is difficult or impossible to get your line of sight parallel to the surface.

The #380, or any tool with a similar wide edge, is a good choice for this technique.

3. Swing it easy

The first two techniques are slow and almost always overkill for wood preparation. So here’s the quick, easy, practical method that I suggest for dressing stock.

Set the straightedge on the wood, grasp and unweight one end, but do not lift it, and gently swing it along the surface. See where the tool “grips” or pivots. If it pivots just barely at the opposite end, the surface is slightly concave. If it pivots somewhere in the middle, you’ve got a bump. In woodworking, bumps are generally undesirable so you work with a one-sided tolerance, flat or a trace concave. You’ll quickly get the feel of this method.

Here is where a heavy, wide-edged, metal straightedge gives you a nice feel on the wood. The steel Starretts or the big Lee Valley aluminum work well.

This is convenient – no lifting or unclamping the work – and it quickly tells you what you want to know – that one-sided tolerance. It allows you to work in rhythm with your craftsman’s intuition.

In conclusion, the straightedge, while the simplest of tools, requires matching the technique to the task.

Category: Techniques, Tools and Shop  | Comments off
Author:
• Thursday, October 20th, 2011

It can be argued that a straightedge is unnecessary. When using a handplane, for example, a woodworker can sense the flatness of a board from the bite of the blade and the shavings produced as the work progresses. As another example, the ultimate test of an edge-to-edge glue joint is how the boards meet each other rather than an external standard. You would, however, mostly have to just trust that your planes’ soles, tablesaw top, jointer beds, and so forth are accurately flat.

As a practical matter, a high quality straightedge is a fundamental reference tool that is very useful in the shop and is easy to acquire. I prefer factory-made metal straightedges, but wooden straightedges can be made in the shop to a very high standard. 

Here’s a simple method:

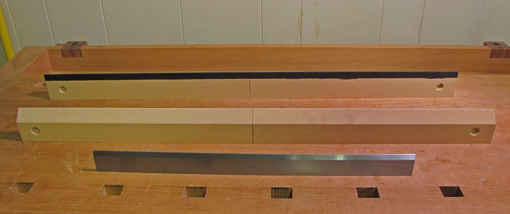
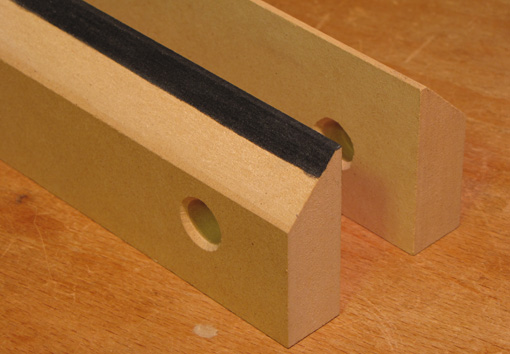
Start with two pieces of a stable, fine-textured wood such as mahogany or cherry, quartersawn, flat, with straight grain, about 2″ wide, 18″ – 30″ long, and 3/8″ – 1/2″ thick. MDF will also do. Join the two pieces face to face by clamping, or by pinning with nails or dowels that are snug but removable. Bevel a pair of adjacent edges to make each 3/32″ – 1/8″ wide.

Now plane both the thick and the thin pairs of edges as flat as you can. I think the easiest way to accurately plane the edges is to shoot them. Put the plane on its side, clamp the pair of sticks on a flat board with a pair of edges overhanging, and plane away. Uncouple the pieces and check the edges against each other.

You can start off by simply ripping each piece on an accurately set up table saw and then go to the planing steps.

Because two edges are being planed together, they will have the same type of inaccuracy – concave or convex – at the same places. The inaccuracy will be effectively doubled when you place the edges against each other and compare them against a lighted background. [There is no realistic possibility of creating a falsely acceptable result by producing one concave edge which happens to mate with the other edge being symmetrically convex.] Work until you achieve whatever level of accuracy that you think is practical for your work.

You now have made two straightedges AND a pair of winding sticks!

I made the 30″ winding sticks, pictured above, from 3/4″ MDF. Only minimal planing was required to refine tablesawn edges. They’re good to about 0.001″ over their lengths. I use them only as winding sticks, which is another topic for another time.

For straightedges, I like steel and, in some cases, aluminum. A quality metal straightedge, such as a Starrett, is accurate to an extremely high tolerance and has the advantage of durability. I like the weight, contact feel, and affordability of a steel straightedge in lengths up to 24″. For longer ones, aluminum keeps the weight and cost down. Properly cared for, these tools will last a lifetime.

Next: a selection of straightedges and techniques for using them.

Category: Tools and Shop  | 4 Comments
Author:
• Tuesday, September 13th, 2011

When I want an absolutely reliable reference measuring tool, I reach for a Starrett. It’s that simple.

We’ve all had our frustrations with tools that seemed promising when new but proved to be deficient in design or construction and thus do not perform. I particularly avoid tools that are unnecessarily complicated or are merely solutions chasing a problem. Worst of all are tools that are made just to be pretty. On the other hand, don’t get me wrong, there are some great small-scale toolmakers out there making high quality, useful, and often innovative products.

Reliable primary references for straight and square are necessities in the shop – specifically, a straightedge at least 24″ long and a combination square (a large machinist square is a more expensive and less versatile alternative). Don’t skimp on quality for these; they are lifetime tools. Get Starretts and be done with it. (A flat reference, such as a granite surface plate, though not a must, is also helpful and can be had economically.) My Starrett tools include a 24″ straightedge, a combination square with a hardened head and 12″ and 18″ blades, a 6″ adjustable square, and several others that would be considered more optional than basic.

The integrity of most shop procedures and tools can be traced to verifications using these reference tools. Examples are a flat jointer table with a square fence, the soles of handplanes, a table saw crosscut jig, shop-made jigs, and so forth. Things such as these allow you to start a project on a reliable basis rather than dealing with fundamental inaccuracies that will be carried like an infection through the building process.

Top grade straight and square reference tools are like the Constitution of your shop and you’re the Supreme Court.

Starrett is a solid American company with a proud history, and is technologically current and innovative. They continue to manufacture most of their precision tools at their Athol, Massachusetts plant, working to unsurpassed tolerances. Every one of their measuring tools that I own or have seen has been exquisitely well finished. A Starrett is a mensch at the bench.

Author:
• Friday, August 05th, 2011

As discussed in the previous post, one of the keys to successful work with the jack plane is the use of a vigorous diagonal stroke. To stabilize the board from the pressure in multiple directions, I like to use Veritas Bench Pups, Bench Anchors, and Wonder Pups in various configurations, usually along with regular bench dogs, as shown in the photo above. Other options for use of these handy devices and shop-made stops at the right and left sides of the workbench are discussed in these two earlier posts.

Beware when planing thin boards, say under ½”, which can flex. It may be necessary, for example, to place shims, such as blue tape or veneer, under a convex surface facing the bench for a similar reason that you would not place a non-flat surface on a thickness planer machine bed. Likewise, it is often necessary to place shims under the high corners of a twisted board.

To set the blade projection, I use these steps: I sight from the front of the sole, with light adjusted to reflect off the thin flat at the rear of the mouth (I file that flat when I set up a new plane). I advance the blade enough to see it to correct the lateral adjustment, then back off the projection to a minimal amount. I start stroking the plane on the wood, back and forth, gradually advancing the blade, often using my left hand on the feed screw and my right on the tote. I’ve found this method gives better results than using sight alone, or running a narrow scrap against the blade.

The long infeed length of the Veritas BU jack makes it feel almost like a jointer. It’s easy and natural to move the plane back and forth rapidly without lifting it, like scrubbing the wood. This gives excellent tactile feedback to be able to sense when the surface is approaching flatness.

The Veritas BU jack has some other nice features. The lack of a cap iron (“chipbreaker”) makes swapping blades very easy. I find the little set screws on each side of the plane near the mouth help to quickly position the new blade. The mouth opening can be adjusted in seconds to accommodate different shaving thicknesses. This is far easier than adjusting the frog on a bevel-down plane. I also like the Norris-type combined feed and lateral adjustment mechanism, though some woodworkers do not.

I strongly suggest getting rid of the awful handles that Veritas puts on their planes and get a set from Bill Rittner – I think you will find that they dramatically improve the feel of the plane.

These features make the Veritas BU a good choice for your workhorse jack plane. That said, I also have a 30-year-old Record #5. They each have their advantages, I use both of them regularly, and will not be parting with either. If you want me to declare a winner, I can only say that there’s more than one good way to do most everything in woodworking. I hope these posts will help you find your way.

[These endorsements are unsolicited and uncompensated.]

Category: Tools and Shop  | 2 Comments