Here’s how to make the joint described in the previous post.
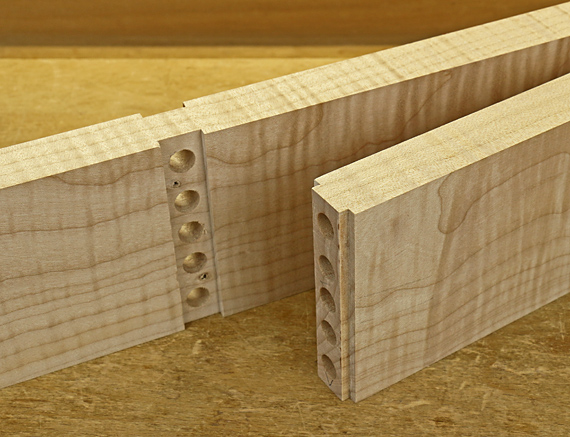
The joint starts with back-to-back dados. These must be precisely aligned because the dowels that extend across the joint will afford virtually no wiggle room when the tongues enter the dados. I didn’t take a photo of the dados before I drilled the holes but you get the idea.
For the 7/8″-thick stock used here, the dados are 5/8″ wide and 1/8″ deep. This leaves a 5/8″-thick web through which the holes will be drilled. Since the 3/8″-diameter dowels are 2″ long, there will be 11/16″ of dowel length to penetrate the long grain of each of the two tongued components.
For a 1/2″ dado, I would use 5/16″-diameter dowels to leave enough meat around the dowels in the tongued components.
How you make the dados is up to you, but accurate stock preparation is important for all methods. Handwork is doable: knife the lines, square them around to the other side, saw, chop the waste, pare the walls, and router plane the floor.
For machine methods you will be referencing from both long edges, so they must be exactly parallel. I used a 5/8″ downshear router bit, and a sled to move the work across my router table. A dado blade in the table saw would also work.
I used the same router bit and the router table to make the tongue in the other two components, sneaking up on the length and width to get a tight fit. If you make the tongue too long, or later reduce the depth of the dado with finish planing, it is easy to correct this by shooting off the excess tongue length. Just make sure the tongues are not too long (it’s a one-sided tolerance), which would prevent the shoulders from meeting neatly.
So, now that we have the double dado joint, we are going to bind the whole thing together with dowels. Note that the glue surfaces in the tongued components are long grain-to-long grain. That, plus the multiple mechanical locks make this a very strong joint. Here is “half” of the joint:

Next: Making and using a simple dowel jig to make precisely aligned holes in all the components.

Interesting joint. As you said must be very strong. Could you get away with just three dowels instead of five?
Pascal,
I guess so but it wouldn’t be as strong. There would be less glue surface and less cross-sectional area connecting the tongued pieces. I think four dowels would be the lower limit for these pieces, which are 3 3/8″ wide. I’ll try to get the rest of the construction posted soon.
Rob