• Wednesday, December 31st, 2014

For a craft or any pursuit that is meaningful to you, to do it really well, you must grant yourself freedom. And that takes courage.
Category: Ideas
| 4 Comments
For a craft or any pursuit that is meaningful to you, to do it really well, you must grant yourself freedom. And that takes courage.
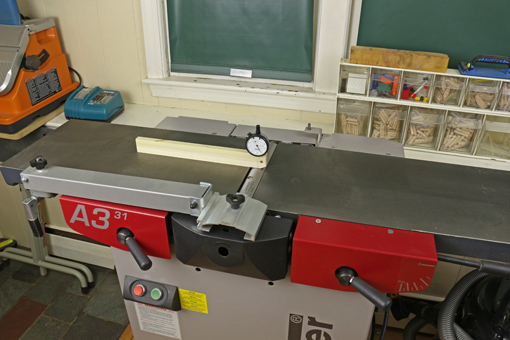
After the posts on jointer-planer combination machines and the Hammer A3-31, some readers emailed questions about how to align the tables and knives so the jointer does what it is supposed to do – produce flat, straight surfaces on wood.
Here are the steps in tuning jointer tables and knives. The methods of adjustment will, of course, depend on the make and model of your machine, but hopefully this will clarify the overall logic of the process. Methods specific to the A3-31 are entered within brackets.
1. The cutterhead rotates on its axis. This is the reference to which all the other parts must be aligned.
Further, the tables should be flat. Of course, they are not perfect but if they are pretty good – not dished/bumped/twisted more than a few thou – then go with what you have. Some localized imperfections will cancel out with the procedures described here. In any case, practical woodworking, not perfection, is the goal.
2. Check the parallelism of the cutterhead block to the outfeed table. This step is often neglected. Make a wooden holder for a dial indicator as shown in the photo. Alternatively, a feeler gauge and the stock of a square can be used but this is awkward.
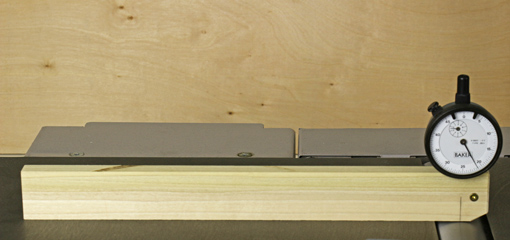
The reading is noted when the tip of the indicator is at the top of the cutterhead circle (i.e. its most retracted reading) at several points across the width. Use the same portion of the circumference of the cutterhead for all of the readings to negate any imperfections in the roundness of the cutterhead.
If the indicator readings are not consistent across the width, the tilt of the outfeed table on its long axis must be adjusted to make it parallel with the cutterhead. My outfeed table is parallel to the cutterhead within half a thou across the full width.
[On the A3-31, the two M12 x 1.75 bolts on the handle side under the outfeed table are adjusted. Calculate the amount of turn required and work from there rather than guessing. You should not have to adjust from the hinge side for this.] Other jointers may require shimming where the table and base castings meet on one side.
3. Adjust the height of the outfeed table relative to the knife arc. The knife arc should be consistent for all three blades and all across the cutterhead. On most jointers, this is adjusted by means of jackscrews in the blade holder. Really you are making the knife arcs consistent with the cutterhead, which previously has been determined to be parallel with the outfeed table. Aim for the top of the knife arc to be a thou or two above the infeed outfeed table using the method described in this post.
Hopefully, you are in the range of requiring only small adjustments of a few of the jackscrews. However, if it is way off for all of the knives, the outfeed table should be adjusted as a unit. [For the A3-31, this latter adjustment is found under the left side red plate. Page 33 of the User Manual shows where it is and how to move it.]
At this point, you should have a cutterblock parallel to the outfeed table, three knife arcs also parallel to the outfeed table, and the top of the arcs should be about .001 – .002” above the outfeed table. Only now should you turn your attention to the infeed table.
Note that wear of the knife edges may later require very slight adjustment in the overall height of the outfeed table. However, the parallelism should be retained.
4. Make the infeed table parallel to the outfeed table across their widths. Assess this just at the cutterhead-end of the infeed table. Use the dial indicator jig or place a 12” straightedge on the outfeed table and extend it past the cutterhead just an inch or two over the infeed table.
Adjust the infeed table using the regular depth-of-cut lever to about the shallowest cut. Observe the dial indicator or use a feeler gauge under the straightedge to check across the width of the infeed table for parallelism of the tables. If the tables are out of parallel, it is easiest to retain the outfeed table settings and adjust the tilt of only the infeed table along its long axis.
[On the A3-31, adjust the two M12x1.75 bolts on the handle side under the infeed table. Again, calculate the amount needed and work from there rather than guessing.] Other jointers may require shimming where the table and base castings meet on one side
5. Finally, adjust the infeed table so the infeed table and the outfeed table are parallel along their lengths. Assess this with the longest, best straightedge that you can find. You do not want the tables tipped in toward each other at all (like a V), in my opinion. You want them parallel or, if anything, a trace tipped away from each other (like an A).
It is easiest to retain the outfeed table settings and make the adjustment only on the infeed table. It is tilted on its short axis only by making equal adjustments on both sides of the table so as not to disturb what was accomplished in step 4. Again, the specifics will vary among machines. The intent here is to explain the overall logic.
[To adjust this on the A3-31 you have to work on both sides of the infeed table. On the near side are the M12x1.75 bolts. On the hinge side there are M10x1.5 set screws, accessed under the plate cover. To make a directed adjustment, rather than by trial and error, there is some geometry required. The Hammer manual does not cover this. I’ve done the geometry and it works but to write and diagram it is beyond the intent of this post. Hey Hammer, how about updating that 2005 manual to reflect the current model machine!]
The object of all of this is to get the machine to produce surfaces within the tolerances you need for the work you want to do. That is the answer to the question of how precise these adjustments need to be. Practical woodworking, not perfection, is the goal.
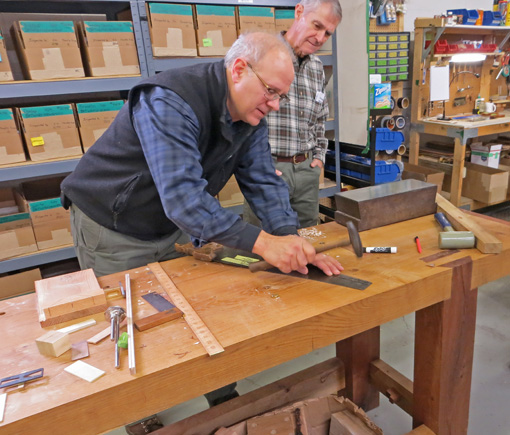
I recently had the wonderful experience of attending the two day seminar on saw sharpening and tune up at Bad Axe Tool Works, along with about a half-dozen other enthusiasts, presented by BATW owner and founder Mark Harrell who was assisted by his impressively skilled crew. I learned a lot, starting with the realization of how much there is to learn.
Several key aspects of making a world-class saw stood out.
First, and I think foremost, is hammer setting the teeth. For a very long time I stayed away from even the best available Western backsaws, instead preferring Japanese saws. The best way I can describe the problem that I felt with the Western saws that I tried was an annoying subtle vibration or tension at the bottom of the kerf.
Bad Axe saws are decidedly different. They transmit a palpable sense of resolute ease and smoothness as the saw cuts, which, frankly, raises my confidence as I track a layout line. The teeth undergo sophisticated hammer setting that relieves them of the stress and saw plate distortion induced by merely bending over the spring steel teeth, problems that ultimately transmit unease to the hand of the sawyer.
Second, I learned how the folded sawback does more than merely add weight and stiffness to the saw plate. It almost magically contributes to making the toothline dead straight. In fact, it can be rather easily adjusted if needed to straighten an errant toothline. This is quite different from the saw plate being fixed in a sawback with a milled slot.
Further, all of us were especially grateful to learn that excellent saw sharpening does not have to be complicated. Mark coached us through real deal sharpening techniques that we could bring home and directly use in our shops. What a relief! In particular, we all saw the value of Mark’s “hybrid” sharpening pattern that uses intermediate rake and bevel (fleam) angles to produce a toothline that is remarkably versatile in the shop.
As I thought more about what I learned that weekend, a couple of rough analogies came to mind. In writing and classes on sawing technique, I emphasize how core stabilization and balance are essential for steady ease and control of the distal motion of the hand and saw, somewhat similar to the how tension of the heavy folded sawback produces precision at the toothline.
Producing these saws involves automated steps early in the process with increasing amounts of hand skills that infuse exquisite quality, culminating in sharpening. This is analogous to how most of us make high quality woodwork. We prepare stock with machines but the special quality comes from skilled handwork.
In summary, the seminar brought me to appreciate the depth of understanding and refinement of craft for each element of making the saw, and I could see how it all comes together to produce the saw performance I have been experiencing. And of course, the customization options available from Bad Axe are irresistibly cool.
Without doing controlled side-by-side tests, I have had the opportunity to try at least one backsaw by almost all of the high quality American and Canadian makers. I generally shy away from superlative statements but here goes: these Bad Axe saws are hands down the best. And they are indeed tools with souls.
Above, Mark Harrell is finishing work on my 14″ sash saw and yea, I’m happy.

In previous posts, I discussed nagura stones in general and presented a rationale for a diamond nagura. Here is a report on the development of a diamond nagura.
Pictured above on the right is a makeshift first attempt produced by cutting down a DMT 1200 diamond stone. The polka dot surface reduces sticking to the finishing stone but improvement is needed.
The other two naguras were made by routing 5/32″ wide x 1/16″ deep channels in 1″-thick ABS plastic, sawing out 2″ square blocks, and applying PSA diamond sheet to the prominent surfaces. The one on the left is 300 grit and the middle one is 1200 grit.
These channeled diamond naguras work much faster that any other nagura I have used and sticking is completely eliminated. The square pattern of channels allows the user to intuitively retain slurry on the stone or sweep some of it away to produce the desired surface ready for sharpening.
So, returning to the rationale for a nagura, at least two definite nagura functions are expedited: the improvement in “feel and ride” of the blade on the finishing stone with the slurry, and “refreshing” the surface of the stone by removing metal and glazing. Removal of defects on natural stones and perhaps even some localized flattening are also facilitated.
Several questions remain:
1. Does the slurry actually cut steel? I don’t know for sure but the slurry and the action of the nagura are still useful for the other reasons stated.
2. Does the diamond nagura crush the grit particles released from the finishing stone to produce finer particles that cut steel either in the slurry or lodged in the stone surface or both? The lodging effect can be somewhat likened to powdered silicon carbide lodging into a steel flattening plate (kanaban).
3. If that is so, does a 1200 grit nagura crush better and produce finer particles than coarser grits do? As I have mentioned in the past, my sense is that the crushing is real, enhances sharpening, and is indeed better with 1200 than with coarser grits.
In any case, the 1200 diamond nagura test model feels much more friendly on the finishing stone than does the 300 version, which feels too scratchy and harsh.
4. Are diamond particles breaking free from the nagura and thus becoming available to score heavy scratches in the tool? A sharpening stone expert alerted me to this possibility with 1200 grit diamond. So far, I have not noticed this in testing with the 1200 model but I did feel it once using the 300, though the latter diamond film is lower quality.
I wonder if DMT’s “Hardcoat Technology,” which they use on their 95 micron/160 mesh diamond Lapping Plate, could be applied to 1200 grit to safeguard against this potential problem.
In summary, progress has been made but there is more work to do.
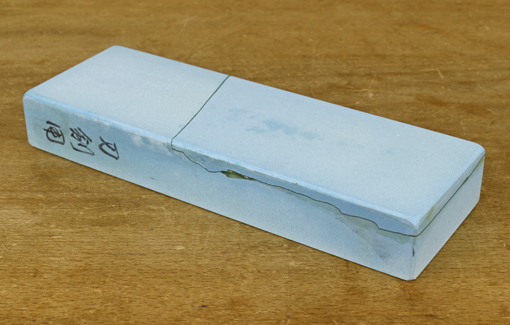
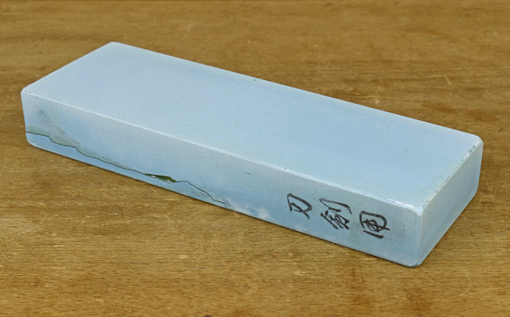
I still think the Naniwa Chosera 10,000 is a great finishing stone for all the reasons discussed in an earlier post but unfortunately it developed a large crack across the lower area after drying from a sharpening session. Fortunately, the loose area cleanly separated with a light tap with a chisel. I epoxied it in place with System Three T-88 and flattened both faces. The top face is uninterrupted and the stone works fine.
So what happened?
Over months of using the stone, I had gravitated to a soaking time of 15 minutes before use, though never longer. Searching the internet produces different recommendations from knowledgeable dealers and users: 15 minutes, at least 10 minutes, 5-10 minutes, no longer than 5 minutes, and some suggest no soaking at all. Everyone agrees that the magnesia binder, which contributes to the excellent feel of these stones in use, will not withstand prolonged soaking. There is also no doubt that the stone should be allowed to air dry slowly and evenly, which I did consistently. There are reports online of hairline cracks and major splits like the one in my stone.
The stone certainly absorbs water and so does not work as nicely in a splash-and-go mode as does a Shapton. As a practical matter, I found that soaking it for, say, 5 minutes is not much better than not soaking at all – it still pretty quickly drinks in the little puddle of water placed on it. This happens a bit slower after a brief presoak but also slows down during the sharpening session even without a presoak.
So, to play it safe and practical, I no longer presoak the stone. I just puddle some water on the surface and work from there, adjusting as necessary. This works out just fine. It’s still a very cool stone to sharpen on and produces excellent results, but I just wanted to give readers a heads up on the potential for cracking and how I chose to deal with it.
By the way, Naniwa now sells the Chosera line as the “Professional Series.”
Many woodworkers, knowing the joy that tools can bring, will give gifts of toy tools to young children, their own or those of relatives and friends. As Christmas approaches, here are some thoughts on the matter.
First, toy tools that actually do something are much more exciting than toys that resemble a tool but are capable of nothing. For example, a thing that looks like a power drill but can make only noise soon becomes boring – and boring is bad for kids and everyone else. A toy handsaw that cannot cut anything is likely to be quickly abandoned, while a toy saw that can cut something, even a potato, is much more fun. Within the range of age-appropriate complexity, even a simple active toy beats an elaborate passive one.
Second, toys that have open-ended tasks are more stimulating than those with narrowly defined tasks. For example, something like the classic wooden peg pounding bench is great fun for very little kids. Soon, however, the developing child will probably have a lot more fun with a tool for which he can decide the use instead of being restricted by the design of the toy. A saw that cuts or a set of little wrenches is limited only by imagination. Of course, you must consider safety and the potential for your home to get destroyed.
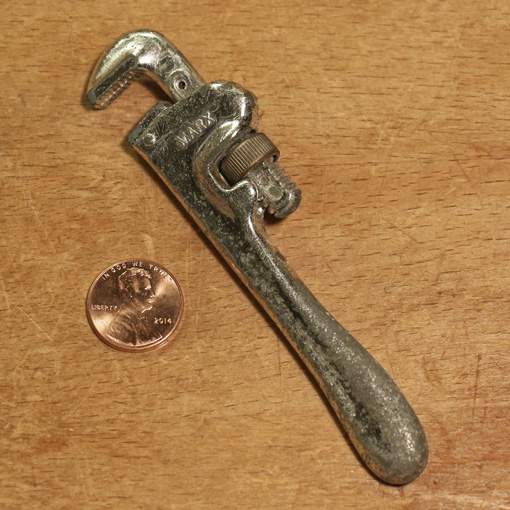
After all, that feeling of unboundedness and the swell of imagination are what tools are about at all stages of life. I remember somewhere in the early 1960s the now long-defunct Marx toy company made a line of miniature toy tools called Pocket Tools. Does anyone else remember the TV ads, “Uh-oh, dad ran off with his Pocket Tools again”? I carefully considered the capability of each tool in deciding which ones to ask my parents for. I wanted the tool, albeit a toy tool, to do something. The little Marx pipe wrench in the photo above, dear to me, really, really works.
Finally, what about a first real woodworking tool when your little boy or girl is old enough? I suggest a coping saw. Attach an inexpensive portable clamp-on vise to a sturdy table or countertop to secure the wood so both hands can stay on the saw handle. Get some pine wood and a bottle of wood glue and you’ve opened up unlimited possibilities. Spend time together; you are the assistant. Ensure safe work habits.
Merry Christmas/happy holidays to you and yours, dear readers.
