Now for a look at the parts and systems of the Hammer A3-31 that can be adjusted and tuned, with particular consideration to the ease, accuracy, and durability of the adjustments.
Jointer beds
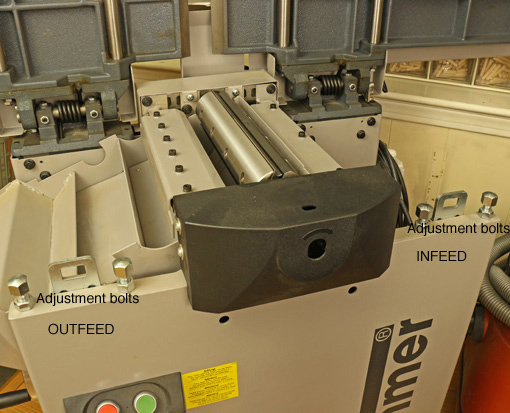
When the machine arrived, the beds were slightly out of parallel to each other across their widths (i.e. in twist) – by .006″ over the 12″ width. Not bad, but having seen the potential in the excellent flatness of the beds, I wanted to improve their alignment.
Since the alignment of the outfeed table to the knife arc was fine from the factory, the twist was easily removed by adjusting only the two bolts (see the photo above) on the operator side of the infeed table to make the tables parallel within .001″.
Next, using a long straightedge, I determined that the infeed and outfeed beds were tipped along their lengths toward each other. The gap at the middle was 0.018″. To my mind, this is like have a concavity along the full length of a jointer plane sole and would make accurate jointing difficult at best.
Again, the correction was made by adjusting only the infeed table. This was a more complicated adjustment involving the pair of bolts on the operator side and a pair of setscrews, accessed under a removable panel, on the hinge side. Each of each pair of screws must be adjusted by a different amount. To make a long story short, I did a little trigonometry to prevent having to do it by trial and error. The result: cha-ching! The beds are parallel along their length within .001″.
Unfortunately, the Setup Guide, which covers these adjustments and is available as a pdf on the Hammer website, is out of date (copyright 2005). It references an earlier design of the machine and much of the adjustment parts have changed. Fortunately, Hammer makes knowledgeable technicians available by phone who were generous with their time in helping me understand the machine.
I called Hammer this week in anticipation of this post, and they favorably received my suggestion to update the Setup Guide. The User Manual, included in print with the machine and also available online, is more current and clearly explains assembly, basic adjustments, operation, maintenance, and so forth.
Planer bed
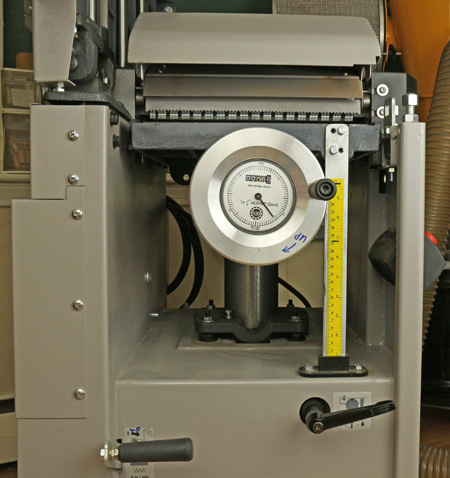
I tested this on a performance basis by planing an 11 3/8″-wide board, and by planing two narrow sticks simultaneously sent into the planer at the outer width of it. From the factory, the planing parallelism was within one thou. Wow! This is adjustable if ever needed.
Digital handwheel
This accessory, which I have found very helpful, was calibrated using the information in the Setup Guide. Reading it takes a bit of getting used to because the numerals indicate decimal inches while the hash mark increments are actually metric that approximates imperial. It is really not a problem though.
Fence
Setting up the fence accurately went according to directions, though it does take some care. To maintain a consistent angle, it is important when adjusting the side-to-side position of the fence in use to hold the sliding bracket down firmly on the extruded track while tightening the knob.
In summary, the A3-31 can be tuned to a high degree of accuracy. There are some finicky steps for those who want to tune it really well. Some documentation is lacking but help is available.
The most welcome feature is that the adjustments hold solidly over time and when converting back and forth from jointer to planer mode. This is invaluable.
Next: one more installment – knife changing and an overview.

I am really curious as to how thin you can plane with this machine. Many planers can do not much less than 8 mm (1/3), the DW will do about 3 mm (1/8). How about the Hammer?
Émile,
I use a simple auxiliary bed to plane thin pieces with any planer. I use ¾” MDF because it is extremely flat and consistent in thickness. I attach a wooden cleat that hooks over the outer edge of the infeed table.
In this manner, the limiting factors for how thin a piece can be planed include: the nature of the feed rollers and drive mechanism, the blade set up, the species of wood, and the nature of the grain of the wood. If the wood is too thin, or not straight grained, or the feed rollers are too harsh, etc., the piece can get shredded by the planer. This is potentially dangerous.
In this manner with the A3-31, I have successfully planed straight-grained ash, a few inches wide and a few feet long, to under ⅛” for use in bent laminations.
Ultimately you will have to use your own judgement in this, but that is how I do it.
Rob