These saws solve problems.
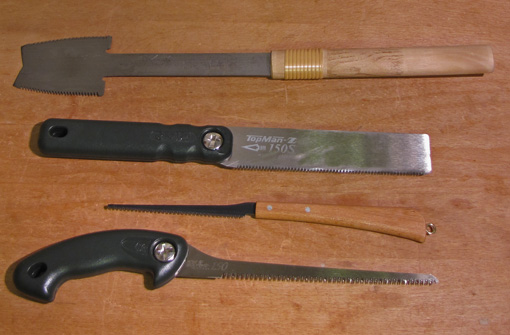
The Japanese azebiki saw, at the top in the photo, has curved tooth lines designed to start a cut in the middle of a board. One side is rip, the other crosscut. The neck is thicker toward the handle, which, along with the short cutting length, makes this saw fairly stiff for a Japanese saw.
The azebiki works well cutting against a straightedge wood guide to make kerfs for starting grooves and dados, including sliding dovetail sockets. Use a chisel to clear the waste and a router plane to true the bottom. I prefer an electric router for this work but sometimes it is too risky or awkward, so it is good to have hand tool options.
For all sorts of odd small-scale sawing tasks, the azebiki saves the day. It is inexpensive and worth having in the shop.
The Z brand 6″ keyhole/compass saw (S-150), at the bottom in the photo, has Japanese three-bevel crosscut-style teeth (17 tpi) with variations in the set to help clear waste. This saw cuts more smoothly than other Japanese and Western keyhole saws that I have tried.
At .035″ thick, it is stiff enough to maintain control when sawing curves, as long as the stock is not too thick. Of course, it cuts on the pull stroke, which occasionally is a disadvantage when jabbing into a small hole to start a cut.
I bought the skinny keyhole saw with the wooden handle many years ago, and it hangs around waiting for an odd situation where there is only a tiny hole or narrow slot to sneak into with the nose of the saw. It would be expecting a lot for a saw of this size to cut smoothly, and indeed, it does not.
The little guy keeps his place on the roster because, though infrequently, he continues to make plays when needed. And he doesn’t take up much space on the bench.
Second from the top in the photo is a Z brand flush cut saw (S-150). You might not need this type of saw if you use the trick I discussed in an earlier post, but I still like having it as an option. The .016″ thick plate is very flexible, so it can be bent to allow the handle to be lifted away from the work surface, as you use the fingers of your other hand to press down on the saw blade.
To prevent scratching the work, the three-bevel crosscut style teeth (21 tpi) have no set whatsoever. I prepped the saw by lightly working each side on a medium sharpening stone to ensure that any trace of burr would be gone. As discussed here, binding can be a problem with this saw but it works well enough for shallow cuts.
Z brand saws are well made. The replaceable blades are inexpensive, so there is no worry if you occasionally abuse them when desperately trying to do an awkward job.
This part 8 concludes the My Saws series. Or does it? Our current woodworking world has some great saw makers at work, modern technology, and an expanding appreciation of the woodworking wisdom of our forebears, so a new saw for my shop is always a possibility. The bottom line will always be: how the tool can help me make things that I so dearly want to make.
Note: The entire series, parts 1-8, of “East meets West: My Saws” can viewed on a single page via this link.

Rob,
I have been following your site for some time. I find many of the topics you have covered very useful. Thank you for your efforts.
Would you elaborate on your technique for cutting tenon cheeks with a ryoba? I tried it the way you described in a previous post (at least I think I did). I clamped the workpiece vertically in my front vise, so as to saw parallel to the width of the workbench. I started at the far corner of the tenon and split the gauge line on the end grain, continuing diagonally down the length of the tenon. I reversed the workpiece in the vise and repeated the diagonal cut on the other side finishing with the saw teeth parallel to the shoulder line. Although it worked well enough, there seemed to be some vibration or perhaps grating of the saw teeth that I attribute to ripping “uphill.” I have seen others clamp the workpiece on the bench, and start the cheek cut near the shoulder line then follow diagonally down the end grain surface. I tried it that way, but it required me to kneel beneath the workpiece. I also found it awkward to finish the cheek cut at the shoulder line, because it is completely under the workpiece. On the plus side, the vibration or grating went away. I would appreciate your thought on this subject.
Bill V.
Bill,
I suggest you use the tail vise to clamp the work piece. I think it is awkward at best to get good body-saw mechanics using the front vise for this work.
With the piece vertical, working first from the near side of the end grain, then from the far side, then connecting the two, I split the gauge line and saw horizontally just deep enough to fully bury the saw teeth. I make the first quick cuts with the crosscut teeth to establish the kerf at each corner, then, of course, switch to the rip teeth for all the remaining sawing.
I suggest avoiding the often-recommended technique of making a “V” notch with a chisel at each corner. It’s unnecessary at best.
Then I saw down the near side long grain line, taking care to never let the teeth lift out of the kerf at the far end of the piece. I turn the piece around in the vise and do the same sawing for the other long grain line.
Then, holding the saw particularly lightly, I saw away the remaining unseen triangle of wood, letting the big kerfs guide the saw. The sawing is completed with the tooth line horizontal, taking care to avoid overcutting the shoulder lines.
I very much like the Gyokucho #611 ryoba blade for furniture-size tenons.
I see what you mean by ripping “uphill” but I don’t find vibration to be a problem, even in bubinga. I realize that a push Western saw would avoid this uphill approach, but I just have not found that I can be as accurate with a Western tenon saw, even high quality ones. I’ve tried several.
I hope this is more helpful than confusing. A post about sawing tenons by hand is on my “to do” list, but the list is long, so I hope this suffices in the meantime.
Send me an email if not.
Rob
Hi Rob,
Have appreciated this series on saws. Was wondering if you would venture some advice on which japanese saws to start with. Currently I have western panel saws that I have restored and managed to sharpen successfully since these are readily available and the bigger teeth are a bit easier. On the joinery side though I can’t seem to find any decent second hand backed saws here in New Zealand and the couple I have tried to sharpen so far haven’t worked out that well.
Hence I have a need for some new joinery saws …
And have thought of getting a japanese saw or two since they are substantially cheaper than the western ones (especially including shipping costs). If we ignore dovetails and just consider basic furniture joinery then I reckon I would go for a western carcass/sash saw with a hybrid filing to manage both crosscutting and rip cutting OR a carcass crosscut and sash/tenon rip. But what would be the equivalent in japanese saws? – battling to see whether I should be considering kataba, dozuki or ryoba.
From your preferences it seems that the ryoba would cover the rip part for joinery but what is better for crosscutting – a kataba or dozuki? And is there any such thing as a good hybrid toothed kataba or dozuki?
Hope all that rambling makes some sense.
thanks
Robin
Hi Robin,
I suggest try a Gyokucho #611 240 mm ryoba to start. With this saw, you can cut tenon cheeks with the rip side, and do many other joinery cuts using the rip and crosscut sides. It will also serve for various other small rip and crosscut jobs.
From there, if you decide you like Japanese saws, instead of a hybrid tooth saw, I’d add the Gyokucho 05 kataba for general bench crosscut work, and a Gyokucho or Z brand crosscut dozuki for tenon shoulders and similar tasks.
You might even want to try a rip tooth dozuki (not crosscut!) for dovetails, such as the Hishiki saw. I still like the Bad Axe better for dovetails though.
I like dedicated rip and crosscut teeth in Japanese saws better than hybrid Japanese teeth. If you wish, however, there are various forms of “hybrid” Japanese teeth, falling into two general categories. One is a two-bevel tooth design (nezumi-ba) which looks somewhat like Western crosscut teeth. The other design is three-bevel Japanese crosscut teeth interspersed with rakers to clear the waste when ripping.
I prefer dedicated Japanese teeth over either of those designs. It is not too expensive to get a set of saws with dedicated teeth with replaceable blades.
Of course, I like Western AND Japanese saws!
I hope this helps.
Rob
Thanks for the advice Rob,
I have gone ahead and ordered the #611 Ryoba. So will let you know how that goes. Crazily I happened to find a nice brass back tenon saw last week that I sharpened as a hybrid saw (10 deg rake, 15 deg fleam) – which has been awesome to use compared to my cheap bahco so-called tenon saw and another vintage saw that has some saw plate issues and has been a problem.
Very interested in the japanese saws – originally started thinking I would stick to western style tools (for no other reason than to control expenditure) but bought a $10 cheapo plane from toolsfromjapan that has been so nice to use I am now looking at it’s bigger brothers with fresh interest.
Like the metal jack planes quite a bit but starting to find I really like wooden planes for the rest of it especially now that I am picking up the knack to adjust to them.
Most this is probably just a reflection of me being a beginner and still on a very steep learning curve e.g. now that I am starting to sharpen better it has been amazing how much easier a number of tasks have become.
anyway will let you know how it goes with the ryoba.
cheers
Robin
Sounds great, Robin. I would be interested to know what you find with the new saw.
Woodworking is so much about making small discoveries, as the late James Krenov said.
Guidance is good, but ultimately each person must experience these discoveries via his own neurons, and then process them into his overall approach to the craft.
Enjoy!
Rob