A reader described the following frustration he is experiencing with end grain shooting.
“I have a problem getting perfectly square ends when shooting them on my shooting board.
“I have a homemade plywood shooting board and use a Record 5 1/2 on its side to shoot. I’ve checked everything, and everything is square to each other and the plane is sharp, however when shooting end grain the plane takes more off the near edge (closer to the front) than the back edge.
“Am I doing something wrong?”
If you are getting this inaccuracy despite having everything set up square and true, the glitch may be in the shooting stroke itself. The blade can grab the workpiece on initial contact and slightly pivot it away from the fence at the opposite end. This can easily happen with wide workpieces.
But first let’s check a few things with your set up.
The sole of the plane should be flat, at least in the critical areas. Use a very wicked sharp blade with a straight, not cambered, edge, and a fine, even blade projection.
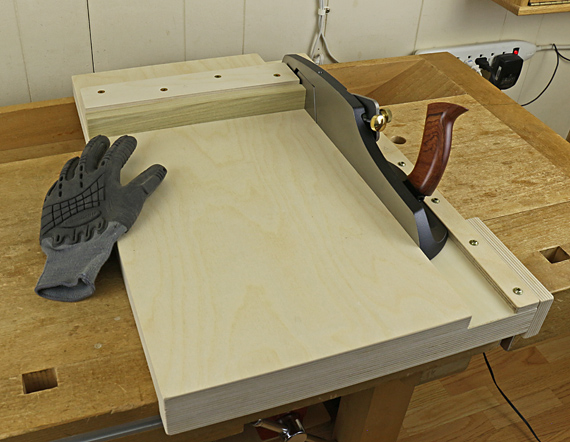
The track edge that the sole of the plane runs against in the shooting board must be straight. Ideally, the shooting board should have a snug channel in which the plane travels to prevent it from deviating during its run. (This will not work with a bench plane with a rounded side hump but not as well as with a dedicated shooter.) Wax the channel and/or use UHMW plastic on the running surface. If your shooting board does not have such a channel, take extra care to hold the plane firmly (without tipping it) against the running edge throughout the shooting stroke.
The fence must be straight, of course. The best way to square the fence is to place the sole of the plane (with the blade retracted) firmly against the track edge, then place a square against the sole of the plane and the fence. This directly assesses the elements that produce the square edge on the workpiece. The fence has to tolerate considerable pressure in use, so make sure it is fastened securely.
The fence also has to be long enough to register an adequate length of the workpiece so the workpiece does not budge during the planing stroke. I sometimes had problems with my old shooting board that had a fence that was too short. My current shooting board’s fence is 11 1/4″ long. Books often show shooting boards with a fence that is too short for furniture work.
A grippy glove on the hand holding the wood is a huge help in keeping the workpiece steadily registered and in advancing it after each cut. Otherwise, inaccurate registration can creep in, especially with wide workpieces, and especially as you fatigue. As a diagnostic experiment, try positioning a workpiece just right, then clamping it in place, shoot, and see if you get a square edge.
In summary, your shooting “machine” must be set up accurately, but also must be dynamically stable in use.
Mystery frustrations like this reader is experiencing afflict all of us woodworkers but are rarely addressed in books and other teaching media where the descriptions are often idealized. Rest assured, however, there are solutions.
I hope this helps, dear reader, but if you are still stymied, let me know. We’ll get it right.

Rob – Thanks for all the interesting, informative and well thought out posts over the years. I have to wonder though if you have the right of it on the humped planes and a snug channel. If the plane is locked in by the channel I can’t see how there would be any movement if both sides of the channel extends sufficiently past the end of cut. May require a re-designed board, but seems doable. Of course, my not having yet made a shooting board may mean I’m just blowing smoke here. Thanks again for all the info over the years, Tom
The only other tip I have to offer is one passed along to me when I visited the LieNielsen showroom. When shooting, the pressure focus needs to be downwards. Not sideways. Otherwise you will have a tendency to tilt your plane often towards the wood.
Tom, you’re welcome.
Yea, on second thought and after a mock-up test in the shop, I think a humped-side bench plane could work in a channel, though not as well as with a dedicated shooting plane. (So I did a strike-through in the text.) Also, the small length of contact seems not as stable, and the side wall might wear faster. Anyway, the channel could be adjusted, and it also might help to line the wall with PSA UHMW plastic.
Joe, I apply the pressure intuitively as needed to keep the plane running and cutting true. It’s forward, inward toward the workpiece, and, yes, definitely downward – to avoid tipping the plane. With the Veritas shooter, it happens almost automatically.
Rob
Thank you for the excellent analysis of the readers issue. I’m having this problem too sometimes and now that you mentioned it, it must be because my fence is too small, my blade not sharp enough. It works fine with small pieces up to 4 inches wide, but then anything wider I sometimes have trouble achieving a square edge. Time to build a new shooting board. Yours looks really good! Did you only use one piece of plywood or did you laminate two layers to achieve a flat board?
My trouble in shooting is (I guess) in advancing the wood. I often find myself in a situation where I’m feel like I’m pushing the wood very firmly against the toe of the plane and still not getting any bite from the blade. This problem seems to come and go and I have yet to diagnose what I’m doing wrong.
Pascal,
There are two layers of 3/4″ good quality birch plywood. I used the flattest pieces I could find. 1) The large base layer. The plane is riding on the right side of it. 2) On top of the base there is platform for the workpiece.
The photo may be a bit confusing because there is also a cleat at the front of the shooting board that hooks onto the front edge of the workbench. There is also a small cleat on the right side that fits into the tail vise.
I’ll try to sometime soon write a post about the details of the shooting board but it’s really pretty simple.
Rob
Thank you again. Your picture is good, and I will be fine building one with the info you provided.
Great. There is a little trick to the fence though. There is the big permanent block in the back and a replaceable poplar strip on the front that is fastened to the block with screws from the rear side. This allows some lateral adjustment to compensate for wear, and permits placement of a shim (behind the poplar) if needed to square it perfectly.
Rob
“Mystery frustrations like this reader is experiencing afflict all of us woodworkers but are rarely addressed in books and other teaching media where the descriptions are often idealized. Rest assured, however, there are solutions.”
Thank you for expressing this sentiment! I’ve run into these often and continually as I try to learn new things in a part-time hobby manner. It’s such a large part of the experience and so rarely expressed I feel!
Thanks, Jonathan. That is one of the main reasons I continue to write. There is much left unsaid in most teaching materials. My aim is to help empower fellow woodworkers to enjoy and master our wonderful craft.
Rob
Thank you for pointing out the fence detail. I would not have thought of the wear factor. I will build it as you described with an adjustable replaceable strip. It totally makes sense. Great design!
Hi Rob, Thanks for the tips – I really appreciate it.
I took another REALLY close look at my shooting board today and I noticed a couple of things. The fence is not perfectly flat. It’s slightly convex near the plane end which can throw things off by 1/64″. If you hold the wood against the fence it is square, but I could see that because of the convex face the force of the plane hitting the wood could move the piece on the fence throwing things off.
It doesn’t help that I made the fence out of hard maple (thinking it needed to be hard to wear well) and glued and screwed it onto the board – it makes it very hard to plane in place, and it can’t be removed to be worked on.
I do have the plane riding in a snug channel but because of the humped sides there is only one point of contact with the side wall of the channel. There is a tiny little bit of slack in the channel and along with the single point of contact the plane pivots ever so slightly if pushed sideways at the front or the back. Again, the initial force of hitting the wood could be pivoting the plane slightly.
I think I’m going to have a go at making another shooting board with a removable fence that can be easily trued up, or adjusted it it is out of square and see if that helps. It may take me a while because I don’t have much free time, but I’ll let you know if it helps or not. thanks again, Matt
OK, Matt, so the blade initially hooks the workpiece, then pivots it on the convex fence, moving the distal portion of the workpiece away from the blade. Hence, the systematic error you observed, as described in the opening section of the post, above.
I will write soon about the shooting board I constructed, and include some other construction options.
This is all worthwhile because, again, shooting is a core technique for accurate woodworking.
Rob