Archive for ◊ December, 2015 ◊

Author:
• Thursday, December 31st, 2015

square to check dovetails

When making dovetail joints, it is important that the tails, which you’ve cut first (of course, right?), have their sides square to the reference (inside) face of the board.

In practice, depending on the compressibility of the wood species being worked, it may be acceptable or even helpful for the inside width of the tail to be a hair narrower than the outside face. This creates a slight wedge effect that helps ensure tightly meeting surfaces at the outside face of the completed joint.

There should never be the opposite arrangement where the entering width of the tail is wider than the outside face of the tail. That would directly, by the geometry of it, leave gaps on the show face of the joint, making it weaker and less attractive. It would also indirectly create these gaps by corrupting the marking out of the pins from the inside-face edges of the tails.

Thus, as with many aspects of woodworking, this is a one-sided tolerance issue, and we want to avoid compounding small errors.

So, is it really necessary to check the sawn surfaces of the tails before proceeding to mark and saw the pins?

With good sawing skills, frequent repetition, and an easy-going wood, you may need little or no checking. Realistically however, it is not easy to make all the saw cuts right on, and checking takes very little time and effort. And while you or a demonstrator may be heroic in pine, what about oak, shedua, or hard maple? Also, it’s a lot easier to dovetail a 3/8″-thick, 3″-wide drawer side than a 3/4″-thick 12″ carcase side.

I suggest be realistic and reasonably careful in your work without being timid or plodding.

dovetail square

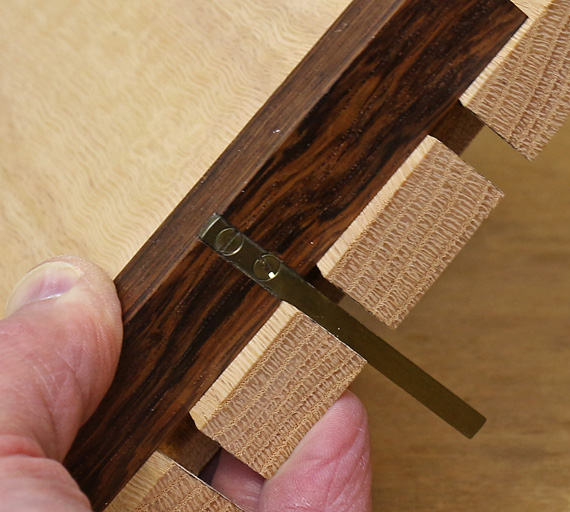
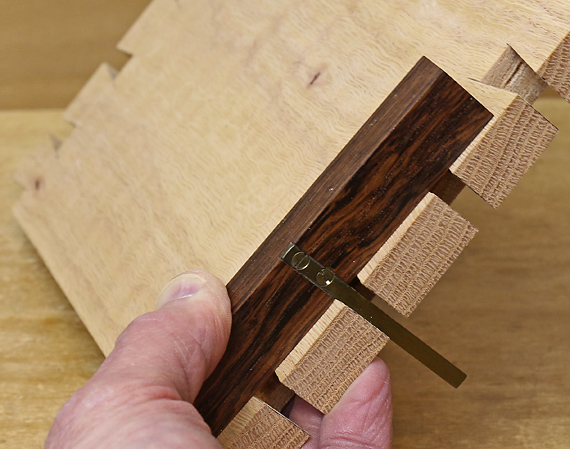
Here is the little square I use to check the sawn sides of the tails as well as the adjustments I make by paring them. I made this tool about 30 years ago.

The beam, made of pre-ban Brazilian rosewood (Dalbergia nigra), is about 4 1/4″ long x 3/4″ x 1/2″. The 1/16″-thick brass blade is 11/64″ wide, which can fit between almost any pair of tails that I make. At almost 1 3/4″, it is unnecessarily long – maybe I envisioned sometime making giant dovetails. The square is accurate to less than 0.001″ on both sides, a tolerance not too difficult to achieve in this size tool with patient filing and scraping.

The T shape allows the beam to register on the face of the wood on both sides of the measurement point. This makes it fast and convenient to use. It also averages out any trace of cupping that might have creeped into the board since it was four-squared.

There are two excellent manufactured tools for this task. One is the little (in size but not in price) Starrett 14D square, shown below, which has a blade 5/32″-wide over most of its length that is cut down to a mere 3/32″ wide over the remainder.

small squares

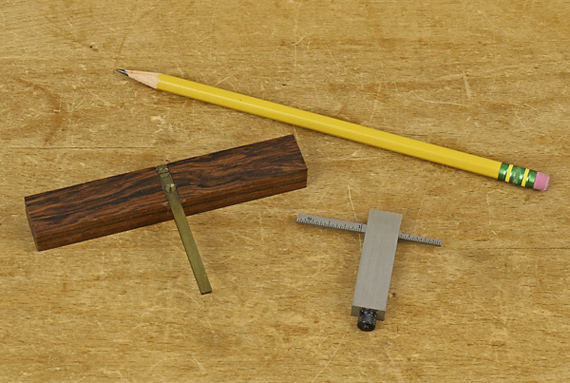
A lot less expensive is Sterling Toolworks’ Dovetailing Rule. This blade fits in a 6″ combination square stock (Starrett and others) and has a section just under 3/32″ wide to fit between virtually any pair of tails. Chris Kuehn, founder of Sterling, has produced a practical, commercially available solution.

Category: Tools and Shop  | Comments off
Author:
• Friday, December 18th, 2015

woodworking tools

It has been a while since I expanded this wish list, so here goes.

1. Is it too much to ask for Lee, Lie, or some other great maker to come up with a modern compass plane? To use this tool effectively, think of the compass plane as a light jack plane, not a smoother, for curves. As with other hand planes, I have little doubt that modern manufacturing, informed by history, will outdo vintage models.

2. Speaking of tools for curves, a curved rasp, flat across its width, would be nice. Start with the idea of the “curved ironing rasps” made by Auriou (pictured above) and Liogier but make one about 6-7″ long, 1 1/2″ wide, with a knob on the leading end and a near-vertical handle at the rear. And Santa, if you’re listening, I want the radius of the curve to be smaller toward the rear and larger toward the front. Medium and fine grain, thanks.

None of the following currently available tools quite fits the bill: flexible floats, the very coarse Liogier Beast, and the Surform shaver. The latter is decent when modified, but it’s rather short.

3. The Pony brand 22″ hard-tooth saw with three-bevel, Japanese-like teeth is a wonderfully useful stock breakdown tool and a great value at about $16. It crosscuts like a demon but does not rip very well. A 26″ rip tooth version would be a very useful bargain.

Pony hand saw

4. I still haven’t given up on advocating a higher bed angle for bevel-up bench planes. About 22.5° would be good. This is a large topic that has been addressed earlier on this site but here are some highlights. [I should add here that this is mostly applicable to bevel-up smoothing planes.]

Compared to a 22.5° bed, the 12° bed angle in Lee and Lie bevel-up models may have a slight advantage in reducing the downward deflection of the blade edge but I think this is made largely moot by the excellent support of the blade close to its edge that is provided by the bevel-up design.

The 12° bed creates problems with sharpening. For example, to get a 55° attack angle, the blade must be sharpened to a 42.5° secondary bevel. That makes it significantly more difficult to produce and retain a good edge.

Even if you don’t agree with my contention that such a blade creates a fatter wedge that is more difficult to drive through the wood, and that the only thing the woods “sees” is the attack angle, then why not use a 22.5° bed and make edge creation and retention easier?

5. To mark pins from tails, in some situations, I prefer to use a chip carving knife like this, modified to eliminate the secondary bevel. I learned this idea from Chris Becksvoort.

However, it is not easy to flatten both sides of the blade to meet at the edge in a single bevel because the angle gets quite small, making the edge fragile. It would be nice to have a manufactured version. The sides of a blade 5/16″ wide and 1/8″ thick at the back would meet in a single bevel at 25°.

6. I wish the pads on my earmuffs did not squeeze the temples of my glasses against my skull. It’s uncomfortable. And I hate earplugs.

7. When jointing and planing to get flat stock, the thickness of some boards seems to disappear faster than cash in my wallet. I don’t need a board stretcher, I need a board inflator.

Hope is a good thing.

Category: Tools and Shop  | 8 Comments
Author:
• Thursday, December 03rd, 2015

furniture books

One of the best ways to develop your design skills is to look thoughtfully at lots of furniture, including unfamiliar work. Books and collections that organize work in historical and stylistic context are especially helpful learning tools. Here are two books that are both worthwhile but differ greatly in approach.

Furniture by Judith Miller (Dorling Kindersley Publishing) covers furniture design from ancient Egypt to contemporary. [Note: At Amazon, the larger format 2005 American edition is now much more expensive than the slightly smaller format 2010 UK edition.]

Done in the beautiful and orderly style typical of DK Publishing, the more than 500 pages will supply you with plenty of browsing hours. It is organized primarily by time period, for example 1760-1800, then by country and style, for example late 18th century Scandinavian. I like best the several sections within each time period that are devoted to specific furniture types, which allow you to study, for example, tables in the Art Deco period of 1919-1940.

Even though anything I design and make is unlikely to directly emulate more than a few, if any, of the pieces in this book, there are lots of stimulating ideas, motifs to borrow, and much to learn just from studying a wide variety of good design.

That’s the good part of the book. Now for the bad and the ugly. It is painful enough just to look at much of the furniture in the “Postmodern and Contemporary – 1970 Onward” chapter, but it is exacerbated by reading the highbrow credibility given by the author to some of this crap.

There is no Maloof rocker or Krenov cabinet to found here, though we are informed that Castle, Maloof, and Frid “worked in a highly contrived Postmodern style.” Further, the author states, “Using a laborious, painstaking method to produce off-hand, jokey objects was self-consciously ironic.”

Administer relief to yourself from such nonsense by picking up Craft Furniture by Dennis Blankemeyer (Schiffer Publishing, 2003). The author does an outstanding job of placing this work in the context of our daily lives and, more broadly, in our spiritual lives. He also gives fitting tribute to craftsmanship.

After sections on Esherick, Krenov, Maloof, and Nakashima, he presents the work and background of 25 contemporary craftspeople. There is so much beautiful, honest woodwork here; I think readers are sure to find it inspirational.

I suspect this book has not gotten the attention that it deserves. It is available in only hardcover from Amazon and Barnes and Noble.

Resolving the different vantage points of these two authors is a matter for another day. I’d rather get back to the shop.

Category: Resources  | 4 Comments