Archive for the Category ◊ Wood ◊

Author:
• Friday, June 20th, 2014

ash curves

From baseball bats to crates to tool handles, ash certainly earns its keep as a versatile workhorse wood, but how about for fine furniture?

For this discussion, ash, as a furniture wood, refers to what is generally sold as “white ash” or just plain “ash,” most of which is Fraxinus americana, though there are several other commercially significant ash species.

Ash has a prominent and usually fairly uniform annual ring figure produced by the great difference between the large earlywood cells and dense latewood. It lacks the flashy visible rays of the oaks, and the large majority of it is composed of unimposing light blonde sapwood. So, is ash a boring wood?

Used unimaginatively in low-end furniture, yes, it is rather boring. However, like most products of nature’s bounty, the key is how it is used and what the craftsperson can draw from it.

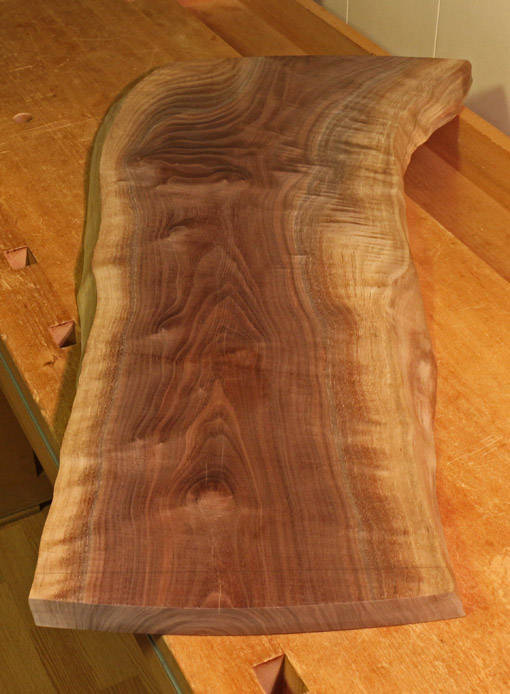
To my mind, one of the prime virtues of ash is that its rift-cut or quartered surface is great for bringing forth and enhancing artful gradual curves. The uniform figure of the wood seems to sensitize the eye to subtle design. It energizes the form of a piece. Sometimes it reminds me of the raked sand in a Japanese Zen garden – not boring, but peaceful.

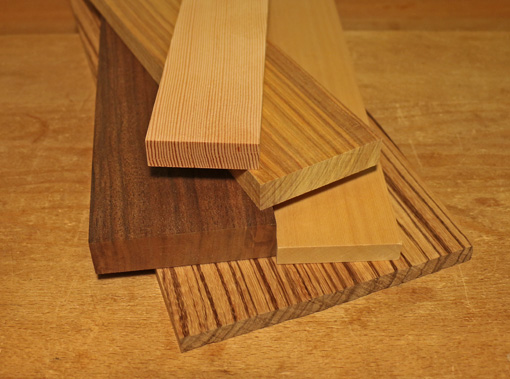
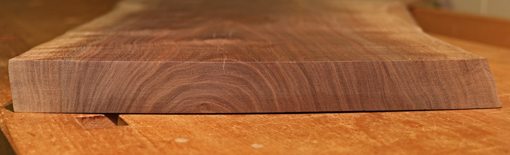
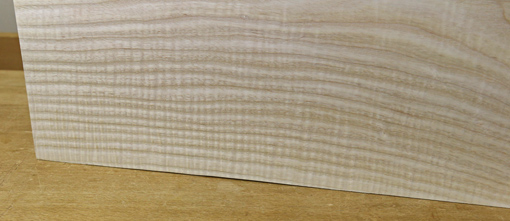
Ash can be a pleasing contrast to more intrinsically glamorous woods, but it can also shine on its own. Curly ash is beautiful and impressive, yet retains the species’ inherent composure. I recently picked up some beautiful curly pieces – I’m thinking thick veneer drawer fronts for these – from Kevin Koski at Curlymaplewood.com, where you can find lots of other gorgeous curly species. Also, ash heartwood has a nice soft brown color that creates interesting contrast when used judiciously alongside the sapwood.

curly ash

With green-to-oven-dry shrinkage values of 4.9% radial and 7.8% tangential (T/R = 1.6), ash is decently stable, and it generally works well with machines and hand tools. I’ve enjoyed using it for frame and panel work, legs, drawer parts, and in bent laminations. The species presents a challenge and an opportunity for thoughtful design and balance in a piece.

I like ash finished with a less-is-more approach, using a “water white” acrylic water-base or maybe thin bleached shellac.

In recent years, ash trees in the central and eastern US have become seriously threatened by the emerald ash borer. Here are some ways to help avoid spreading the infestation.

By the way, all of the “Woods I love” posts, with more to come, can now be conveniently viewed on a single page as one of the Series Topics.

bent lam cutoff and tool handle

Category: Wood  | Tags:  | Comments off
Author:
• Thursday, January 30th, 2014

IMG_1170_edited-2

The visual beauty of wood, its warmth to the touch, and lovely sound properties are so enticing that we might neglect the variety of pleasing scents many species have to offer. Smells are registered deep in the primitive brain in the limbic system where they are associated with memories and emotions, so this is a powerful aspect of wood.

When recently working with some nice quartersawn Douglas fir, the aroma brought me back to my youthful days of projects in humble fir plywood and the simple joy of making things. Continuing to nowadays, the particular scent of a species released by its sawdust and shavings is part of the experience of woodworking and thus, in my mind, part of the personality of the piece.

I think of, as examples, the shop being filled with the aromas of walnut or spicy Port Orford cedar or even the unmistakable horse barn smell of zebrawood. Using canarywood recently for the first time was a pleasant olfactory surprise.

Unfortunately, the aromas then usually disappear under layers of finish, unavailable to the end user of the piece. Of course, with most work, especially things like tables, there’s no getting around that. However, in some casework there is an opportunity to add a wonderful aspect to the piece that will be enjoyed for years to come.

Consider using aromatic woods, left unfinished, for interior drawer parts, case back panels or partitions, and box linings. The “cedars,” sassafras, and even pine are some options.

By the way, I avoid using oil or oil-varnish finishes on the interior of cabinetwork. A light application of a hard-drying varnish or thin shellac are better choices.

Pictured above are, from top to bottom, quartered Doug fir, canarywood, Claro walnut (left), Port Orford cedar (right), and zebrawood. But you have to meet the woods in person for the full experience.

Category: Wood  | 2 Comments
Author:
• Tuesday, July 02nd, 2013

IMG_0400_edited-2

Take a look at the end grain of this live-edge board. Without causing undue stress and tension, do you notice anything?

OK, enough goofy hints.

You probably notice that the board is from a tree with an off-center pith. The wider growth rings on the far right side, compared with the corresponding years on the left side, represent tension wood.

When a tree trunk leans due to environmental stresses such as gravity, snow, or light availability, it wants to redirect its growth upward and thus bows. To accomplish this, it forms aberrant wood known as reaction wood on one side of the tree, often recognized by its wider growth rings with the pith located off center.

In softwoods, the reaction wood, called compression wood, is usually on the underside of the bow, while in hardwoods it known as tension wood and is usually found on the upper side of the bow. The growth ring width asymmetry and consequent decentration of the pith can be dramatic in softwoods, but mild to absent in hardwoods. Reaction wood differs from normal wood in cellulose content and structure.

There are visual and behavioral clues to the presence of reaction wood.

It may be difficult to recognize in roughsawn boards at the lumberyard. Look for growth ring asymmetry in flatsawn boards. This is easy to notice in a live edge board but possibly not in a board with sawn edges. An unexplained lengthwise split or a pronounced crook (a curve in the width plane of the board)  may be caused by the abnormally high longitudinal shrinkage of reaction wood.

After the wood is in your shop, take note of behavioral clues such as persistent and unexplained distortion after milling. Another possible clue that most woodworkers have encountered is a stubbornly persistent fuzzy surface on an area of wood despite repeated attempts at smoothing it – you sand it and the fuzz never goes away. More confusing may be an unexpected excessively blotchy look that shows up after finish is applied.

This wood does not want to play nice; avoid it. I have read, however, of wooden bow makers taking advantage of the abnormally greater strength of tension wood.

There are exceptions, of course. This is wood – every tree, every board is an exception!

IMG_0402_edited-2

Being very cautious, I’ve monitored this walnut board with suspicion for a long time now, through partial milling and changes in moisture content. There are only some old shallow surface checks and a little distortion that has settled. I think it is safe to use in a project.

It pays to watch the wood.

Category: Wood  | 4 Comments
Author:
• Saturday, June 22nd, 2013

IMG_1089_edited-2

4. Interpret the information and use it.

“Yes, I am asking you to fuss with wood.”

-James Krenov, from The Fine Art of Cabinetmaking

In this final installment on the topic of moisture meters, I will broaden the discussion to the management of wood that has been dried and brought into the shop, from wherever you have obtained it, because it still needs attention before it is ready to be used in a project. A moisture meter can help here.

When a new board comes into the shop, I write the date and moisture content (MC) on it. I refer to the back of the Lee Valley Wood Movement Reference Guide to know the equilibrium MC for the ambient relative humidity (RH) indicated on my shop hygrometer. (Temperature is a negligible factor for practical purposes.) The FPL Wood Handbook has the same information. I try to keep the RH within about 40 – 65%, winter to summer, with the use of a humidifier and dehumidifier, as needed.

Unless I am lucky, the wood has some adjusting to do. Therefore, I store it so air can circulate on all sides of each board by storing it horizontally on a rack and stickering it, or leaning it vertically against something. Sometimes I will do an initial light skim planing to get a peek past the rough surface, and to facilitate measurements with the pinless meter.

Then I keep an eye on the wood, checking the MC in a few days to see if it is moving. Depending on the initial MC, species, and thickness, I look for the MC to level off over the next few weeks. The wood is then ready for the first dressing.

Another approach is to look for when the MC of the new wood matches that of wood of the same species that has been in the shop for a long time. Beware, however, of the density issue with pinless meters that was discussed in the previous post. Also beware of the possibility of a moisture gradient through the thickness of the wood, especially in thick stock.

I usually use the pinless meter for this because it is faster and doesn’t make holes in the wood. However, if surface or density issues seem to be confusing, or if the stock is thick and I want to look for a moisture gradient, I will turn to the pin meter for additional information. If I could own only one? Pinless, probably. No holes.

Could this be done without a moisture meter? Sure. Patience and experience will work. Even quick monitoring with a straight edge on flatsawn boards will be informative. I like the convenience and greater reliability offered by the meters to help avert disappointments.

Unless it is very tame straight-grained wood and the final thickness is only slightly reduced from the initial state, I usually dress rough stock in two stages, even after it has reached uniform equilibrium MC. For example, to get a finished 5/8″ from a rough 4/4, I will first joint and thickness down to 3/4″, taking approximately equal thicknesses off each side of the board.

I watch the wood. Did the initial jointing stay flat and true? Did new a twist arise, or maybe a slight bow? These surprises can come about from internal tension releasing when some thickness is removed. Odd grain and case hardening are among the possible causes. These issues will usually manifest their effects quickly, sometimes immediately.

Then I take the wood down to final thickness, removing any slight distortions. If the distortions are large, or reappear, I usually find another board.

Resawing is another matter, discussed here, but requires knowledgeable observation and understanding casehardening to avoid disappointments.

Understand the wood. Watch the wood. A moisture meter can help.

Category: Wood  | Tags:  | Comments off
Author:
• Sunday, June 09th, 2013

IMG_1087_edited-2

3. Important factors that affect the readings

This is the third of four keys to making effective use of a moisture meter. Even properly taken readings are subject to factors inherent in the design of the meter.

Pin meters are affected by temperature. They will overestimate the moisture content (MC) in a hot environment (wood temperature), and underestimate it in the cold. This will probably only be significant in a cold lumberyard where the meter will read perhaps 1-3 points less than the actual MC. Consult the table that comes with the meter.

The species of wood also affects pin meters but, in the MC ranges we are typically measuring in the wood shop, there is little difference among most species, in the range of one or two points.

Measuring boards of one species in a consistent environment will cancel any significance of these two factors.

Surprisingly, wood density is an unimportant factor. Measuring with the grain, versus across it, is a slight, but generally insignificant factor. Of course, wet spots on the wood (such as melted snow) will greatly distort the readings.

In summary, for pin meters, there are not too many factors to be greatly concerned about. The main issue is to be aware of the depth into the thickness of the board at which the meter is measuring, and be aware of the possibility of a moisture gradient, especially in thick stock.

Remember too, the meter measures the wettest layer between the probes. This is usually the deepest point of penetration by the probes if the wood is still in the initial drying process, though not if it is rapidly gaining moisture.

And, of course, they make holes in your wood!

——————————-

Pinless meters are significantly affected by wood species, density, and, as addressed in the previous post, surface quality.

The “species” is really just a proxy for density, and this can be confusing. The tables or programmable functions that accompany the meter are necessarily based on average density values for a given species. However, because each tree is unique, the densities of different samples of a species can vary greatly.

The manufacturer supplies a formula to calculate your own correction factor, but it requires an accurate measurement of the specific gravity (density) of the sample of wood in question, which is usually rather impractical, especially when you do not already know how much of the measured weight is water.

Furthermore, when assessing newly acquired wood, referencing boards of same species on the racks in your shop, fully equilibrated, is not necessarily helpful since they may be quite different in density.

I recently bought some white ash which measured 13-15% MC with the Wagner pinless meter using the correction table. This seemed oddly high for wood that was kiln dried and stored indoors. I brought the wood to my shop, stickered it, and after a couple of weeks, the apparent MC decreased very little. After over two months, it was reading only 12%. Other ash that had been in my shop for a long time was reading about 9%, about what I would expect in the ambient humidity.

So, what’s going on? As I suspected, the recently acquired ash is just denser than the average value for ash used for the Wagner tables. How do I know? Well, two months ought to be plenty of time for the wood to equilibrate and it did not change much over that time. Furthermore, the pin meter, which is unaffected by wood density, verified that this wood was now about the same MC as the other wood in my shop, and there was no gradient through the thickness of a fresh crosscut.

Thus, we have two easy ways of dealing with the density issue affecting pinless meters: time and a pin meter.

Next: We’ll distill all of these technicalities into practical options for wood management.

Category: Wood  | Tags:  | 4 Comments
Author:
• Thursday, May 30th, 2013

IMG_1085_edited-2

2. Taking the readings

Whether a moisture meter or your blood pressure, if you don’t take the readings properly, they won’t mean much. So let’s take a look.

Pin meters:

The pins must be inserted and held in without backing off, which will create a small air gap, or cause the spring-loaded activation button to release. This can take considerable force, especially if using longer pins. Though longer pins are available, even big hammer-in probes for some meters, I almost always use the default pins on my miniLigno that penetrate about 1/8″.

The pins at the left in the photo penetrate about 1/4″, and even those are difficult to push into dense woods, and I find they tend to break.

IMG_1083_edited-2

One of the advantages of a pin meter is its ability to check precisely for a moisture gradient through the thickness of a board that has not reached uniform equilibrium moisture content. In the photo at the top, my pinless meter, which has a measuring depth of 1/2″, could evaluate just about the full thickness of the 1 1/8″ Claro walnut board. Remember however, those would be readings of the average moisture content in the measured volume of wood. By crosscutting the wood, then promptly comparing pin readings taken in the end grain near the surface and near the center of the board, a moisture gradient can be detected. The same can be done, sometimes with dramatic results, in a stick like the 16/4 Doug fir in the photo.

I have found little or no difference in pin readings taken along versus across the grain. Furthermore, there is usually little or no difference in the readings for most species whether the meter is set on “wood group” 2 or 3 on the miniLigno meter.

Pinless meters:

Readings are best taken on a smooth, flat wood surface with the length of the sensor aligned along the grain. In the photos of the cherry board, below, my Wagner L609 meter is reading 9% with the sensor along the grain of smooth wood, but 7% on the immediately adjacent rough surface. It read 11% with the sensor placed across the grain of the smooth, flat wood. These relationships are typical. Note also that if the wood surface is not flat in any case, the readings are likely to be relatively underestimated.

IMG_1081_edited-2

IMG_1082_edited-2

At the lumberyard, you probably won’t have the luxury of reading off a smooth surface, but at least you can make comparisons between similarly rough boards.

Pinless meter readings must be corrected for the density of the species. Some meters allow this to be programmed in before taking a set of readings, but with my meter I must hassle with having to add or subtract an amount based on tables in a little booklet that comes with the meter.

By the way, do not measure thin wood in the manner as shown below, unless you want to average it with the moisture content of your workbench!

IMG_1084_edited-2

Next: In part 3 of the series, we’ll look at important factors that affect the readings, especially for pinless meters.

Category: Wood  | Tags:  | Comments off
Author:
• Tuesday, May 14th, 2013

IMG_1074_edited-2

The relationship between wood and water is of great concern to woodworkers. Specifically, we want to know how much water is in the wood, and what will happen to the wood when that amount changes, as we know it always will. A moisture meter tells us the percent moisture content of wood relative to its completely dry weight.

So, we all need a moisture meter, right? Well, on the one hand, great furniture was made for hundreds of years without moisture meters. On the other hand, a meter is a modern convenience that facilitates reliable management and use of valuable wood. I use mine regularly in the shop and when I buy wood at the lumberyard.

However, to be of value, a moisture meter must be used intelligently. That is the topic here, geared for the small shop woodworker. Reviews of specific brands and models can be found in the magazines, whose publishers have the wherewithal to do such testing.

There are four keys to making effective use of a moisture meter:

1. Understand how the meters work.

2. Take the readings properly.

3. Understand the main factors that affect the readings.

4. Interpret the information and use it. You are craftsman, not a data collector.

 1. How they work

IMG_1077_edited-2

“Pin” meters involve sticking two pins, from 3/16″ to 2″, into the wood. The meter works by conducting a small electric current through the wood from one pin to the other. The water in the wood conducts electricity well but the wood resists electrical flow. The meter measures the resistance, and from this, figures out how much moisture is in the wood.

It is important to realize that the meter measures the path of least electrical resistance between the pins. This means the wettest wood layer that is anywhere between the two pins. (The exception to this is the use of insulated pins that have metal exposed only at their tips.)

IMG_1078_edited-2

“Pinless” meters involve simply placing the base of the meter on the wood (no punctures). The meter produces an electromagnetic field in a three-dimensional volume of wood, defined by the functional base area of the meter and the depth to which the meter is designed to operate. The field is altered by the moisture content and density of the wood, and the meter uses that alteration to figure out how much moisture is in the wood.

It is important to realize that the meter is reading an approximately average moisture content throughout that volume of wood.

Later we’ll look at how the operating characteristics of the two types of meters affect the interpretation and use of their readings.

– – – – – – – –

Before moving on in the upcoming posts about the next three points listed above, a couple of no-tech maneuvers deserve mention.

First, when at the lumberyard, you can estimate the moisture content simply by holding your hand on the wood surface. Use this as a relative measure for boards of the same species with similar surface quality (rough or planed) in the same storage environment. The wetter wood will feel slightly cooler and damper. It is a subtle sensation, but you can use your pinless moisture meter (or borrow one) to calibrate your senses. It can be done, and it’s quick and cheap.

I’ve heard of using your lips on the wood instead of your hand to increase the sensitivity. Now, as much as I love wood . . . nah, I don’t think so.

Second, if you buy wood and want to let it reach its equilibrium moisture content for the humidity level of your shop, you can probably do well enough by simply being patient. Feel the wood right after you buy it, compare it to boards of the same species that have resided in your shop for a long time, and wait it out for a few weeks, depending on the thickness of the stock. You can also resaw a small chunk and feel the inside surfaces, and watch its movement later.

If you wait long enough, the wood is going to be OK. But how long? Well, that is why it pays to have a moisture meter – efficiency, ease, and reliability.

Next: part 2.

Category: Wood  | Tags:  | 2 Comments
Author:
• Sunday, January 27th, 2013

Projects featuring live edge wood can be fun and liberating as the gifts of nature guide the woodworker’s design. Though preferences vary in managing live edge boards, I like to remove all of the bark down to the sapwood surface, retaining and exposing the wonderful natural undulations of the wood.

Live, or “natural,” edge boards may have been dried with all of the bark on, or after most of it was removed. During the growing season, the cambium layer is fragile, making the bark easier to shear off. Either way, my goal is to remove all remaining bark without damaging the natural contours of the wood.

The walnut board shown here was dried with all of its bark so I began by removing the bulk of it with a bowsaw. A drawknife may also work well. This is not a job for a bandsaw or jig saw because you want the maneuverability and feel of a hand tool. In the soft inner bark, the saw almost feels like it is going through Styrofoam; the harder resistance of wood is a sign of going too far. To save work later, I get as close as I safely can to the wood, intermittently checking both sides of the board. It is easier to work with the board held vertically, if possible.

The next step is to use abrasives. Dico Nyalox brushes used in an electric hand drill work ideally. They are aggressive enough to remove remaining bark but not enough to reshape the wood. In most cases, an 80-grit (grey) flap brush is a good start, followed by the orange 120-grit. I brace the drill against my body and wear a dust mask.

Next, I use the less aggressive cup brushes, which, as I ramble the drill along the edge, act almost like a random orbit sander. The 80 and 120-grit cup brushes, followed by a light pass with a blue 240-grit flap brush, finish the job.

 The photo below shows the result I like: cleaned up, but ruggedly natural.

The edges of curly wood require special caution. The coarser flap brushes seem to impact the peaks of the bumpy, wavy edge to gouge tiny horizontal grooves that are difficult to remove. Depending on the species, I’ve found it better to work mostly with the cup brushes for curly wood. The photo below shows the edge of curly big leaf maple in a finished piece.

Notice the rasps and sandpaper in the photo showing the tools. “Natural” is nice, but occasionally I’ll “improve” on nature with a little cosmetic surgery using a coping saw, rasps, sandpaper, and maybe even fillers to alter a shape or defect that I don’t like, and to get the look I want. That’s part of the fun.

Category: Wood  | Comments off