Author Archive

Author:
• Sunday, August 03rd, 2025

Here are three tools worth having.

1.

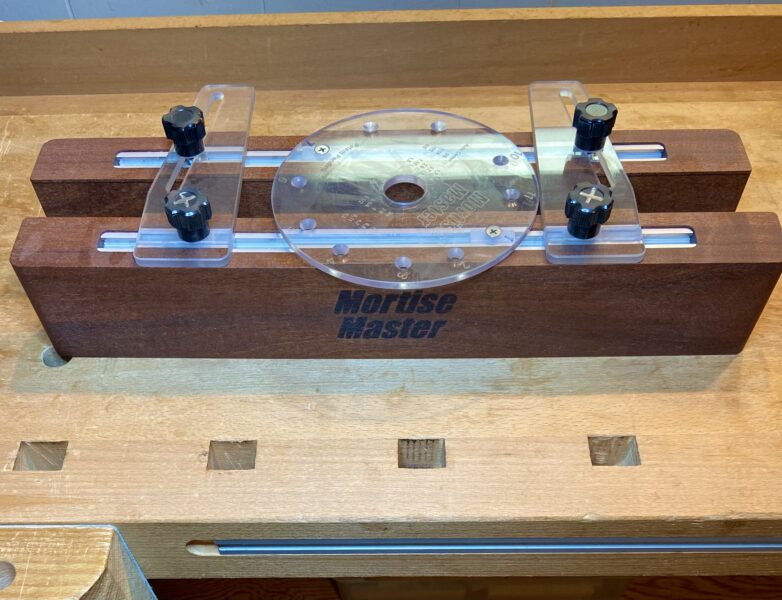
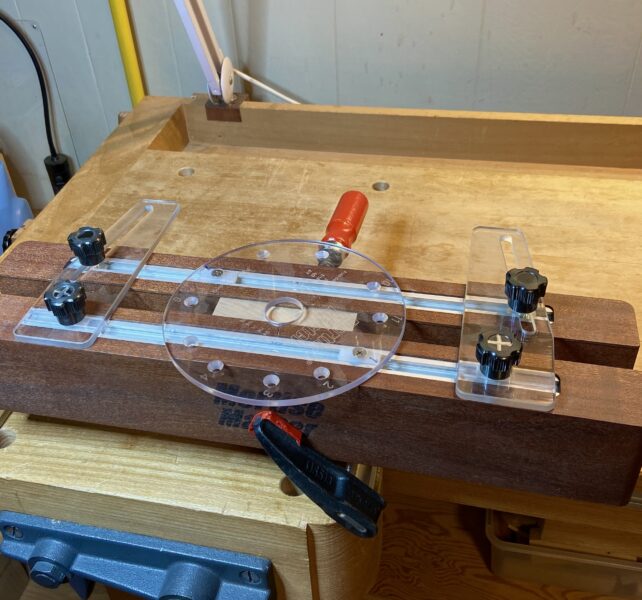
Mortise Master is a cleverly designed way to use your plunge router to make loose tenon mortises. In other words, you simply make a mortise in both wood parts and then add a separate tenon to fit them together.

Does this mean that it will not be a strong joint? No. We well break down this issue in an upcoming post.

Mortise Master has a clever way to keep the mortises laterally centered on both pieces. Just as easy, they both can be set equally off center, or they can be unequally off sided.

The vertical positions are also readily set. The router’s guide bushing sets in the slide plate which is governed by the two metal runners and limited by the screw-held stops on each side.

Work moves quickly and reliably.

It does have a couple of shared limitations. Like most mortising, there is no dust collection. Routers tend to through lots of cutting waste. Also, you cannot, like most basic mortise setups, do angled mortises. That can be done with the Leigh FMT ($) mortice and tenon jig, which takes a lot more learning to use.

I really like this tool! You can get a Mortise Master now for $230 with free shipping. (I have no business/money connection.)

2.

The JessEm dowel joint tool is just great. I have the common 3/8” dowel version. (I will be discussing the grace of dowel joinery in a soon upcoming post.) This very well made tool is accurate, direct and easy to use. You can make small joints or stepwise reposition it to make longer joints.

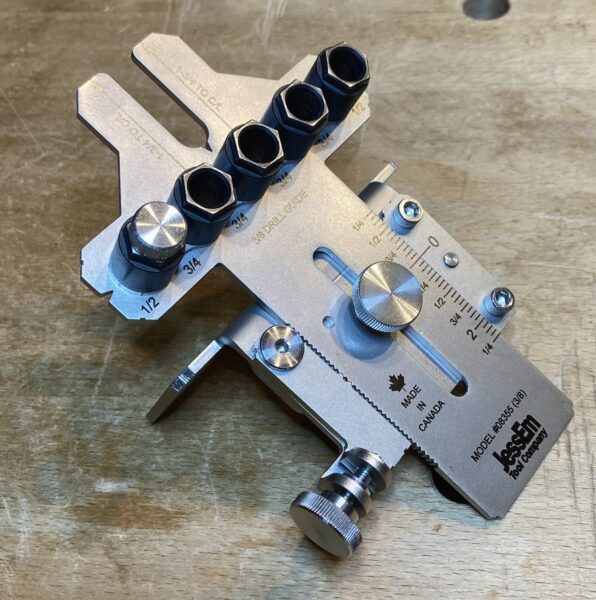
It has a great precision line up mechanism.

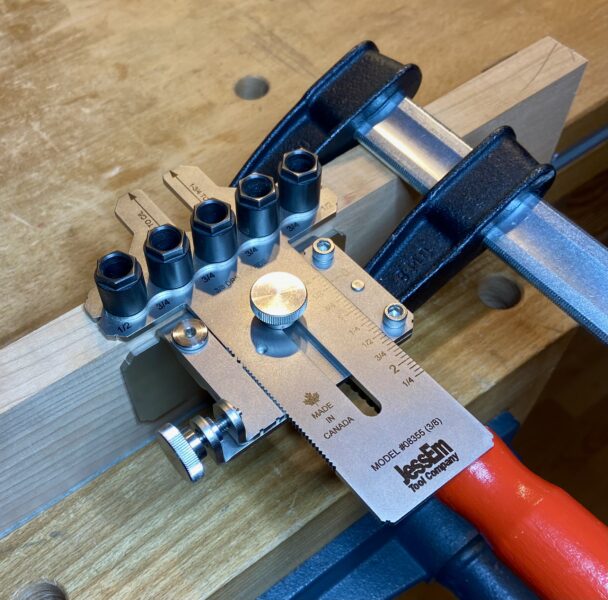
I cannot find a JessEm discussion/demonstration about using the jig to make the dowel holes across the flat face of the board. However, it is straight-forward and I have done it very accurately. 

Well, I do not think I am going back to my years of using the wooden hole jigs to set out and drill dowel holes. 

3.

Leigh makes bench hold-down clamps that I like better than the longtime traditional curved metal holdfast clamps. I never found that even good quality holdfasts grip well without more than a quick bang to set it up.

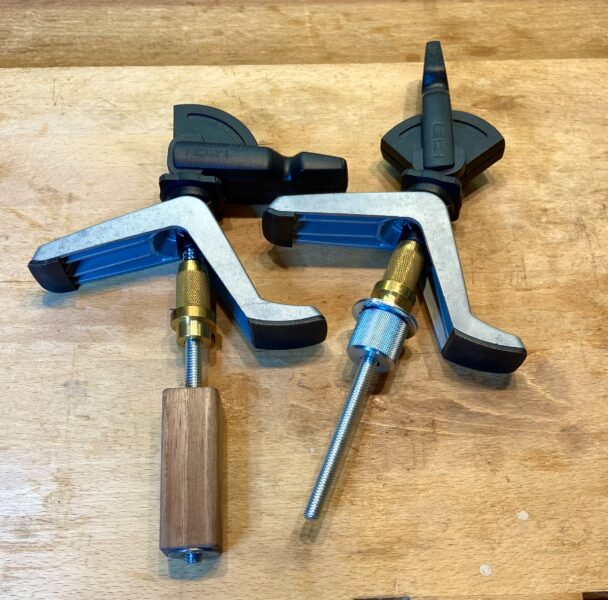
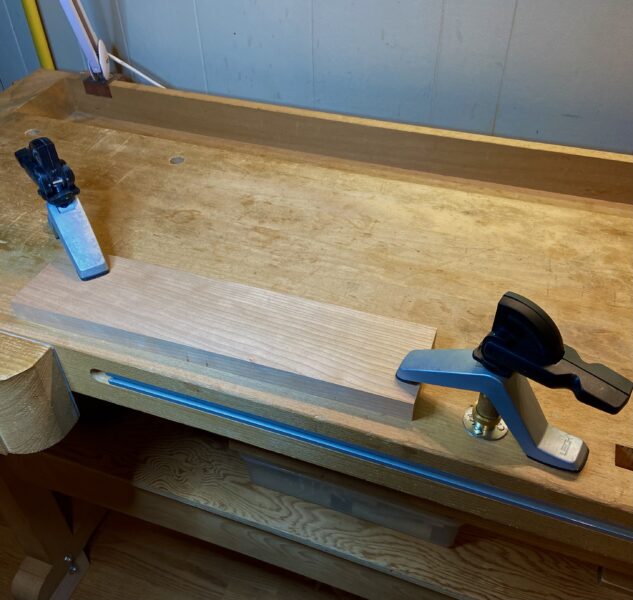
The Leigh tool bench connection does not set up quite as fast as the old kind, but once it is set up, it quickly grips on and off the woodwork. You simply move the lever at the top. 

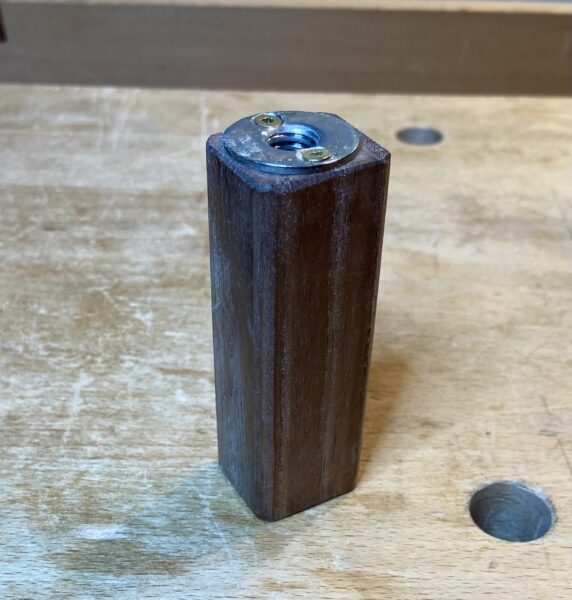
A useful help that I think Leigh should supply at the rather expensive cost of this tool: The “speed nut” that fits underneath the bench top can be awkward in some situations. It can also loosen and even drop off occasionally. I made a simple wood piece (about 3 1/2” long, 1″-square thick) with a full-length hole. A framed nut is screwed into the wood. It attaches to the tool’s long screw at the bottom. It holds fast and well.

I have no business/money connection in any of these tools. They are worth your try!

Author:
• Saturday, July 26th, 2025

Woodwork that you put yourself into creating can last a long time and have personal meaning. Consider that these are among the reasons it is worth doing.

Look back at the item from over 60 years ago discussed in a recent post: Still here

My 50-year file of Fine Woodworking magazine is still housed in a large bookshelf cabinet that I made not long after the magazine began. The beds made for my kids over 30 years ago, used by them in their young lives, are still in the house long after they moved into their own.

Now lately these two nifty trucks are for the grandkids. They are not high art woodwork but as personal creations they are meaningful.

Consider this when you work in the shop: personal connections, the joy of your work (usually), and how it may even outlast you. We work with our hands and tools because it matters.

Now a few comments on the kids’ trucks. They are about 14″l. x 8″h. x 7″w. with specially 10 species of nice wood. Practical, rugged, and fun – constructed to take plenty of playing action. The one at the top has a lifting back, and the other has a lifting lid of its back.

So, dear readers, get into the shop, go to work, and consider what is really going on – and enjoy!

Category: Ideas  | 4 Comments
Author:
• Saturday, July 19th, 2025

Four months ago, I replaced almost all of my Norton sanding discs that I had been using with 3M. There is no contest in sanding speed and efficiency: the 3M wins.

3M Xtract Net Disc 710W Cubitron II sanding discs

A few different sources online that I read in the past 6 months show a clear sanding efficiency superiority with the 3M. More convincing for me is the actual use in my shop. It sands faster and lasts longer.

One quirk that I have with the 3M product is the progression of grit: 80, 120, 180, 22o, 240, 320. I think a more sensible progression is 80, 120, 150, 220, 320, 400, which with Norton. Why is 3M’s 240 between 220 and 320? And why not 120-150-220? I suppose 120-180-220 with 3M is probably fine but seems a bit odd to me.

On Amazon, I found $0.73/disc for a 12 pack of 6 grits, and $0.48/disc for a 50 single-grit pack.

I use the 5-inch discs on the cordless DeWalt DCW210. I attach it with a 1058 Design nozzle whose other end (1 1/4″ inside diameter) I filled inside to allow it to firmly connect to my Fein collection vac hose. I also have a handy power switch near the end of the Fein hose. Virtually all of the dust gets collected! 

I always finish off with fine hand sanding paper (such as 320 or 400) to improve the final look.

I almost like sanding now! OK, I do like it a little bit! But I love the results!

Author:
• Thursday, July 17th, 2025

Here are a few more optional refinements that you can use with the regular sharpening system as described in the previous post.

Method #1

After finishing on the stones, I spend less than a minute with diamond compounds. I use 1/2µ, 1/4µ, and finally, 1/8µ. The diamond compound is from Beta Diamond Products, Inc. in the Medium Concentration, Oil Soluble.

The diamond concentration has simply been applied to leather fabric that has been lightly glued to flat wood. The stroke with the tool is pulling back at the correct angle (as discussed in the last post, most commonly 32.5°) just a few times.

I also add just a bit of back/diagonal pull on the back layer of the tool using the finer micron diamond surfaces. That is the same way as done with the final stone. (See the series Ruler Trick” parts 1 – 5 for all the details. For this diamond procedure, I use the 0.015″ strip to make 1/2° (see Part 4) to accommodate for the width of the material.)

This “optional” bit of quick extra work refines the final edge.

Method #2

For some tools with  just mildly dulled edges such as in the middle of dovetail work using the great Japanese chisels, I very quickly resharpen by skipping the stones altogether and quickly using pull strokes on aluminum oxide films. These have been applied to a flat 3/4″ plywood base.

I use the same finishing angles as with stones, though only pull strokes for the angled side of the tool. I find it too easy to cut the paper by pushing.

I use the aluminum sheets of 1.0µ, then 0.3µ, which is even finer than the finest stone. I finish with back/diagonal strokes. (0.020″ strip. Again, see the Ruler Trick, parts 1-5″ series.)

There are diamond sheets available down to 0.1µ but are many times more expensive than aluminum. The aluminum oxide 8 1/2 x 11 sheets by 3M are about 1/20 the cost of the equivalent area of diamond sheet. I have not found a great advantage of the diamond sheet.

You can also use an aluminum oxide sheet of 3µ in a stone-replacement routine. I do not do this but instead, I go back to the stones.

Method #3

This is the simplest, least expensive, easiest refinement of sharpening!

Use the 0.3µ aluminum sheet just to finish off your routine stone sharpening, instead of finishing it off with the fine diamond compound as described above in Method #1. It is a cheap, simple, and quick way to take a step beyond the stones!

Well, maybe I should have described this last method first, but I wanted to generate the understanding of my sharpening methods.

These are all very easy and fast refinements to your sharpening work that can increase the performance of your tools AND help your fine hand tool woodworking!

Category: Techniques  | Leave a Comment
Author:
• Thursday, July 10th, 2025

We cannot do fine hand tool woodworking without very well sharpened tools. Yet, we want sharpening done in high quality and without great effort. 

So let us look at logical efficiency.

Now for most tools, I work with a 27.5° main bevel, and a 32.5° edge bevel. Use your choices in angles. (Forget my decimal numbers. I just established them long ago with equipment and nerdiness.)

If the working edge has deteriorated a lot from use, particularly with edge breaks from rough work, or if there has been a large series of sharpening done that greatly expanded the second, steeper bevel (32.5°), you need to regrind. Most of the time, you don’t need to do this but it is easiest to do with a machine.

The first step is to grind the lower (27.5°) edge on a wheel. The expensive Tormek machine is a basic approach. I have had one for about 25 years but now I suggest a similar machine at about one-fourth the cost. I also suggest a CBN wheel (cubic boron nitride), 10 or 8-inch diameter (8 is cheaper and easier), and ideally 2 inches wide, but spend less for a narrower wheel if you need to.

Grind away the bulk of the edge. If the edge tip is not broken up much, then barely avoid cutting the very tip (and usually the corner at the top). If the edge is broken up a lot, then just barely cut it away too.

It is not necessary to be exact about the angle. Here, we are working efficiently without a high-speed wheel. I like a 200 grit wheel. 

Now to the stones. Or directly to them if the edge is not too bad.

If the blade has been machined fully or just short of a rough edge, start with a course stone at the low angle (27.5°).

If this is one of the majority of sharpening times without machining, go right to the intact higher angle (32.5°) 

Now let us look at how we will use the hand-work stones.        

Here, organize your approach based on the micron levels. The micro numbers guide the fineness of the cuts. I work with these:

45µ  Most coarse.

  I use a two-sided 9µ-45µ combo DuoSharp E/C. It is fast.

  The step from the 9µ.

0.5µ  The final step.

I use the 45µ on a more dulled edge, especially with breaks, and if it has been machined to the edge.  

However, most of the time I start with the 9µ. That is because I try not to delay to resharpen. In a really minimally imperfect edge, I go right to the 2µ. Use your judgement. Sense and see the response you are getting from the stones. 

Note that the step interval is about 1/4 to 1/5 degree of fineness. That is the key to making sense of the stone progression. You could use smaller micron steps but you will need more stones, more setup, and probably take more time.

From the DuoSharp 9µ I go to a Shapton Kuromaku 8,000 (~2µ), then finish with the 0.5µ. Regarding the finest stone, after many years I continue to use the Suehiro 20,000 0.5µ as the final stone. It is a great stone leaving a great edge. It is now about $265! The Shapton Kuromaku 30,000, also 0.5µ, is even more at about $345, and their 30,000 Glass Stone, also 0.5µ, is about $290! 

But I notice online, the Proyan 15,000, which is 0.64µ, is only $46! I have never tried it but it sounds like a nice deal to finish off with.

Another way, but not quite as good, is to use a 3 or 4µ instead of a 2µ, and finish with a 1µ, such as a the much less expensive Shapton Kuromaku 12,000. Finishing off with a mere 3µ, such as a DMT 8000, will not give the same quality edge as the finer stones.

That is a rational plan for managing your tools. I will later go on to discuss  some ultra-fine very quick applications to do after the stoned edge.

Category: Techniques  | 6 Comments
Author:
• Thursday, July 03rd, 2025

Dear readers, you might wonder why I started writing again last week but was gone for over two years. (This site started in 2008.)

Here is the story.

I was in excellent health – regular doctor visits, no medications, excellent diet, weight, and exercise. However, at the gym one day, I fully collapsed, immediately unconscious. I was rushed to the hospital and underwent brain surgery for a major hemorrhagic stroke in my left-side brain. 

It was May, 2023. This was very bad.

For the next six months, with some hospital stay, shifting to home stay, and back to medical institutions, I worked on recovery. Unfortunately, things got worse by the end of 2023 and early 2024. The second major surgery, to put parts of my skull back together and try to make my brain work, occurred in January, 2024.

I was unconscious and near death, and had religious final rites.   

Odds were not much in my favor, but I lived. Still living in a supportive medical facility, I was a vegetable. My right leg and right arm were completely disabled. I could not speak, move, eat, or have basic systems work. In fact, I have almost no memory of the first 5-6 months of 2024. 

But by late May or early June, 2024, I started to gain some abilities. I could move with supportive equipment, and had some pathetic speaking ability. Of course, I had little understanding and I could not read a word. 

I recall watching a comedy movie about baseball and I was able to laugh. And I enjoyed music.

Some abilities started to return. I realized I could battle forward. I spent the next six months still away from home but working at everything. I relearned to speak, to move, and eventually to lift and walk, to read and to write (4 – 8 hours per day of studying) . . . and to live.

I much later learned via a knowledgeable medical source that about half of people who got what I did unfortunately do not live through it. 75% of the living end up in a bad, restricted state. The remaining 25% of the living gain some improvement but extremely few return to a full life. I am lucky, I did.

By the end of 2024, I came back home. I continued to improve. I can walk, hike, run a bit, exercise and lift heavy weights, read, write, and just LIVE. I diligently continue to work on all aspects of improving. It is going very well.

I do not quit.

I happily restudied woodworking with countless hours in the home shop! On June 24, 2025, I started to write online again. 

That’s my story.

Thanks be to God. Thanks to my family. And, my dear readers: I’m back online.

Click below to enjoy:

So put me in coach, I’m ready to play . . .

Category: Ideas  | 17 Comments
Author:
• Tuesday, June 24th, 2025

Yes, I’m still here. The last post was over two years ago, so perhaps you wonder what has been going on with your devoted author.

I will tell you but in the next post. Here, I want to go way back and tell you first about when I began woodworking. I mean way back. Enough that I can truly say that I’ve been woodworking for about 62 years.

In the basement of the family house, prior to Palm Sunday, I built a little Catholic memorial and then gave it to my mother and father. I did not see it again until 59 years later when I discovered it shortly after my mom died (at 102; dad at 91).

She had saved the woodwork in her small number of collectibles.

Woodworking. It mattered then, and it still does.

And this is how and why I work a saw, chisel, and plane. Because what I do matters.

Go ahead, dear readers, pick up your tools and make things.

It matters.

So, I’m back online. I will tell you in the next post what has been going on. And after that, we will do more woodworking stuff. Lots to come.

Category: Ideas  | 4 Comments
Author:
• Sunday, April 30th, 2023

Ruler Trick for short blade

Ironically, I do not use a ruler for the Ruler Trick. As I described in a post about five years ago, I like a 0.020″ strip of plastic cut from shim stock and roughened on the bottom for a better grip on the stone. This is about the same thickness as a 1/2mm ruler.

One advantage of using shim stock is for short blades. In the photo above, I am using a 0.015″ shim to raise the spokeshave blade to approximately the same angle as a 0.020″ shim raises a full size blade that fully straddles the stone. Perhaps this adjustment matters little but it helps keep my sharpening technique consistent and it is simple to do.

Many specialty and joinery planes have short blades, and many are bedded bevel up. Some of the bevel-up blades, such as side rabbet planes, have quite a low clearance angle. The Ruler Trick is especially helpful on these.

The blade of the wonderful Veritas router plane is detachable from its vertical stem for convenient sharpening. The clearance angle of the blade as installed in the plane is only about 5°. For this little blade, only about 1 inch long, a 0.005″ shim gives about same 1/2° back bevel as a ruler or 0.020″ shim under a full size blade.

Regarding the direction of Ruler Trick honing as discussed in the previous post, the spokeshave blade above is about the shortest I can practically use the across-the-edge motion. For very short blades like the router and for short skew-edged blades, the along-the-edge motion is more practical.

Woodworkers are indebted to the late David Charlesworth for the Ruler Trick and for the abundance of his other insightful teaching.

Category: Techniques  | Tags:  | Comments off