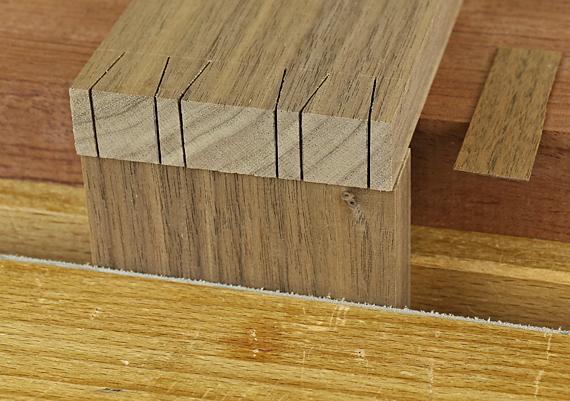
In writings from the 1970s and 80s, Charles Hayward, Ernest Scott and others discuss using shallow saw kerfs to mark the tail layout onto the endgrain of the pin board. The idea is to drag the saw through the tail kerfs, which act as guides. There is no instruction to laterally displace the tail board to compensate for the width of the kerf, and so the intention is to saw to one side of the mark.
I find it difficult to start the cut by following such a mark. Moreover, if the start of the cut is imperfect, it is too easy to become disoriented by the hacked up endgrain surface. I do not like or use this method.
A better method is to use shallow kerfs to guide the placement and engage the saw as you start to saw the pins. Of course, you must laterally displace the pin board to compensate for the kerf thickness. Otherwise, the sockets will be too wide by the amount of two kerf widths.
I do not know who first came up with this method. I first saw it on Kevin Drake’s website. More recently, dovetail master Rob Cosman, who mentions that he learned it from The Encyclopedia of Furniture Making by Ernest Joyce, has taught it. I suspect that like most woodworking methods, it has been around longer than we realize.
In the demonstration photo above, the tail board is shifted one kerf width to the left to prepare for making marks through the kerfs on the right side of the tails. This puts the kerf marks in the waste wood of the sockets on the pin board.
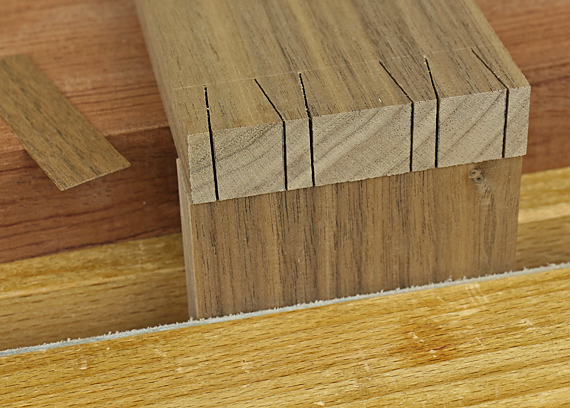
Below, the tail board is shifted to the right for making the marks through the kerfs on the left side of the tails.

To gauge the shift, I used a shim that is a tight fit in a kerf made by my dovetail saw. You can regulate the tightness of the joint and/or allow for a margin for error by adjusting the thickness of the shim. Making a slightly thicker shim (say .002″ or a piece of Scotch tape) will make the sockets slightly undersized. This may be good for softer, more compressible woods.
Make the kerf marks before sawing or chopping out the waste between the tails. This gives you a tighter guide. Note that you have to saw the tails square or at least to a one-sided tolerance.
You will need a specialized tool to make the kerf marks. With a Western saw, it is impossible to make them on the push stroke, and slow going on the pull stroke unless the wood is quite soft. Japanese saws do not work well for this because the teeth do not extend to the toe of the blade.
Kevin Drake’s system uses a hawk bill scraper, which acts as a saw with a single big tooth, while Rob Cosman sells a nifty marking tool that is essentially a tiny pull-stroke saw with the same kerf width as his dovetail saw. Note that Drake’s system uses a special dovetail saw with no teeth at all at the toe to aid in registering the saw in the kerf mark.
Unlike when using a scriber or knife, it is easy to inadvertently shift the tail board when making these pronounced marks in the pin board endgrain. A dovetail alignment board of the sort used by David Barron is one way to minimize this. This tool is a great aid to dovetailing no matter the transfer method you use.
Another method, is to make a very shallow rabbet (1/32″ is enough) on the inside face of the tail board. This gives a dead-on, steady alignment of the tail board against the pin board. I really like this trick for dovetailing in general and use it especially for wider boards. I recall first learning it from an article by Rob Cosman in Popular Woodworking (April 2006), where he notes that he learned it from Ian Kirby.
Remember, any method of marking out the pin board goes better if you are working on cleanly sliced endgrain, at least from the table saw or, better, from the shooting board.
So, there you have it: three posts on the critical step of transferring the tail layout to the pin board. I suggest experiment and choose what works for you! My go-to method is still the scriber. I cut my first dovetails 40 years ago but I still like to explore and refine different methods. I’ve only experimented with the kerf mark method, but I may adopt it for some circumstances. I like having options as various woods and constructions favor different methods.


Great reading! I am a beginner and have been practicing sawing and studying how dovetails are cut. It seems that there are many techniques out there.
I see from your photos that you mark your pins without completing the tail horizontal cut. This leaves just the saw kerf as a guide and you would need a thin blade to mark the pins. Do you normally do this?
Thanks,
John
Hi John,
In this post, I am only discussing and demonstrating methods to mark out the pins using the kerfs made on the tail board. As mentioned above, a special tool is used for this mark out. I do not use this method.
Refer to the earlier posts in the series. I like a scribing point or, sometimes, a marking knife, to mark out the pins from the tails.
I completely remove the waste between the tails before using the tail board to mark out the pin board. I use a Knew Concepts fret saw to cut out most of the waste between the tails, sawing very close to the cutting gauge line. Then, I chop to the cutting gauge line.
I clean up the tails as needed, particularly checking that the walls of the tails are square to the face of the board. (This is a one-sided tolerance task – if it’s a trace out of square, it must be in the correct direction to avoid any gap on the outside of the joint.)
Then, I use the tail board to mark out the pin board.
I hope the blog is helpful. Just drop me an email if I can assist.
Rob