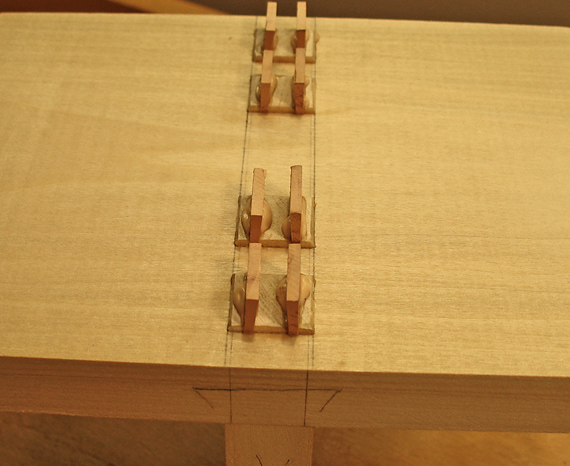
The usual directive is to flare the end grain mortise walls and wedge the tenons against those walls, as in the photo above. With the opposite configuration, which has the side grain mortise walls flared, there is reasonable concern that the wedges might exert pressure across the grain of the mortised board sufficient to split it.
However, there is another important way to consider this joint.
In the conventional configuration (photo above) with a well-fit joint, strength is created by the glue bond of the long grain-to-long grain interfaces, which are not wedged. In the long grain-to-end grain interfaces, which are deficient as glue surfaces, strength is created by the mechanical action of the wedges. Thus, all four interfaces contribute to the strength of the joint.
In the opposite configuration (as in the photo below), the wedges apply some “clamping” pressure for the long grain interfaces, but I would contend that is largely superfluous. At the same time, the long grain-to-end grain interfaces are mostly wasted as strength components.
Therefore, to maximize the strength of this type of joint, the conventional wedge configuration is better. In all cases, I think it is best to clamp across the joint and then insert the wedges.
Now, realistically, splitting is not likely in the opposite configuration with judicious wedging, especially if the joint is not too near the edge of the board. And the multiple mortise and tenon joint is probably more than strong enough in either configuration for its typical applications. Still, it is a labor intensive joint and one therefore tends to minimize the number of tenons, so it pays to get the most strength from each one.
The whole point here is to think about what is actually going on in the design of the joint, and make rational choices.
You can find step-by-step instruction on making this joint in my article, Making Multiple Through-Mortise-and-Tenon Joints, in the August 2008 issue (#170) of Popular Woodworking magazine. By the way, an important aspect of my method is to not use a fully housed tenon board as is often advised.
We should not be too definitive about these matters because each piece has different requirements for strength and appearance, and other factors inevitably influence both. Interestingly, in the same issue of PW, Bob Lang uses dual M&Ts to join shelves to the sides of a bookcase, using an approach very different from mine. Yet, I’d bet his bookcase is still going strong.
[Photo of the “opposite” configuration courtesy of Mark Ketelsen.]

Tage Frid and others split the difference and wedged diagonally, corner to corner. I have tried that approach and everything’s holding so far.
Hey Tico,
Yea, a different approach, and I have no doubt that what you are doing works. However, according to Frid’s instruction in his book, he did not flare the mortises. He used the wedges essentially to compensate for any minor errors in the tenon-mortise fit, and as a form of clamping.
When the tenon is wedged on the diagonal, I question how much the tenon can actually be flexed by the wedge. I’m sure it is enough to compensate for the inevitable small errors in fit with a mortise that is not flared. However, if the mortise is intentionally and significantly flared to create a good mechanical lock, I’d wonder if the tenon can RELIABLY flex enough to fill the flare. And a partially empty mortise is bad news, especially when it’s visible.
I guess it comes down to the specifics of joint dimensions (tenon width and depth), wood species, and the specific application.
There’s always more than one good way to do this stuff.
Rob