When to remove the clamps
The instructions on the Titebond III bottle recommend “clamp for a minimum of 30 minutes (longer is better)” and “Do not stress joints for 24 hours,” which is how long PVA glues generally take to fully cure.
I leave the clamps on at least overnight. There really is no hurry to remove them unless they are needed for other work. Furthermore, I will not be working the board for at least 24 hours to allow time for the joint to condition and the board to reach a uniform moisture content as excess moisture exits the glue line area. This avoids producing a sunken joint line or depressions over the biscuits when surfacing the panel.
Also, it seems plausible that the joint could be stressed from changes in moisture and applied forces if the clamps are removed too early in the curing process.
For these reasons, I put the assembly aside and wait until the next day to remove the clamps, tending toward longer times for larger work, and up to 24 hours if there are any doubts about the behavior of the wood. Small, light panels such as a drawer bottom can be unclamped sooner.
Flattening the panel
Hopefully, this will be fairly easy and corrections will be well within the range of hand planing for small to medium panels if biscuits were used for alignment. The panel only needs to be flat enough for its function. Don’t worry about small imperfections that yield to light hand pressure and, for example, a table frame will easily flatten. On the other hand, don’t allow an errant panel to twist the frame of a light cabinet door that needs to fit and close precisely.
As needed, work diagonally with the jack plane to true the surface, then finish off with the smoother or scrape or sand to the final surface.
If you glued up a large panel in stages, you may be able to flatten the intermediate glue ups with a wide jointer-planer, minimizing the work required on the final panel. For a big table top that needs significant correction, consider using the services of a local commercial shop with a giant wide-belt sander.
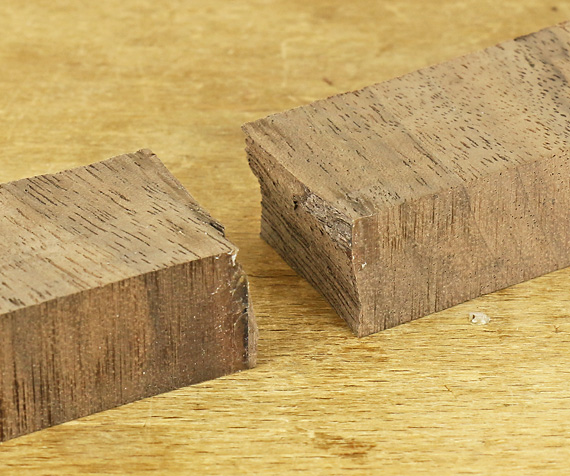
It is reassuring to do some testing on the off-cuts, as in the photo at top. I grasp both ends of the off-cut and bash the joint line against a hard table edge. Though the force is directed on or very close to the joint line, only the surrounding wood will break while the joint line remains intact.
Summary
To confidently and efficiently produce sound edge-to-edge joints and beautiful glued-up panels, here is what to do:
- Select reliable wood to produce visual and structural harmony, especially along the joint line.
- Use straightforward methods, finishing with hand planes, to make good joint surfaces that fully meet. Use the slightest bit of camber as a one-sided tolerance.
- Use biscuits for alignment in boards thick enough to accommodate them and the special method for small, thin boards.
- Use parallel-head clamps with a simple tunable setup.
- Rehearse the glue up then work fast.
- Feel good about what you made – it’s going to last!
Closing thoughts
I hope this series on edge-to-edge joints will assist you in this essential aspect of woodworking. In writing this blog, I want to empower people to make things and experience the quiet – yet great – joy of it. I’m not an infallible guru – no one is. Nevertheless, I can assure you that these methods are carefully thought out, researched, have been used by me for many years, and actually work in my shop.
Of course, there is more than one good way to do almost everything in woodworking, so you will surely find those who disagree with some of what I have presented. No problem. Please do consider alternatives, try things in your shop, and ultimately use your judgment to find what works for you in your shop to give you the results you want.
NOTE: The entire 6000-word series on Edge-to-edge Joints and the many other series on this blog can be conveniently accessed via the Series page.
