Sharpening is such an important part of woodworking that it deserves its own place in the shop. A dedicated bench is made with features conducive to efficient sharpening, such as an ideal height, just as your workbench is designed for efficient woodworking. Furthermore, bringing sharpening gear onto the main workbench interrupts the workflow of a project, and can create considerable mess where you do not want it.
In this series of posts, I will discuss my sharpening bench and setup, the product of many years of evolution, which I have been using in essentially its present state for about ten years. It works well for me but I hasten to add that there are lots of good ways to do these things. This series may be the source of only a single handy tip, or you may want to duplicate the entire setup.
Let’s start with the bench itself. The key features are:
- It’s compact, with a projected footprint of only 4.5 square feet.
- Very rigid and strong, it does not move or wobble when sharpening.
- There is storage for all sharpening paraphernalia.
- It is inexpensive and easy to build.
- Most important, it is suited to the task.
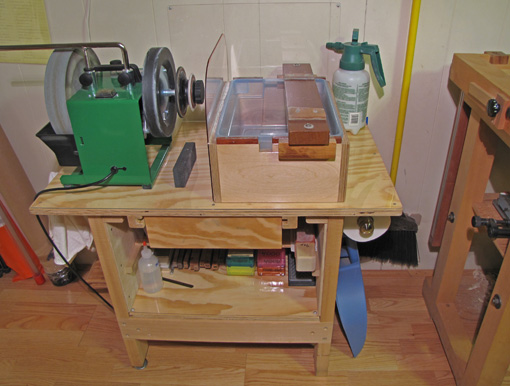
The photo above shows the sharpening bench in its inactive state, nice and neat, though minus the Tormek’s cover. The edge of the tabletop is only 8 inches to the left of the woodworking bench.
Good lighting, an absolute must, is supplied by a fixture above the bench on the wall (just out of range of the photo), and by moving an articulated-arm lamp (with a large magnifying lens) into the workbench’s left-side shop-made bracket (visible near the corner of the woodworking bench).
Water is imported from a nearby bathroom using the pump sprayer bottle, seen on the right. The rear wall is protected from overspray and splashes by a polycarbonate (or acrylic) plate. Paper towels are close by on a dispenser on the right side of the bench, and there is a hook for rags on the left. A scraper/small saw vise is barely visible hung on the left side, in the back.
The yellow paper with a plastic report cover, tacked to the wall on the left, is my sharpening “recipe” sheet.
Thus, when standing in front of this bench, everything is at hand. True, I’d still rather be working wood, but I am ready to sharpen!
In the next post, I’ll discuss the details of the design and construction of the main unit. Later, I’ll cover the box-basin, and the various functionalities of the setup.

I’m slowly coming around to the realization that I need a bench just for sharpening. I’ll have to find a spot in my phone booth workshop and this bench looks to be compact enough to do that.