Archive for ◊ August, 2012 ◊

Author:
• Monday, August 27th, 2012

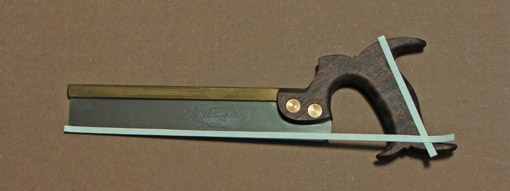
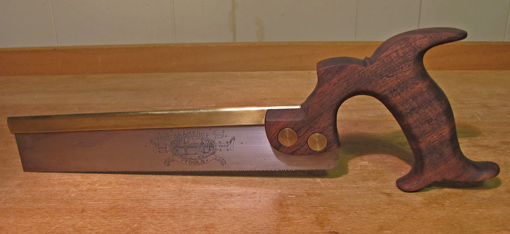
The saw pictured in the previous post, and above, is the Gramercy dovetail saw but that is not the original handle.

In this blog, I have praised the Gramercy saw, and I still think it’s a great saw. However, the original handle is set rather high – a high hang angle – and I have come to dislike that feature. I understand and respect Joel Moskowitz’ reasons for designing it that way but, partly because I’ve reworked some of my sawing mechanics, I now find it just does not best suit me. I’m using a lower stance with my shoulder and elbow more downward.

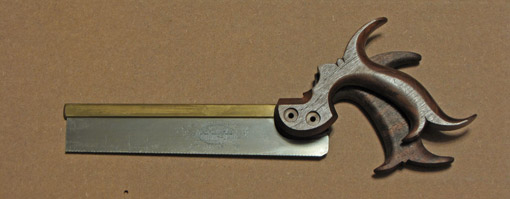
So, I made a handle from some spare Claro walnut. (In the process, I increased my appreciation of the skill level exhibited by professional tool makers. I needed some shimming to get the fit right.) In the photo below, the Gramercy handle is placed in its original position, a hang angle of 35°, for comparison with the 66° of the replacement handle. This is a large difference which, to me, makes the replacement feel significantly better in use. I also like the beefier grip of the replacement better than the skinnier original.
Mark Harrell of Bad Axe Tool Works deserves most of the thanks for my evolution. I have been using his dovetail saw this year and it has become my favorite. The hang angle of the Bad Axe is about 61° and the tote feels just right in my hand. I outlined its basic shape and adapted the front to fit the Gramercy. As Mark explains, the hang angle of his saw “gets you behind the push stroke.” [To be clear, converting the Gramercy saw was not done at the suggestion of, in consultation with, or to the knowledge of Mark. Reading Mark’s ideas and using his saw were informative, but the responsibility for the conversion is mine alone.]
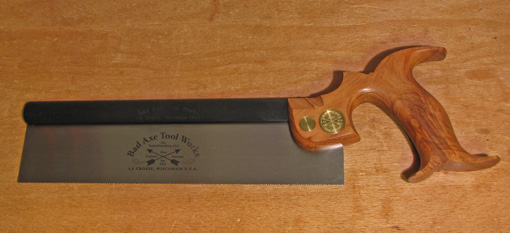
In a future post, I will discuss the Bad Axe saw more, but the summary for now is that it’s wonderful. Mark’s passion for excellence has raised the game for saw making.

Here are a few more thoughts on saw hang angles:

The Disston D-7, pictured below, has an angle of 74° which puts the power more behind the saw, which is needed for heavy ripping with an aggressive tooth rake.
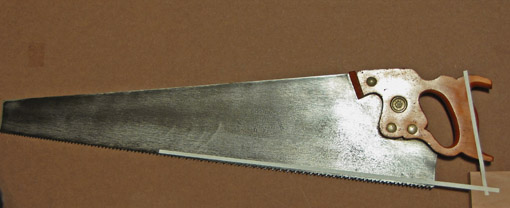
Tilting the wrist can compensate for an undesirable saw hang, but, as any tennis player knows, the wrist is most firm in its unbent position.

Finally, what is the hang angle of the saw below? Defying just about everything discussed here, the Japanese pull stroke saws demonstrate that there is more than one good way to do things.

Category: Tools and Shop  | 2 Comments
Author:
• Monday, August 27th, 2012

A saw that feels just right in your hand and sails through the wood with ease and control is a wonderful thing. An important factor in this is the angle formed by the handle (tote) of a saw and its tooth line – the “hang” of the saw. Though it gets relatively little attention among the details of teeth-per-inch, plate thickness, set, rake, and so forth, the hang is the foundation of your interface with all the other aspects of the saw.

I propose that it is important enough to be routinely specified by the makers of top quality saws along with the other parameters of the saw. True, it can be estimated by simply looking at the saw, but quantifying it would facilitate its manipulation in designing the saw, just as is done with tpi, for example. Of course, similar to all the other quantifiable elements of a saw, the hang defies formulaic prescription because the many factors all work together to produce the desired sawing mechanics, comfort, and effectiveness.

In the saw above, the hang angle is 66°, defined by the white tape lines. Note that the line on the tote connects the two rounded forward-most points on the surface against which your palm rests. This discussion should not be misconstrued as suggesting that a saw handle can be defined simply by a number. Similar to the weight of a tennis racket, the number gives you some information, a manipulable parameter, but does not negate the importance of balance, shape, and numerous other factors, many subtle.

The rake angle of the teeth, essentially the aggressiveness of the front of the saw tooth meeting the wood, is a particularly important influence on the effectiveness of a given hang angle. Other influences include:

  • The height of the work, your bench, and you
  • The balance of the saw
  • Crosscut vs rip
  • Wood hardness
  • Tooth sharpness
  • Your wrist, preferred grip, stance, and body mechanics

The interaction of all these factors will decide what hang is right for you. The main point is that the hang angle is an important element to be aware of when considering a saw. Of course, this is not something to determine with a computer model in an armchair. Try different saws in different cutting situations and see what works right for you. Nowadays, woodworkers are so fortunate to have tremendous saw makers producing magnificent tools.

Next: I will show an example of a saw hang that I decided I did not like, and what I did about it.

Category: Tools and Shop  | 4 Comments
Author:
• Sunday, August 12th, 2012

In managing the fit of the height of a drawer in its housing, the seasonal changes are larger, and thus not a matter of such fine tolerances as with the width which was discussed in the previous post. Let’s take a closer look.

A four-inch high drawer front in flatsawn solid maple will expand about 1/8 inch when the ambient air goes from 35% to 80% relative humidity. For flatsawn cherry or walnut, the change will be about 3/32 inch. For quartersawn wood, the values will be about half to two-thirds of those. Wood finishes will slow but not eliminate these changes, as shown by the work of the US Forest Products Laboratory.

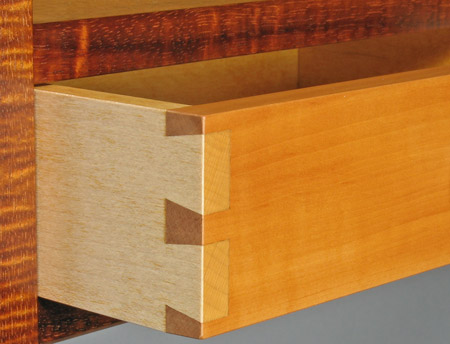
If you are building inset drawers and the humidity in your shop is at the low end of that range, allow those amounts of clearance from the top edge of the drawer front to the divider or case member above it. If the drawer is eight inches high, double those clearance amounts; for a two-inch drawer, halve them. (The drawer in the photo is just over two inches high.) The tops of the drawer sides are made flush with the front, while the top edge of the drawer back is made a bit lower than the sides.

This means that during the dry season, the clearance space above each drawer front in a group will be proportionate to the height of the drawer. This will look odd only to those who do not understand wood. For overlay or lipped drawers, appropriate clearance must still be made but it is, of course, hidden by the front.

Remember too, the depth of a solid-wood case with the grain running vertically will similarly change with the seasons, and thus the length of the drawer must be calculated for the time when the case has the shortest depth, plus a margin of safety.

Woodworking lore and some authors extol “piston-fit” drawers whereby pushing in one drawer in a set will cause others to be forced outward from the resulting air pressure within the case. Well, this can be done and is not very difficult to accomplish. For fun, you might try it on the way to building useful work. To me, “piston-fit” implies virtually zero clearances – which may work for small drawers at one particular time of the year, but not for practical woodworking. Proper clearances for the sides, front, and back that render a drawer functional year-round preclude a true piston-fit. It should not be considered a hallmark of top-quality drawers.

Really, you’ll feel much more comfortable when your drawers have a practical fit.

Category: Techniques  | Comments off
Author:
• Sunday, August 05th, 2012

Drawers must work throughout the year. There is no virtue in constructing an ego-feeding science project with a “piston-fit” in February only to find that you, or worse, a client, are unable to open the drawer in August. Let’s take a closer look.

In the “High-End Drawers” ten-part series on this blog that ran intermittently from July to November 2009, and in the article “4 Steps to a Sweet-Fitting Drawer” in Fine Woodworking magazine #224 (January/February 2012), I describe a reliable process for producing a good drawer fit. But just as with a good suit, a good drawer fit means not too tight and not too loose. With wood, however, we have the added complication of the inevitable changes in moisture content that occur with seasonal humidity changes. A zero-tolerance “piston fit” in February will be all wrong in August.

Let’s think it through.

Consider the width of the drawer in its case. In both solid-board and frame-and-panel constructions, the width of the case remains essentially stable throughout seasonal humidity changes, since it is defined and limited by long-grain pieces. Even the expansion of the side walls of a solid-board drawer pocket will occur on the outsides, not within the pocket.

The drawer sides are oriented to expand laterally. (Their expansion in height will be discussed later.) As an example, hard maple, typically quartersawn for drawer sides, 3/8″ thick, will expand .012″ (12 thou) over a humidity increase from 35% to 80%. Drawer sides normally receive little or no finish, so these changes can, at least theoretically, occur rapidly. There are some mitigating factors though, including that the drawer spends most of its time secluded in the case, and the sides are somewhat bound by the joinery, usually dovetails. However, PVA glues retain some elasticity, as evidenced by the tiny elevation of tails above the endgrain of pins in very humid conditions. It should be noted, however, that this theoretical amount of expansion does not seem empirically to fully manifest.

Does this matter? Yes, it does. With the incremental construction method wherein the final step of fitting the drawer to its pocket is to plane the sides down to the level of the endgrain of the pins of the front and back, the drawer width can easily be fit to tolerances of a few thousandths of an inch.

So, if during the dry months, the drawer width is fit like a piston with a clearance of say a couple thou between the sides and the case, it is sure to be too tight in the humid months.

Is this all just theoretical? Not at all. I can tell you from experience that it matters. Years ago, during a low-humidity season, I made some nice drawers with a piston fit. I felt proud and thought that since they were small drawers, all would be fine during the coming summer, and I could get away with this exercise in ego-stroking perfectionism. Not so. The following August, neither drawer could be opened.

That is not practical woodworking. The perfect defeated the good. That Fall, I made things right.

Right now, in an August steam bath here in the Northeast US, drawers in pieces that I made several years ago operate well but with almost no remaining clearance. That’s fine. In the dry winter, the fit of these drawers do indeed have more play in width, but are by no means sloppy.

In summary, if you are building a drawer during very humid weather, fit the width to be very snug. If you are building a drawer in the dryness of February, you must leave some allowance.

Ah, but how much allowance should you make when building in dry conditions? It depends on the thickness of the drawer sides (less for thin sides), the species of wood, and the conditions where the piece will be housed. More play is appropriate in large, practical drawers than in small, delicate drawers. It helps to keep your shop from getting too dry in the winter. This will reduce the range of estimating that you have to do.

To avoid a stuck drawer, stay on the safe side but don’t go so far as to make a clearance that feels at all sloppy in dry conditions. For a small drawer, building in dry conditions, I like to at least get a sheet of paper, maybe two, in there on each side. Experience helps a lot; I go by how it feels. The theoretical expansion amount calculated above will be too much allowance.

Of course, haha, if your piece will be placed in a climate-controlled museum, don’t worry about any of this!

Next, we’ll look at the height of the drawer and appropriate clearances. That’s important too, but less finicky.

Category: Techniques  | 3 Comments