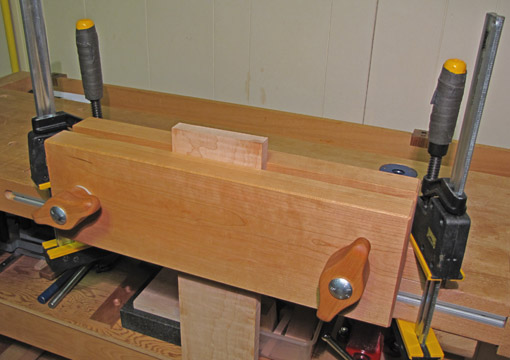
For sawing dovetails, as well as various other tasks, this vise raises the work piece to a more comfortable height than does the typical bench front vise. It was first described by Joseph Moxon, the seventeenth century author of The Art of Joinery. Credit for its revival and refinement goes to Chris Schwarz, editor of Popular Woodworking, who published a modern adaptation of Moxon’s text along with extensive new analysis. Chris published plans for a vise in the December 2010 PW. Stephen Shepherd’s insights and the variations produced by web authors such as Derek Cohen have added to our shared knowledge. What a wonderful example of the vibrancy of current woodworking!
That said, I’ll toss in my two cents: I built my version of the vise and would like to share it with readers.
I used an 8/4 cherry board that had been hanging around the shop far too long and $22 of hardware available locally. The vise jaws are 1 3/4″ thick, 6″ high, and 19 1/4″ wide, with a clamping capacity of 14 1/8″ between the bolts. The ½” diameter 8″ carriage bolts are set in functionally shaped handles. Each is secured with a cross pin (finishing nail) passing through a hole drilled in the shaft of the bolt. The handle shape facilitates a one finger spin of the lightly waxed bolt as well as a solid grip to sock the jaws tight. Clamping thickness capacity is at least 2 ½”.
In the front jaw, for smooth operation and to protect the wood, each bolt is supported in a ½” ID, 3/4″ OD, 1 1/8″ long oiled bronze bushing which sits in a stepped hole. To prevent erosion of the bushing, the first 1 1/2″ of the bolt threads is filled with epoxy and the sharp edges of the threads were eased with a file. A 1/4″ thick, ½” ID, 1 5/8″ OD nylon washer, sanded flat, placed between the handle and the front jaw, protects the wood.
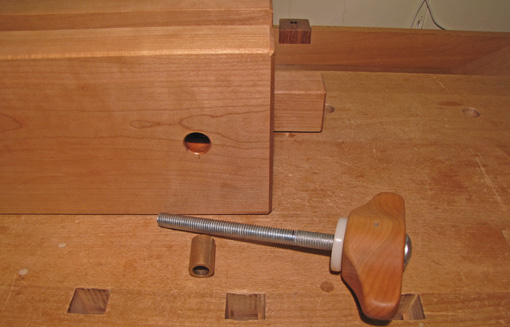
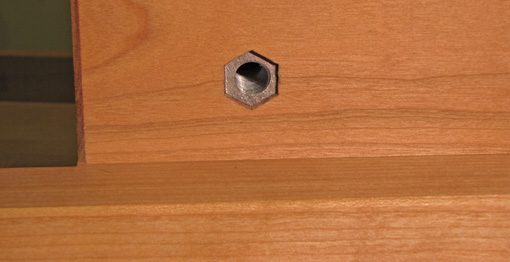
To receive the bolt in the rear jaw, a 2″ long coupling nut was hacksawed to about 1 3/16″ and set from the back side into a stepped hole chiseled to a matching hexagon. This gives more support than a regular hex nut. A wood screw that meets it from the side prevents any chance of the nut twisting in its housing.
The rear cleat, about 1 3/4″ square in section, extends to each side 2 1/4″ beyond the jaws and allows for convenient clamping to the bench. Thanks to Derek Cohen for this idea. I chamfered the edges and finished the wood with one coat of oil-varnish.
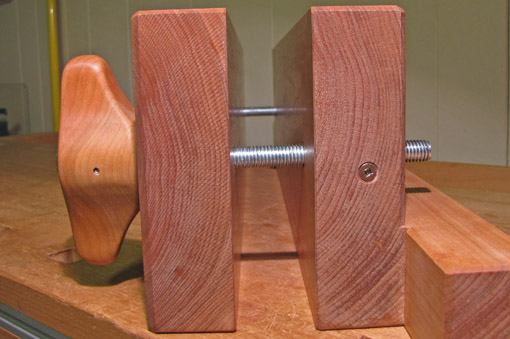
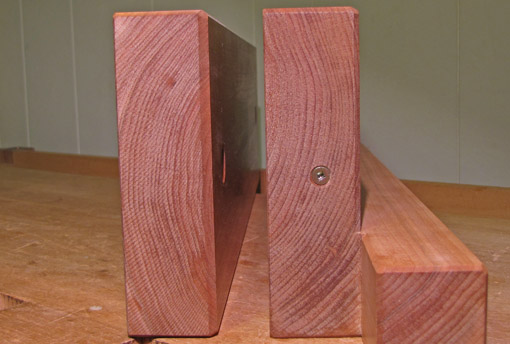
One more detail. Quartersawn wood would have been ideal but I used flatsawn wood because that is all I had available in this thickness. It will inevitably cup and reverse through the seasons. I wanted to avoid a vise that in some seasons would grip the wood only at the central part of the jaw faces and thus make the work piece prone to slipping. I arranged the growth rings as shown in the first photo below and not like the photo beneath it.
Here’s why. I built the vise during the approximate midrange of the yearly humidity cycle in my shop. I left the inner surface of each jaw very slightly concave across its width. As the driest months come along, the inner surface of the front jaw will become more concave while the mating surface of the rear jaw will become flat, then slightly convex. Thus, the grip will be maintained at the limits of the width of the jaws. As the humid months come along, the rear jaw’s inner surface will become more concave (than now) while that of the front jaw will become flat, then slightly convex, again maintaining a good grip of the work piece. Too punctilious you say? Well, the pieces were going to be given some arrangement and I preferred giving it some thought rather than just guessing, and this is one simple solution.
The vise now has had test runs in the shop and I like it a lot. It feels more ergonomic for use with a Western dovetail saw than with a Japanese saw due to differences in the handle angles, but it is good for both.


Thanks for posting – I was thinking about building Schwartz’ and wondering how I was going to turn the wooden handles since I don’t have a lathe… now I have another option!
Nice design. How is the cleat attached to the rear jaws?
Very nice version of this concept. I have an elderly 8/4 chunk of white oak that should do the trick as well. Ithink I already have the hardware including the bronze bushings!
In the top photo, do you have a piece of T-track let into the front edge of your bench? What do you use it for?
Kevin,
You’re welcome. There are other options for us lathe-less woodworkers. A Google Image search of “Moxon vise” shows some really clever ideas including one using pipe clamps that looks very quick.
Wesley,
Thanks. With glue and, for alignment, a few biscuits.
Mike,
Good luck with the build. The T-track is for use with a toggle clamp that rides on a small sled. It is used in conjunction with the front vise for clamping wide boards and some medium length boards. Details are in my article in the November 2007 Popular Woodworking.
Rob
I made one closer to Chris’ version recently. I’m not thrilled with the wooden threads operation as produced using the typical $45 kit ubiquitously available. Likely, some of the play and tightness in my threading is due to my inexpereince in using the tools, so bully to those reading this who have had good results. All this is to say that your use of metal was smart for smooth operation. I’m determined not to let wooden threading get the better of me, so I did what woodworkers ususally do in such situtations, I bought a better tool! I’ve obtained the Beal system, and have high hopes that it will make higher quality threads that operate more smoothly. If that doesn’t work, I may have to try your solution!
By the way, does the spinning mean that the relatively high thread count per inch doesn’t slow you down much?
Also, I see Chris has lined one of his with suede on one jaw. That might help with holding as the wood moves too. For what it’s worth.
Best,
Sean
Hi Sean,
The relatively tight pitch of a steel bolt compared to wood threads was a concern. I knew that the high tpi of a steel bolt would give lots of mechanical advantage to sock the jaws tight but I was concerned that it might be annoyingly slow to move the jaw. But no problem, this construction allows the bolts to spin very smoothly, so the jaw adjusts quickly.
I haven’t bothered lining the jaws because I’m getting plenty of grip as is and I think the suede would eventually wear and need replacement. Too complicated.
Good luck with the build. Drop me an email if I can help if you decide to build the steel version.
Rob
Finally got this done this past weekend. The Beall threader worked very well. In the spirit of sharing versions of Chris’ revived Moxon, here’s mine:
http://www.flickr.com/photos/chevy_chase_hughtos/5608136319/
Sean
Looks great, Sean! Nice features, especially the cutaways for the clamps and the vise handles.
Rob
Looks great Rob. Just shows that there are many routes to the same end and that a great vise can be build for very little. I really like the bushings, this may be a modification I make to my Moxon.
Chris
Thanks, Chris.
Rob
Great design! I think I will be making one very similar for my workbench!