Gimlets can be handy tools especially when you need to bore a small hole and the usual drilling tools cannot fit in a tight space. I usually find myself using them if I’m in a jam, meaning that I need to drill a hole that I should have made at an earlier stage in construction. I find gimlets useful in small diameters, from 5/64″ to 5/32″, and mostly use them to pre-bore for screws.
The problem is that gimlets do not work very well – they tend to split the wood. I am referring to the commonly available gimlet with a screw point followed by drill flutes further up the shaft. Lee Valley, Highland Hardware, Garrett Wade, and others sell what appears to be the same set of seven for about $14-$15.
For the record and to distinguish, there are other, fussier-looking, more expensive types of gimlets that more resemble a tapered drill bit, some meant to be used in a brace, that are less widely available and not dealt with here. There is also a Japanese gimlet, the kiri, that resembles a miniature sharply angled spade bit on a tapered dowel handle that is rotated between the palms to bore a hole. Still another tool altogether is the very useful brad awl or bird cage awl.
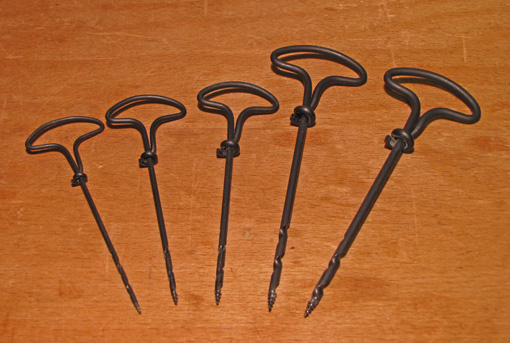
The design of the common gimlet, pictured above, causes the screw threads to feed aggressively into the wood and squeeze past the wood fibers while doing little, if any, actual severing of the fibers. It’s not really much improvement over just pounding a round nail into the wood.
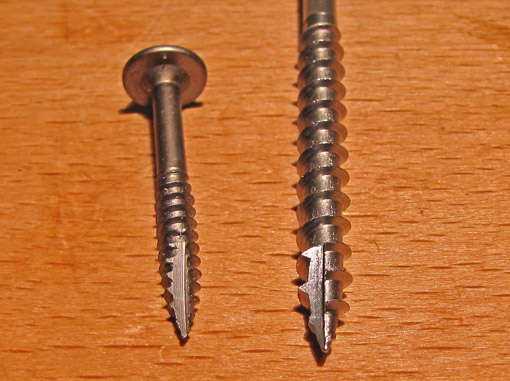
However, consider the design of auger point screws, shown below, such as the type used for pocket-screwed joints. These break some wood fibers as they are driven and so reduce splitting. They do not, however, appreciably clear chips from the hole because the screw threads are not designed to do that. What if the gimlet screw point was altered to mimic an auger screw point so it could cut fibers, and pass the chips onto the drill flutes so they could be cleared?
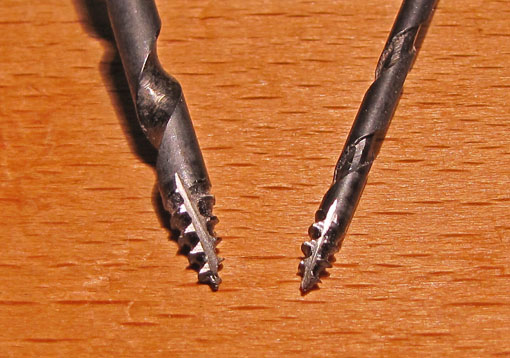
I made this alteration to the points on my set of gimlets. I found that the edge of a Japanese feather saw file (hatsuke-yasuri) did the job quickly and well, even on the 5/64″ gimlet, and better than a diamond paddle or a triangular Western saw file. I cut two slots on each gimlet, 180̊ apart.
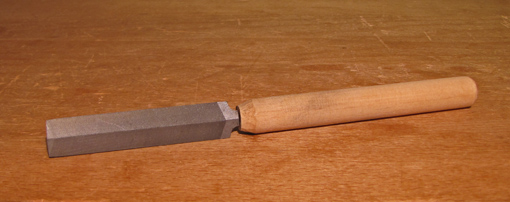
The 75 mm “full cut” Japanese file that I used:
Does it work? Yes, fairly well and certainly a big improvement over the unaltered gimlets! The modified screw point cuts some fibers, makes boring easier, and produces some chips, although the chips don’t get cleared very well by the drill flutes. To compensate, I simply periodically pull out the gimlet to clear chips. Splitting is virtually eliminated.
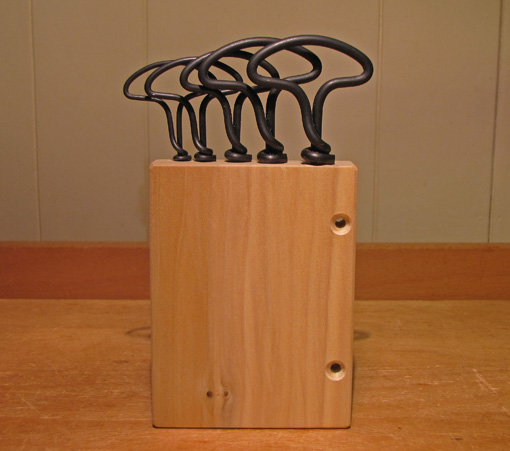
This simple modification turns a frustrating tool into a life-saver in a bind. In fact, I’ve gone from almost having given up on these tools to valuing them enough to make a nice little holder for them which attaches to the inside of a door of my hand tool cabinet.
Addendum: (10/21/10)
By “fairly well” I mean that gimlets still have their drawbacks. They are, after all, very simple tools that are substitutes for more mechanically sophisticated tools that are preferable – like a drill. So, in the context of a gimlet, I think I can say that this modification makes them work, here goes, “well!”
It helps to use the Japanese file to create a clean slot with an approximately 90° attacking edge, as pictured. This edge meets the wood aggressively and breaks the fibers. A sloppy “V” groove would have, in effect, a relaxed “rake” angle to meet the wood and thus be less effective.


Thanks for the nice write up on a very simple, and often overlooked tool. Hope all is well Rob.
You can expect to see your very clever modification in production soon.
Thanks, Rick. I still want a shop like yours.
Paul, Who knows? But I still won’t be rich.
Rob
Hi Rob,
Can you give us an example of when you’ve been “in a jam” and the gimlets have helped out? It looks like their handles prevent them from being able to drill very close to an enclosed corner. How about a high speed drill with a flexible shaft?
Best,
Tico
This is a great example of not reinventing the wheel but paying attention to other things that work and adopting them. Thanks for sharing, now I’m off to cut up my gimlets!
That is a great solution. Thanks for documenting it so well. I’ve avoided buying these gimlets beacause I’ve heard they were less than helpful. Now that has changed, thanks.
Hi Tico,
I also have a flexible shaft for my cordless power drill and that also comes in handy now and then. For a door catch, drawer stop, jig assembly, etc – that type of thing where I’ve painted myself into a corner, are where the gimlets are handy. They are really quite compact, especially the smaller diameters.
Another tool that has helped in similar situations is this little helper from Lee Valley:
http://www.leevalley.com/US/wood/page.aspx?p=32210&cat=1,43411,43417
It holds hex head driver bits AND hex head drill bits, such as Insty Bits. Slow, but it works.
Shannon and Swirt,
I do suggest using the Japanese file if you are going to work on the gimlets. The file costs almost as much as the gimlets, but it’s a tremendously handy tool to have around the shop. It’s very sharp. You can also use it to modify the Hock scraper blade as I’ve discussed here:
http://www.rpwoodwork.com/blog/2010/07/20/working-with-the-veritas-scraping-plane-part-3-microtoothing/
Thanks for reading guys,
Rob
Rob,
Kudos for trying to fight back against these tools. No doubt they can be effective, but just looking at gimlets makes my hands hurt. I’m convinced they were invented as a cruel joke to woodworkers.
-Eric
Thanks, Eric. Ha, ha, I think there’s more than a few other tools that could be added to the “cruel joke” list. But at least gimlets can be made to work.
Rob
So I have tried to do this to one of my gimlets and I’m not sure I can really tell the difference. Maybe I didn’t do it correctly. Can you say how you could tell that a “big improvement” had occurred? (In other words, what’s a test I can try?)
Adrian,
The gimlets cut considerably faster with this modification. Try before and after.
It helps a lot to use a very narrow, very sharp file like the Japanese feather-edge saw file to create a sharp-edged channel. Look at the right side of the channel in the gimlets and the screws, above. It bites the wood.
I hope this helps. Let me know if you’re still having trouble.
Rob
I didn’t trust myself to be able to tell the difference before and after, so I was comparing an unmodified one to a modified one. (This does mean, however, that they aren’t exactly the same size.) I think the scrap I grabbed for testing might have been basswood, perhaps not the best test material? (Or does it matter?)
I used the specific file you recommend. I did have some uncertainty about how much material needed to be removed. That file can make a fairly narrow slot. I widened it some over the minimum size.
When you say it’s faster, do you mean faster to start or faster all the time? Does faster mean that I’ll get a deeper hole with the same number of revolutions? (That would be easy to test because I could count revolutions before I modify the gimlet and then repeat afterward.)
The modified gimlet cuts some of the wood fibers rather than just squeezing past them. So it binds less and in that way is faster – it requires less force. More importantly it cuts better – it avoids splitting.
If you put enough force into the twist, the actual speed of entry would be dictated only by the thread pitch in both the unmodified and modified gimlets.
So I wouldn’t get hung up on counting the revolutions, but rather look at the overall performance of the tool with this modification.
I finally managed to snatch a couple minutes to modify another one. I tried it before. It took for ever to start and then it split the work. I modified it. Then it seemed to dive into the wood…much faster start, certainly…but it still split the work. Maybe I was too close to the edge for hope of not splitting, about 1/2″. But the other modified one seems to be much slower. The test piece is only 1/2″ thick, so maybe I’ll try deeper holes in something else. I’m wondering if I made the tip sharper on the second one and if that could explain the faster start.
I guess one thing I was trying to figure out was whether I have performed the modifications correctly. I seem to be having a hard time getting the leading edge really straight and sharp and angled the right direction. Like on my second attempt it seemed like instead of getting a sharp edge I got a sloping, rounded over “edge”, which seems unlikely to cut anything, and then I was trying to work it back to get rid of the rounding. (I also have a hard time figuring out what I actually did.)