Archive for the Category ◊ Tools and Shop ◊

Author:
• Friday, December 23rd, 2016

marking and cutting gauges

In this series, we will take a close look at gauges, sorting out their useful features and subtle refinements. Though basically simple tools, they deserve our attention because it is awfully difficult to do fine work without clean and accurate marking out.

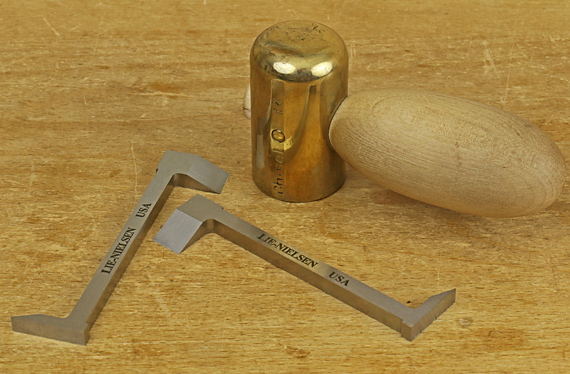
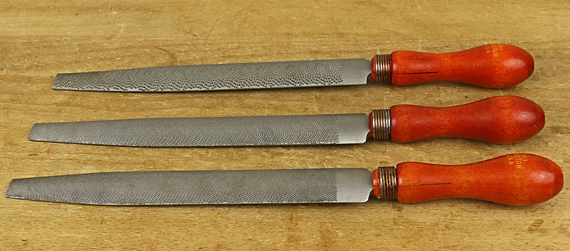
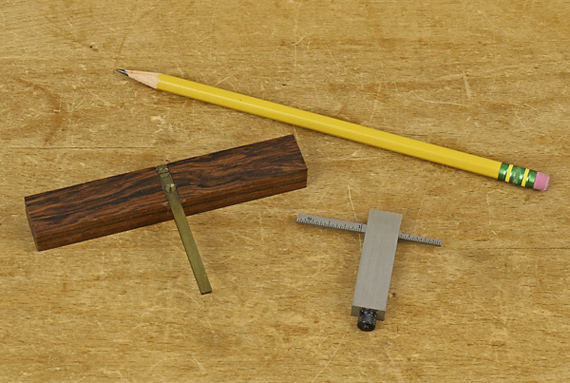
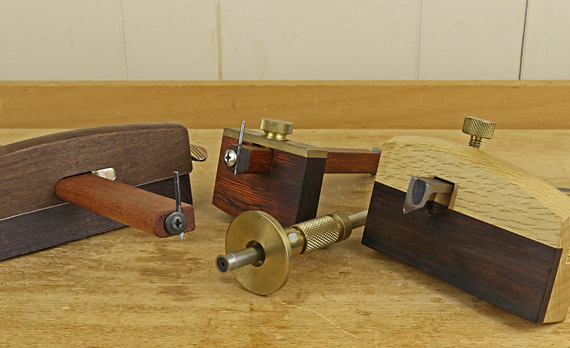
Notice the common feature among these gauges: the point or cutter is at the end of the stem. I prefer this because it makes the marking action easily visible. The starting and stopping locations, and the depth of the mark are plain to see. This feature also makes it easy to set the gauge to an edge or mark in an existing component of the construction.

Most of the available gauges, like the one below, have the point (or cutter) placed well in from the end of the stem where it is less visible. True, tilting the gauge in use, as one should, can give you some view of the point if you push the gauge, but not much if you are drawing the gauge toward you. True also, depending on the situation, attention may be better paid to the registration of the fence against the edge of the board. Still, in my view, it is better to always have the option of easily seeing the point.

marking gauge

The mortise gauge is another matter in this regard, which will be covered later in this series.

I have modified the two gauges on the left in the photo at the top. Leftmost is a Japanese gauge that originally used a cutting knife but is now a 12″ panel gauge. Second from the left, in the back, is a modified Cullen gauge. In front is the Titemark gauge. More on these later in this series.

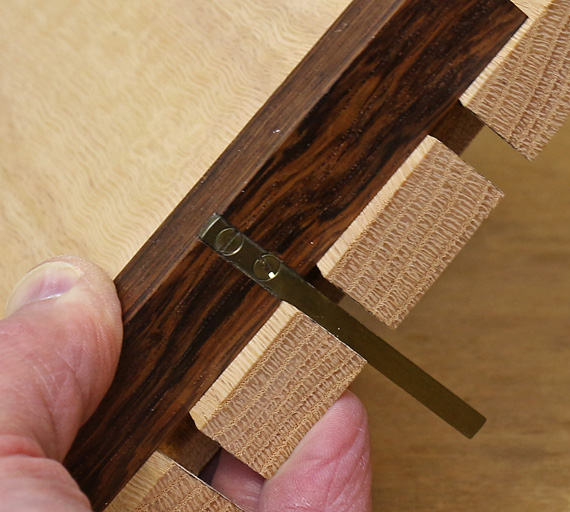
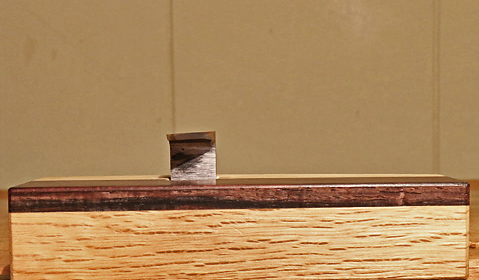
On the right in the photo at the top is a wonderful Japanese cutting gauge that is just about perfect. This is the gauge I always use for dovetailing. It has a broad, beefy fence that is easy to grip in varied ways. The hard exotic wood inlay glides smoothly on the work piece and resists wear.

Japanese cutting gauge

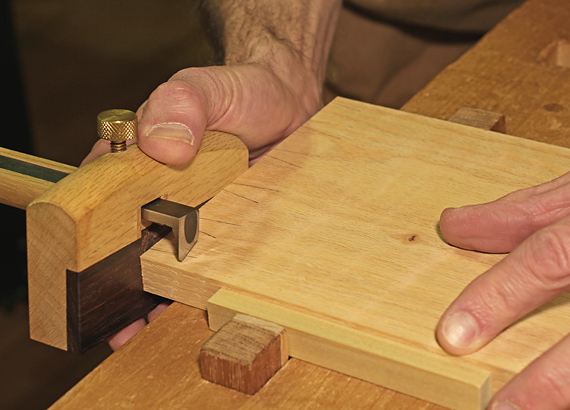
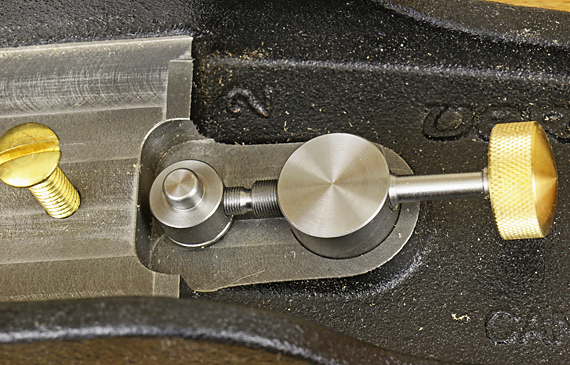
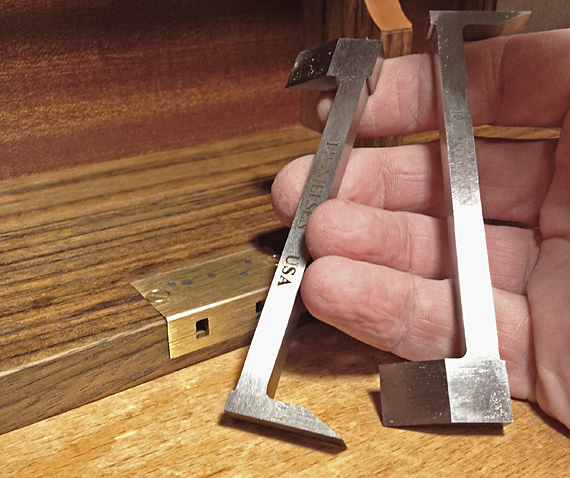
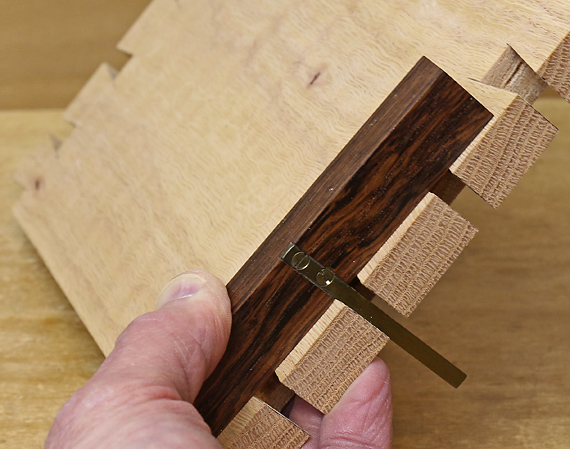
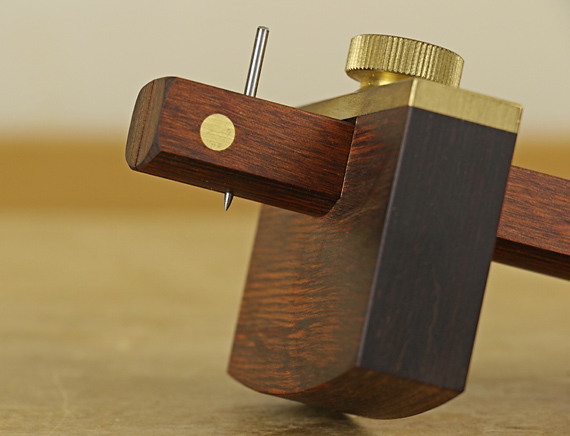
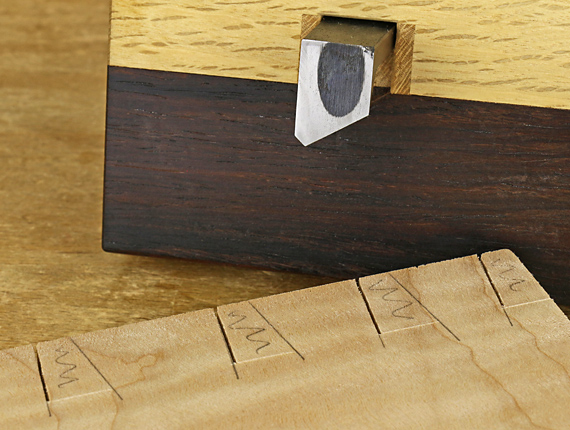
The knife has a modified V-point with the bevel toward the fence, which places it in the waste wood. This gauge is primarily used on the pull stroke. Accordingly, the plane of the face of the knife is slightly angled away from the fence on the side near you. (See the side-view photo, below.) This tends to draw the fence inward, helping to keep it snug against the edge of the work piece. This angle does not at all reduce the quality of the cut.

blade angle

I much prefer to avoid leaving gauge marks in finished dovetails. One way to do this is by making the gauge cut shallow but I prefer to eliminate that variable by gauging the cut only where it is needed and thus where it will be automatically eliminated. This goes for tails and pins. This way I can gauge a substantially deep cut, which helps when chiseling out the waste, and not worry about having to later plane away any marks.

The short arm of the V-point is very helpful to bring the cut up to the penciled tail lines and the squared pin lines by nudging the gauge forward.

cutting gauge for dovetails

The laminated Japanese blade takes a very sharp edge and holds it very well.

I bought this gauge about 15 years ago, as best I recall, but similar ones are quite expensive now. Suzuki-ya sells a model with double blades, Iida with a single blade, and Tools from Japan sells a much less expensive double-blade model without the V-point, but perhaps that could be worked in by the user.

One more thing. I clamp the work piece for any major gauging such as dovetail and tenon layouts. It makes no sense to me to do the cool, casual whip of a gauge across a work piece that is grasped with one arm, like we see in some videos. Gauging is important, just like sawing and chiseling, so it is worth the time and effort to clamp the work piece.

Next: Is there a gauge that works well both along and across the grain?

Author:
• Wednesday, December 07th, 2016

DAP Rapid Fuse for Wood

Last year, I wrote a series on this blog about the characteristics, performance, and practical applications of Nexabond, an excellent cyanoacrylate glue formulated specifically for woodworking.

Since then, the developer of the glue, Sirrus, Inc., has entered into an exclusive licensing agreement with DAP Products, Inc. The Nexabond 2500M (medium set time) formulation in now marketed as DAP RapidFuse Wood Adhesive. The product is no longer sold as “Nexabond.” The slow (“S”) and long (“L”) set Nexabond formulations, which were less useful and less popular, are no longer available.

DAP RapidFuse Wood Adhesive is sold in .85-ounce (about $6) and 4-ounce (about $10) bottles. It is widely available, including at Home Depot, Lowe’s, Ace Hardware, and True Value Hardware. The shelf life of Nexabond 2500M was pretty short in my experience with it – a year at best, and maybe even 8 months or so in a warm shop, as I recall.

DAP also markets RapidFuse All Purpose Adhesive, which, according to Sirrus, is also the Nexabond formulation. I do not know how or if the “All-Purpose” differs from the “Wood” version. The very same technical bulletin shows up on the DAP website for both products, and the listed applications are essentially the same. I suspect the two differ, for marketing, in name only. In that case, either could also be used in the shop as an all-purpose CA glue. Interestingly, Home Depot and Lowe’s currently sell the Wood version for 50¢ more than the All-Purpose in the .85-ounce sizes.

It is good news that the Nexabond formulation is once again available. It is a very useful glue for woodworking.

Category: Tools and Shop  | Tags:  | One Comment
Author:
• Sunday, September 11th, 2016

Veritas slow adjuster

Another thoughtful refinement from Veritas, this adjuster advances the blade in smaller increments than their standard adjusters. It’s a hit.

Veritas bevel-up (BU) planes use a Norris-style adjustment system, which means that one adjuster controls both blade depth and lateral alignment. In a lesser quality tool, this system could be balky but the design and execution by Veritas makes theirs function very smoothly.

Now, just for fun, the lead screw of the slow adjuster has 58 threads per inch by my count, which translates to .0172″ of linear blade advancement per turn of the knob. The increase in depth of cut produced per unit of linear advancement of the blade is represented by the sine of the blade’s bed angle, 12° in this case.

.0172″ x sin12° = .0172″ x .2079 = .0036″ depth of cut increase per one turn of knob

This works out to .0009″ or about 1 thou change in shaving thickness per quarter turn of the knob.

Veritas bevel-up smoother

This may sound like too tentative an approach but in practice this exceptionally smooth mechanism is not only precise but also pleasant to use. I am usually using the BU smoother for difficult wood where small differences in cutting depth really matter. I suggest Lee Valley use the slow adjuster as standard in their BU smoothing planes, or at least offer it as an initial option.

The Veritas bevel-up jack plane, on the other hand, is used for tasks that require less precision in the cutting depth, so there I prefer the original, quicker adjuster.

With the Norris adjuster, side set screws that control the blade registration near the mouth, lack of a chipbreaker, and an easily adjustable mouth opening, you can practically set up a Veritas bevel-up plane with your eyes closed.

Just as a reminder, if the handle and knob on my BU smoother do not look like the Veritas versions, it is because they are not. They are wonderful retrofits made by Bill Rittner of Hardware City Tools.

Category: Product reviews, Tools and Shop  | Comments off
Author:
• Thursday, September 01st, 2016

drawer lock chisels

Well, I painted myself into a corner and now a half-mortise lock must be installed in an already assembled box in tight quarters and on a schedule.

No problem: just call Lie-Nielsen Toolworks. The nice folks there put a set of their drawer lock chisels on their way to me that same day. Thanks to Chris Becksvoort for his excellent design of these handy tools.

The chisels have square, raised corners (ends, really) so the hammer or mallet makes true, solid contact and the force of the blow is properly directed. My Glen-Drake #4 brass mallet came in very handy for this work, supplying more umph in a small space than the side of a hammer.

drawer lock chisels and Glen-Drake mallet

The chisels in the pair are mirror images of each other. In use, it soon becomes apparent why this is helpful. The larger edge, 1/2″ wide, is parallel to the length of the tool, while the 1/4″ edge at the other end is perpendicular to it. Again, only an experienced, thoughtful woodworker would know to incorporate these design features, which turn out to be so right in the hands of the user.

Yes, they are are fairly tedious to sharpen – the 1/4″ edge is like sharpening a hand router blade – but they do come well ground, which mitigates the task. The steel is A2. O1 would be easier to sharpen but I don’t know how it tolerates being struck and how it responds in the manufacturing process. Lie-Nielsen must have good reasons for their choice.

drawer lock chisels and half-mortise lock

These chisels probably would have come in handy long before my recent purchase but I bet they will soon come in handy again. Woodworkers are fortunate to have wonderful tools like this available to us.

Category: Product reviews, Tools and Shop  | Comments off
Author:
• Monday, June 13th, 2016

Woodturners Wonders lamp

Good lighting is one of the most under-appreciated assets for fine woodworking, especially handwork at the bench. It is a shame to see an elaborately equipped shop with nothing more than fluorescent ceiling lights illuminating the workbench.

Basically, the properties of lighting are intensity, distance from source to the object, angle of incidence, and quality, which includes the color cast (color temperature). Without delving into technical detail, for detailed tasks such as hand cutting joinery, you want a strong light that is adjustable for distance and angle, and has a pleasing whiteness.

The Super Nova lamp from Woodturners Wonders delivers big time on all counts. It was developed by woodturner and inventive guy Ken Rizza for use with a lathe but is just as useful for general woodworking. The three LEDs in the lamp head together use 9 watts of power to generate 870 lumens.

This is a heavy-duty lamp. The 30″ flexible stainless steel neck, covered with a black flexible, non-reflective shroud, holds its adjustment in any position. This is the key to the effectiveness of a lamp like this – the light can be adjusted to the exact location and direction desired and it stays put. The heavy rectangular base houses a switchable magnet that holds with 286 pounds of force! The base is large enough to easily accommodate a clamp to secure it to a wooden surface.

Below is not trick photography. The base is holding unyieldingly to the even the 2mm sheet steel of the bandsaw cover, while the neck does not sag a bit when fully extended. Wow!

Woodturners Wonders lamp

The LEDs are rated for 50,000 hours life (8 hours/day every day for more than 17 years). The lamp is equipped with a generous 9-foot cord. Unfortunately it ends with the obligatory transformer but at least this one is small and light. A minor complaint is that I wish the switch button was placed on the back of the lamp head instead of on the side of it because I tend to switch the lamp off when grabbing the head to adjust it.

This bad boy lamp is not cheap at a regular price of $159 (look for sales) but a good light is one of the most important tools in the shop. It is by far the best lamp for detailed bench work that I have ever used or seen. Several cheaper “good” task lamps have frustrated me over the years. I cannot at this time attest to its durability but it certainly seems sturdy and does carry a two-year warranty. Smaller models are available.

I suggest trying a top quality task light in your shop. You may be surprised what you have been missing as you experience the improved visual feedback for detailed handwork, and using a raking light for surfacing and finishing.

This review is unsolicited and uncompensated. I have no affiliation with Woodturners Wonders.

Author:
• Sunday, June 12th, 2016

Sensgard Zem hearing protectors

These Sensgard Zem hearing protectors are the best I have ever used. Before elaborating, I will explain the problems I have had with some other protectors.

I do not like stuffing things into my ear canals. This includes foam plugs that are first compressed with the fingers, which are often dirty, then jammed in where they are uncomfortable and then tend to work their way loose. Various silicon, latex, or high tech torpedoes that are also held in the ear canal much as a cork is held in a wine bottle are also unwelcome in my ears.

Bulky, cumbersome earmuffs are at the other end of the range of options. I have top-quality Peltor muffs but even with their soft padding, they squeeze the temples of my eyeglasses uncomfortably against my skull. It isn’t long before I decide the noise is more tolerable than the headache.

Finally, all problems are solved with Zem hearing protectors by Sensgard. The replaceable foam cuffs of these extremely lightweight protectors comfortably skirt the entrance to the ear canal. The acoustic chambers (the arms) vault my eyeglass temples – no more skull aches. They go on and off in a snap, and when not in use, hang around the neck or fold compactly for storage.

Sensgard

Sensgard Zem

All these advantages would be enough but here is the best part: the noise reduction is phenomenal. I powered up my DW735 thickness planer, measured 100 dB(A) at 2 feet under no load, and then put on the Sensgards. I was flabbergasted at the dramatic but even, pleasant noise diminishment. The nominal NRR (Noise Reduction Rating) is 31 but they are far more superior to my Peltor model, listed at 28, than the numbers might suggest.

I actually had to accustom myself to remaining alert to the ferocity of woodshop machinery while enjoying the auditory peace. Yet, I could adequately hear important shop sounds such as speech.

More information about the Zem technology is available on the Sensgard website. I have the NRR31 model in easy-to-find lime green. Put them on according to the simple package instructions; that makes a big difference. I found the lowest price on Amazon. Extra foam cuffs are good to have.

Sensgard extra foam cuffs

[This review is unsolicited and uncompensated. I have no connection with Sensgard.]

Author:
• Saturday, January 30th, 2016

Corradi rasps

These Corradi rasps are the ones I reach for most often. Several years ago, I wrote on choosing and using rasps, highlighting the excellence of hand-cut rasps, specifically the Auriou brand, based on the feel and feedback they provide.

In this regard, for a 10″ cabinet rasp in the finest grain, I still prefer the Auriou #13. However, I’ve come to prefer the Corradi rasps in the coarse and medium ranges. Furthermore, I don’t think there is a big difference between the finest Corradi #10 and its close equivalent, the Auriou #13. Practically, I tend to save the Auriou for the most sensitive work, much like a carefully tuned smoothing plane.

The Corradi rasps have uniform, densely packed, machine-cut teeth with a surface hardness of Rc 65-66, which the manufacturer claims is harder than the best hand-cut rasps at Rc 59-60. In my experience, which is not controlled testing, the Corradi rasps have indeed maintained their sharpness better than the Aurious.

The swirl pattern of the teeth produces a very smooth cutting action, though again, just slightly lacking the superb feedback of the Auriou in the finest grain models. In the medium and coarse grains, I prefer the consistent smoothness of the Corradis. I do, however, wish the Corradi cabinet rasps were shaped to a point like the Aurious.

Heresy, some may say, but I’m only telling you what the wood and my hands have told me. These comments, unsolicited and uncompensated, are only meant to help readers make their own choices.

Corradi 5, 8, 10 grain

My set of Corradi 10″ half-round cabinet rasps consists of the “Gold” #10 and #8, and the Cabinet #5, from right to left in the photo above. This set is an excellent value at a current total price of $134. By comparison, a single 10″ half-round Auriou #9 costs from $110 – $135, and the finer grains cost still more.

For reference, in 10″ rasps, I estimate the Corradi #10 about the equivalent of the Auriou #13, though the latter is probably a trace finer. Either allows a very easy transition to scraping or sanding.

At the coarse end, the Corradi #5 is about equivalent to an old Nicholson #49 (below, at left and right, respectively), but broader and better. (The Auriou #9 approximates a Nicholson #50.) Looking at the photo above, it seems like a fairly large jump from the Corradi #5 to the #8 but in practice the transition works well.

Corradi 5 grain vs Nicholson #49

The three 10″ half-round Corradis – #5, 8, and 10 – plus an inexpensive Shinto double-sided “saw” rasp and a cheap Surform Shaver, with the modification described in an earlier post, form a versatile basic set. I wish Corradi made “ironing” rasps in the form I described in a recent post.

Aside from cabinet rasps, I like the Corradi Gold 6″ #10 flat (“hand”) rasp with one safe edge for smaller scale work such as rounding over tenons. The 4″ Auriou half-round #14 remains the finest rasp in my drawer.

Rasps are often underestimated but high quality versions, skillfully employed, are capable of sensitive, refined work.

Author:
• Thursday, December 31st, 2015

square to check dovetails

When making dovetail joints, it is important that the tails, which you’ve cut first (of course, right?), have their sides square to the reference (inside) face of the board.

In practice, depending on the compressibility of the wood species being worked, it may be acceptable or even helpful for the inside width of the tail to be a hair narrower than the outside face. This creates a slight wedge effect that helps ensure tightly meeting surfaces at the outside face of the completed joint.

There should never be the opposite arrangement where the entering width of the tail is wider than the outside face of the tail. That would directly, by the geometry of it, leave gaps on the show face of the joint, making it weaker and less attractive. It would also indirectly create these gaps by corrupting the marking out of the pins from the inside-face edges of the tails.

Thus, as with many aspects of woodworking, this is a one-sided tolerance issue, and we want to avoid compounding small errors.

So, is it really necessary to check the sawn surfaces of the tails before proceeding to mark and saw the pins?

With good sawing skills, frequent repetition, and an easy-going wood, you may need little or no checking. Realistically however, it is not easy to make all the saw cuts right on, and checking takes very little time and effort. And while you or a demonstrator may be heroic in pine, what about oak, shedua, or hard maple? Also, it’s a lot easier to dovetail a 3/8″-thick, 3″-wide drawer side than a 3/4″-thick 12″ carcase side.

I suggest be realistic and reasonably careful in your work without being timid or plodding.

dovetail square

Here is the little square I use to check the sawn sides of the tails as well as the adjustments I make by paring them. I made this tool about 30 years ago.

The beam, made of pre-ban Brazilian rosewood (Dalbergia nigra), is about 4 1/4″ long x 3/4″ x 1/2″. The 1/16″-thick brass blade is 11/64″ wide, which can fit between almost any pair of tails that I make. At almost 1 3/4″, it is unnecessarily long – maybe I envisioned sometime making giant dovetails. The square is accurate to less than 0.001″ on both sides, a tolerance not too difficult to achieve in this size tool with patient filing and scraping.

The T shape allows the beam to register on the face of the wood on both sides of the measurement point. This makes it fast and convenient to use. It also averages out any trace of cupping that might have creeped into the board since it was four-squared.

There are two excellent manufactured tools for this task. One is the little (in size but not in price) Starrett 14D square, shown below, which has a blade 5/32″-wide over most of its length that is cut down to a mere 3/32″ wide over the remainder.

small squares

A lot less expensive is Sterling Toolworks’ Dovetailing Rule. This blade fits in a 6″ combination square stock (Starrett and others) and has a section just under 3/32″ wide to fit between virtually any pair of tails. Chris Kuehn, founder of Sterling, has produced a practical, commercially available solution.

Category: Tools and Shop  | Comments off