Archive for ◊ May, 2026 ◊

Author:
• Friday, May 29th, 2026

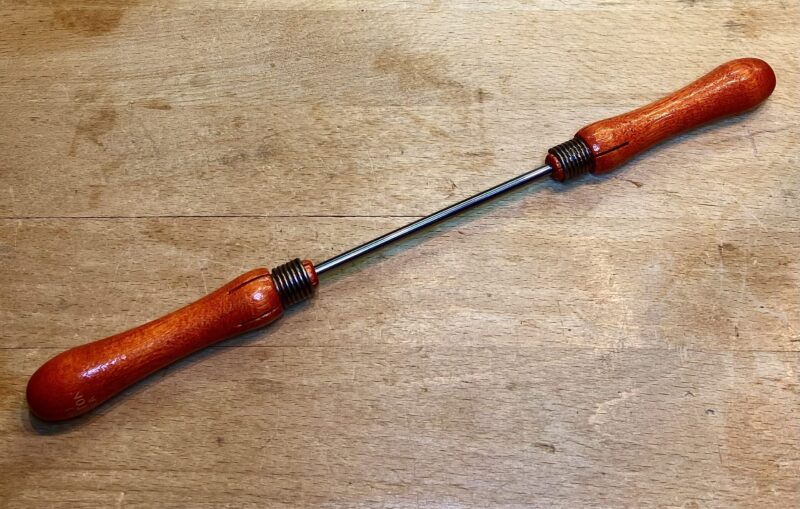
I wrote about this tool a few years ago, having used it for many more years. It is used for scraper sharpening but it is derived from a saw sharpening device detailed in the book: Tage Frid Teaches Woodworking, Book 1, 1979, page 16. My design is significantly different and used entirely differently. 

This holder makes scraper care easier and more comfortable. I will show and detail the uses for sharpening and flattening scrapers in future posts. Now let us look at the construction of the holder.

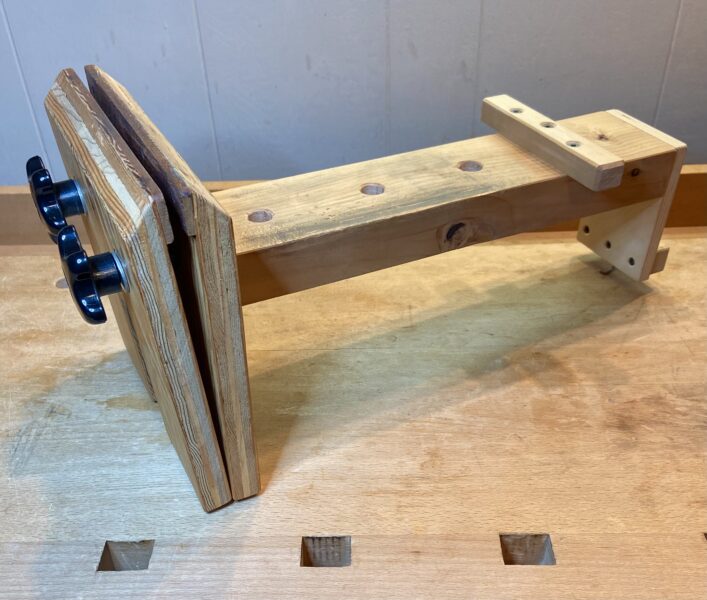
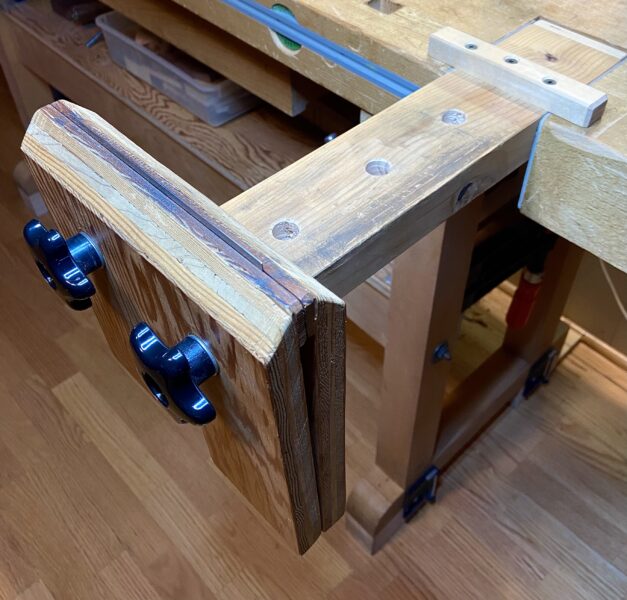
Start with two 8” x 8” pieces of 3/4” plywood, each with a top bevel of 45°. (There is a vertical slot and horizontal rim in each piece of the Frid that are not used in this one.) The two pieces are joined by a pair of metal hinges at the bottom edges. 

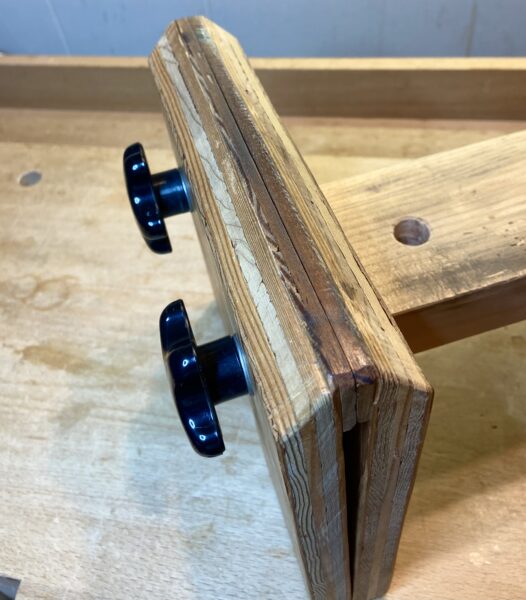
At the top of each angled edge is a pair of hardwood jaw ends, each about 3/16” thick, to improve their grip. Note the tiny gap that is largest at the center of the jaws, and also the tiny gap at the lower edge of the jaws. These improve the grab contact of a scraper by the jaws.

To tighten them closed, the jaws have two 5/16” button head screws (using free holes), washers, and star nobs that are placed 6” from the bottom and 2” in from each side.  

Attached to the inner jaw is a 14” long piece from a good 2 x 4, trimmed to 3 1/4” wide, with the top planed smooth and flat. The attachment is 4” from the bottom of the jaws and centered. Use three strong hex head screws and washers.

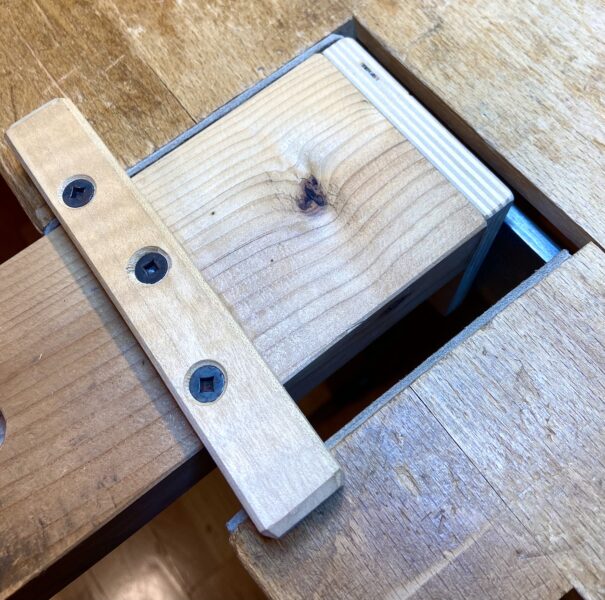
Now let’s see how it is securely held in the tail vise of the workbench. Attached with wood screws at the inner end of the 14” rod is a piece of sturdy 1/2” plywood. It is a trace less than 3 1/4” wide. For length, you want about 1” available to reach below the full thickness at this area of the bench’s tail vice. 4 1/2” long works well for my workbench.

Now, use a direct way (hold it, then clamp it?) to mark where to screw on a horizontal “hook piece” of hardwood about 7/8” tall x 3/4” wide x 3” long. (See the right side of the top photo.) This hooks under the work bench construction.

Finally, screw on a piece of hardwood to extend outward of each side (see the next two photos below), about 5 1/2” long  x 7/8” wide x 3/4” thick, to the top of the 14” rod about 1/2” behind the front of the workbench.

Here it is entirely gripped by the workbench and the bench’s tail vise:

One more thing. Note the three 5/8” diameter x 3/4” deep holes on the platform area. These allow wooden pegs to prevent sliding for burnishing scrapers flat. The center hole is to work with cabinet scraper blades.

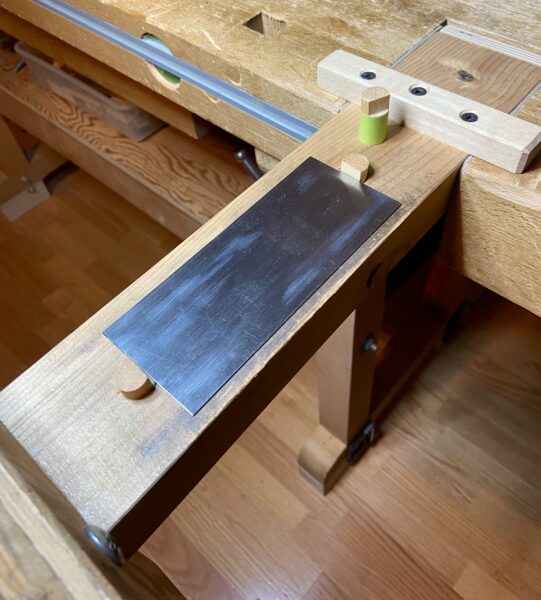
This construction makes the vise helpful and strong for burnishing a scraper. It is well held by the workbench. It also has a convenient area for flattening, avoiding medal debris on the workbench. The structure is not difficult to make.

More to come on the topics of scrapers and scraping them.

Author:
• Wednesday, May 20th, 2026

I enjoyed some instruction classes in the mid-1980s by the late, great Tage Frid at the old Woodcraft store at 313 Montvale Avenue in Woburn, Massachusetts. 

That store then was still the only Woodcraft, having moved north from Boston in 1968. Woodcraft started as a one-room shop in Boston’s North End in 1928 and later expanded. Around 1990, the company started to expand nationally. Much later, the Woburn store moved to its current location, also in Woburn. Woodcraft is now 67 stores nationwide. 

It was at the original Woburn store more than 40 years ago where I bought my Ulmia workbench that I still use. From then, I no longer had to use my own rigs. I had built my first bench in 1971. Before that, the first bench I used was inherited from my grandfather.

https://www.rpwoodwork.com/blog/2022/08/23/the-first-workbench-i-built/

Now back to the main topic! 

Even more fun and instructive was talking with Frid years later when I randomly saw him shopping at the former woodworking store in Cambridge, MA. (It became a Rockler but closed a couple of years ago.)

As I searched the tools around the store, I saw Frid doing much the same as I was doing: managing ideas. Understand, this was the renowned Tage Frid! The man who, probably more than anyone else, brought and taught the skills of woodworking to America. To see him searching at the store much like I was, and then have the privilege and joy of talking with him, really struck me.

Recognizing him still learning and thinking about woodworking, helped me understand that what I too was doing was healthy and creative. Searching, thinking, trying – woodworking. 

Of course, as a woodworker, I am just a small fraction of a Frid. Yet, I hope you happily read here and it benefits you. It is meaningful and, ultimately, joyous.  

Category: Ideas  | Leave a Comment
Author:
• Sunday, May 17th, 2026

A burnisher to sharpen scrapers is widely available from many manufacturers in several variations. What works very well for me is one that I developed. As far as I know, this is unique.

The rod was made of carbide in sub-micron grain size at my request by Innovative Carbide Inc. in Pennsylvania. The hardness of this material is rated 91-92 in the Rockwell A range! This is significantly harder than a 70 at the top of the C range. C is used for tool steels such as chisels, plane blades, and scraper burnishers, all usually about 59 – 64 C. 

This hardness allows easier pressing on the scraper steel which is typically 48 – 52 C. 

The rod is 3/16” in diameter. This works very well. The narrow rod, especially at 91-92 A, more efficiently presses out an angled metal edge on the scraper. Less effort is required than using a rod that is twice the thickness and not as hard.

After 20 years of use, the rod shows no wear. If I built it again, I might choose 1/4” diameter for a little more control, but certainly not wider than 1/4”. Anyway, the 3/16” works well and is exceptionally useful in small curved scrapers. 

The 3/8” diameter, especially at the typical 60 – 62C found in almost all commercial burnishers, does not give as much effective power in pressing out the cutting edge.

The thin and very hard rod in my burnisher gives great contact and control in sharpening a scraper. 

The rod is actually 12” long, which is more than I needed. I used it with 5” in a wooden handle. I was never totally happy with the 7” of exposed working length. I changed to 4” of length in each of two small wooden handles. This leaves 4” to work with. Perfect.

I can push the tool at an angle and move down the range of the angle. This is very effective in making an excellent edge in the scraper. It also works well to flatten a failing edge over the side of the scraper in intermediate-stage sharpening.  

To make all of this work well, I have long used a vise based on what is shown in the 1979 book “Tage Frid Teaches Woodworking.” I added a platform setup to hold it all in the workbench tail vise. I will review my design features in an upcoming post to add onto an old post about that.

Burnishers I have found online, worth noting: Blue Spruce makes a two-handled burnisher with a 3/8” rod of “textured high carbon tool steel.” O’Skool also makes one with two handles. The 3/8” rod is 61C “chrome molybdenum.” The working length of the O’Skool is listed by photo as 2 11/16”, and the Blue Spruce looks about the same.

My scraper sharpening burnisher tool gives easy, comfortable, and very effective sharpening and flattening.