Archive for the Category ◊ Tools and Shop ◊

Author:
• Monday, June 22nd, 2026

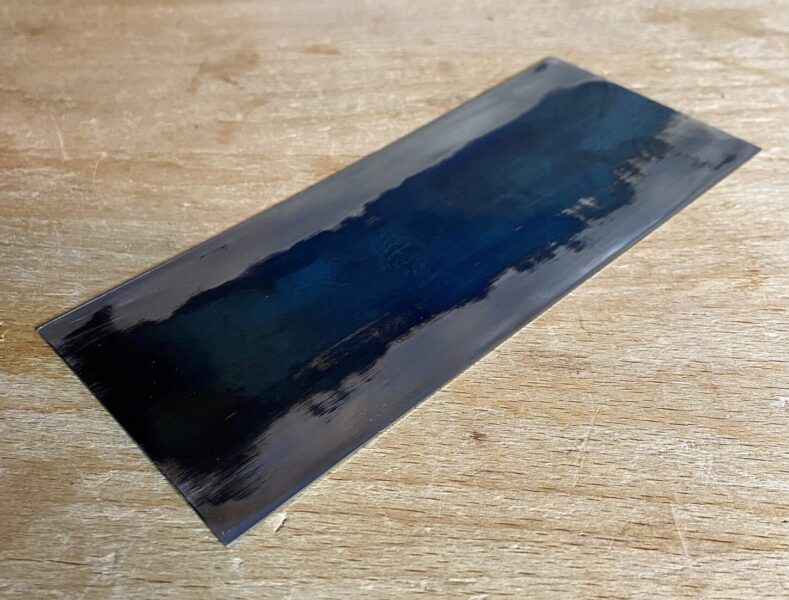
Now let us consider tuning up the hand scraper. Despite what you may have heard, read, or viewed, this is not a difficult task. What makes some demonstrations and discussions confusing is not presenting a simple understanding of exactly what you need to do with the scraper steel. Most demos do not clearly state what the actual task is for each step.

In the next post I will show and discuss the actual tasks being done. In this post, I will state what is done to the scraper metal at each stage. 

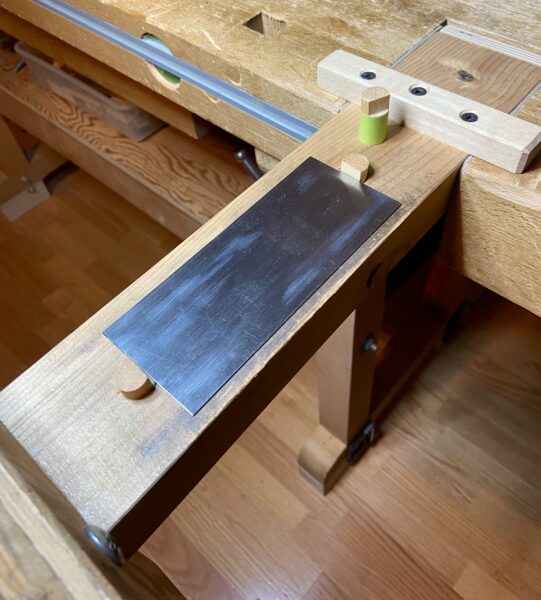
First, the sides and the skinny edge must be made flat and smooth. You do this because the steel is not manufactured smooth enough. That is ok. They should also be approximately square to each other. The surfaces should be honed to at least 1000 stone grit. Better is about 4000, even more. 

Second, compression should be applied to the side faces, just near the edges. Push hard on the steel repeatedly. 

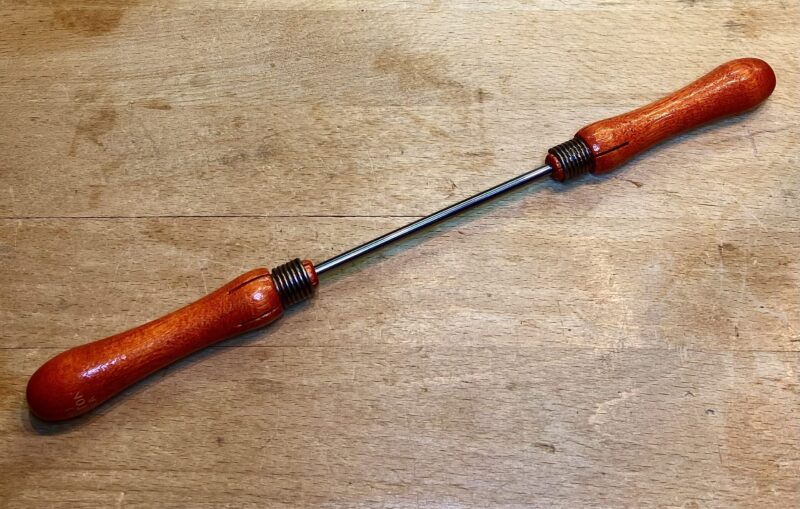
Third, the edge itself should be burnished at an angle – to create the hook which is used to cut wood – scraping.  

That’s it. Done. There are variations and alternatives to achieve each step. These steps are not fully repeated for every sharpening. Every three or so sharpenings, however, require going back to some of the earlier steps. 

Coming up, I will show how I do it. There are other equally good methods and helper jigs to achieve the same principles.  

When you see – and understand – what is going on, you can alter the methods and probably come up with some of your own.   

Author:
• Monday, June 01st, 2026

Here are the dozen hand-blade scrapers that I use. In upcoming posts, I will discuss usages, techniques, and how to sharpen them. 

These are all steel in the hardness range of Rc 48 – 52. Most are Lee Valley. Lie-Nielsen and Bahco are similarly very good. Thickness dimensions are inches/mm.

Top photo, left column, top to bottom:

Sizes approximate. Widths vary from initial purchase due to honing wear.   

1.  .020”/.50mm  6” x 2 1/2”

2.  .024”/.60mm  6” x 2”

3.  .024”/.60mm  5” x 2 3/8”

4.  .032”/.80mm  6” x 2 2/8”

Top photo, right column, top to bottom, curved models:

1.  .024”/.60mm  concave-convex

2.  .024”/.60mm  double convex with different radii

3.  .024”/.60mm  gooseneck 

4.  .016”/.40mm  two mini scrapers 1” x 2” (1” parts sharpened)

Here is the simple storage block (4” wide x 3 1/2” long x 1 3/8” high) with angled slots sawn:

In the photo below, are three concave and convex small scraper combinations, 3” to 3 1/2” overall diameter. I find these very handy. I do not recall the brand name.

I store them in the simple thin leather stapled wallet:

So that’s my crew. I have left the cabinet scraper out of the discussion for now. More scraper discussion is on the way, including how to prepare, sharpen, and work with them.

Category: Tools and Shop  | 3 Comments
Author:
• Friday, May 29th, 2026

I wrote about this tool a few years ago, having used it for many more years. It is used for scraper sharpening but it is derived from a saw sharpening device detailed in the book: Tage Frid Teaches Woodworking, Book 1, 1979, page 16. My design is significantly different and used entirely differently. 

This holder makes scraper care easier and more comfortable. I will show and detail the uses for sharpening and flattening scrapers in future posts. Now let us look at the construction of the holder.

Start with two 8” x 8” pieces of 3/4” plywood, each with a top bevel of 45°. (There is a vertical slot and horizontal rim in each piece of the Frid that are not used in this one.) The two pieces are joined by a pair of metal hinges at the bottom edges. 

At the top of each angled edge is a pair of hardwood jaw ends, each about 3/16” thick, to improve their grip. Note the tiny gap that is largest at the center of the jaws, and also the tiny gap at the lower edge of the jaws. These improve the grab contact of a scraper by the jaws.

To tighten them closed, the jaws have two 5/16” button head screws (using free holes), washers, and star nobs that are placed 6” from the bottom and 2” in from each side.  

Attached to the inner jaw is a 14” long piece from a good 2 x 4, trimmed to 3 1/4” wide, with the top planed smooth and flat. The attachment is 4” from the bottom of the jaws and centered. Use three strong hex head screws and washers.

Now let’s see how it is securely held in the tail vise of the workbench. Attached with wood screws at the inner end of the 14” rod is a piece of sturdy 1/2” plywood. It is a trace less than 3 1/4” wide. For length, you want about 1” available to reach below the full thickness at this area of the bench’s tail vice. 4 1/2” long works well for my workbench.

Now, use a direct way (hold it, then clamp it?) to mark where to screw on a horizontal “hook piece” of hardwood about 7/8” tall x 3/4” wide x 3” long. (See the right side of the top photo.) This hooks under the work bench construction.

Finally, screw on a piece of hardwood to extend outward of each side (see the next two photos below), about 5 1/2” long  x 7/8” wide x 3/4” thick, to the top of the 14” rod about 1/2” behind the front of the workbench.

Here it is entirely gripped by the workbench and the bench’s tail vise:

One more thing. Note the three 5/8” diameter x 3/4” deep holes on the platform area. These allow wooden pegs to prevent sliding for burnishing scrapers flat. The center hole is to work with cabinet scraper blades.

This construction makes the vise helpful and strong for burnishing a scraper. It is well held by the workbench. It also has a convenient area for flattening, avoiding medal debris on the workbench. The structure is not difficult to make.

More to come on the topics of scrapers and scraping them.

Author:
• Sunday, May 17th, 2026

A burnisher to sharpen scrapers is widely available from many manufacturers in several variations. What works very well for me is one that I developed. As far as I know, this is unique.

The rod was made of carbide in sub-micron grain size at my request by Innovative Carbide Inc. in Pennsylvania. The hardness of this material is rated 91-92 in the Rockwell A range! This is significantly harder than a 70 at the top of the C range. C is used for tool steels such as chisels, plane blades, and scraper burnishers, all usually about 59 – 64 C. 

This hardness allows easier pressing on the scraper steel which is typically 48 – 52 C. 

The rod is 3/16” in diameter. This works very well. The narrow rod, especially at 91-92 A, more efficiently presses out an angled metal edge on the scraper. Less effort is required than using a rod that is twice the thickness and not as hard.

After 20 years of use, the rod shows no wear. If I built it again, I might choose 1/4” diameter for a little more control, but certainly not wider than 1/4”. Anyway, the 3/16” works well and is exceptionally useful in small curved scrapers. 

The 3/8” diameter, especially at the typical 60 – 62C found in almost all commercial burnishers, does not give as much effective power in pressing out the cutting edge.

The thin and very hard rod in my burnisher gives great contact and control in sharpening a scraper. 

The rod is actually 12” long, which is more than I needed. I used it with 5” in a wooden handle. I was never totally happy with the 7” of exposed working length. I changed to 4” of length in each of two small wooden handles. This leaves 4” to work with. Perfect.

I can push the tool at an angle and move down the range of the angle. This is very effective in making an excellent edge in the scraper. It also works well to flatten a failing edge over the side of the scraper in intermediate-stage sharpening.  

To make all of this work well, I have long used a vise based on what is shown in the 1979 book “Tage Frid Teaches Woodworking.” I added a platform setup to hold it all in the workbench tail vise. I will review my design features in an upcoming post to add onto an old post about that.

Burnishers I have found online, worth noting: Blue Spruce makes a two-handled burnisher with a 3/8” rod of “textured high carbon tool steel.” O’Skool also makes one with two handles. The 3/8” rod is 61C “chrome molybdenum.” The working length of the O’Skool is listed by photo as 2 11/16”, and the Blue Spruce looks about the same.

My scraper sharpening burnisher tool gives easy, comfortable, and very effective sharpening and flattening.

Author:
• Wednesday, April 22nd, 2026

Continuing from the last two posts, let’s now look at gripping an even longer piece of wood by the front vice and extending it to the right, even fully across the length of the bench. We will use a griper easily installed into the tail vice.

The tail vise will hold a T-track set into a piece of wood. This holds the same toggle clamp mechanism as is used in the T-track on the front of the bench itself. (See the previous post for that.) The photos above and below show the set up for this system.  

The next photo below shows a wider piece of long wood held by this system. The extra width requires an extra clamp on the upper area to prevent the top of the board from bending outward during some work. 

Now lets look at how to easily make the part. The photo below shows it.

I used a 24 1/2” x 1 1/2” x 1 1/2” piece of sturdy hardwood. An aluminum T-track, 3/4” wide x 3/8” deep, is screwed into a router-cut slot. 

Screwed in at the top of the post is a 1 1/2” wide x 1 1/8” thick hardwood that was made 4 11/16” long to neatly fit in the tail vise to make the surface with the T-track even with the front of the bench. 

Then another piece of wood, 3 1/2” x 1 3/4” x 1/2” is screwed on top. This top piece, along with the tail vise tightening, holds the T-track device securely.

So now we have covered four good systems (among the many more) that are used to hold wood so we can work well. Next, for a final “part 5” of this, I will go through the whole idea of wood being secured and why it is so important for working well.

Author:
• Thursday, April 09th, 2026

Let us continue with the previous post. If the wide piece of wood being held in the front vice is also fairly long, we need a second system that grips the right side of it. Otherwise, it will tend to slip down due to weight, especially pressure from planing the edge straight and square with a #5 or #7.

The photo above shows the system in action. 

There is an aluminum T-track (“T-slot track”) (3/4” wide x 3/8” deep) screwed into a slot in the bench top made with a router bit. A small space on the left side of the slot allows you to easily enter the clamping device. The slot is not extended into the opening for the right-sided bench vice. The T-track never interferes with any other use of the workbench.

The workpiece is held with a quick-release toggle clamp with an anti-slip tip. It is attached with four screws on a sturdy piece of hardwood 3/4” x 10” x 2 1/4”. The toggle clamp is screwed in near the end of the wood piece.

This toggle clamp is GH-225-D. This holds the work I use.

A 1/4 x 20 x 1 1/2” T-track bolt is at the mid-point of the wood piece. It tightens with a three-branch star knob.

To use it:

Attach the toggle clamp device in approximate position on the T-track. Set the workpiece in the bench vise, using the compensating thickness piece on the left side of the vise (see the previous post), and tighten.  Then set the final position for the toggle clamp and tighten the T-track bolt. 

Then adjust the height of the toggle clamp based on the tightness to the workpiece, set it, and tighten it.  

This system allows adequate pressure to hold the right side of the workpiece. You can work well.

What about larger pieces and needing even more support on the right side of the workpiece? Coming up on the next post!

Author:
• Friday, April 03rd, 2026

Let’s say you want to hold a wide piece of wood in a classic front vice of the workbench. You probably do not want to grip it in the middle area of the vice because it must be held above the lead screw and guide rod. 

You can grip the wood by the part of the jaw that is fully to the right of the screw and rod. This allows the wood to be lowered to where you want it. It will be held at a much better working height for planing and other tasks. (Exactly what is done with the right end of the wood itself will be discussed in a latter post.)                           

But the problem now comes when the vice is tightened. The empty left side of the moveable vice jaw can curve toward the bench top. This especially happens when strongly gripping thick pieces of wood. When the vise is turned tighter, it actually reduces the area of the pressure contact against the workpiece. (All of this varies with differently constructed vice designs in different benches.) 

Solution? Yes. Easy!

You just put an approximately matching thickness piece of wood in the left side of the jaw. This distributes the tightening pressure against the bench from the right and left ends of the vice. The vice stays aligned and, most importantly, the work wood is gripped more securely and evenly.  

You do not have to hold the matching piece there when tightening the vice. A wide cross piece grips it with a magnet and keeps it there. (See photo above.) So you place it, let it go, and then place in the work piece on the right side of the vice at whatever height you want. 

I have a small collection of gripper pieces, from 3/8” through 1” in 1/16” intervals, and 1 1/8” through 1 3/8” in 1/8” intervals. That is 14 sizes that covers thicknesses within 1/32” of most work pieces. Close enough to work.

They are 3” long with a flat head screw in one end to grip the holder top piece. The holder is 5” x 1” x 3/8” with a 3/4” diameter magnet at the center. The grippers get stored in the bench drawer, and the holder gets stored at the head of a flat screw leveled into the side of workbench. 

This is very easy to make and use. It really improves the performance of the bench vise.

But what do you do with the right side of that long workpiece which has its left side securely in the front vice? 

Answers in the next two posts coming up! 

Author:
• Tuesday, March 31st, 2026

We often use the outer edges of the top of our workbench to restrict any movement of a piece of wood being worked on. Let’s go through some handy, practical methods to keep the wood in place. These can all be easily made by you with minimal cost.

The first one is very simple. Sometimes we have a board, thick or thin, that we do not want to clamp down. We just want to stop it from sliding in one direction – for most people, to the left.

On the left side of my bench, I have two small blockers that can be quickly and easily raised for this purpose. The photo above shows an example of a piece of beautiful cherry in place. The blockers never get in the way when not in use. They have been part of my bench for a long time.

Here is how I made them: 

The hardwood pieces are 1/2” thick x 2 1/2” long x 1 1/2” wide. They have a 1/4” wide slot, about 1 3/4” long from the bottom. The main, visible screws have large handles, 1 1/2” in diameter (“star knob heads”), to make them very easy to use. They are 1/4” – 20, 1” long. These are very easy to loosen and tighten.

Those handled screws go into slotted set screws. The set screws sit very firmly in their drilled and slightly taped holes. These are centered about 1” from the top surface of the bench and about 6 1/2” apart. 

We’re all done. This little rig can be used for lots of tasks. 

Another nifty tool is coming up in the part 2 post.