Author Archive

Author:
• Tuesday, October 22nd, 2013

Learning and laughing, I had a great time at WIA. Here are a few snapshots with preceding captions. A few closing thoughts follow the photos.

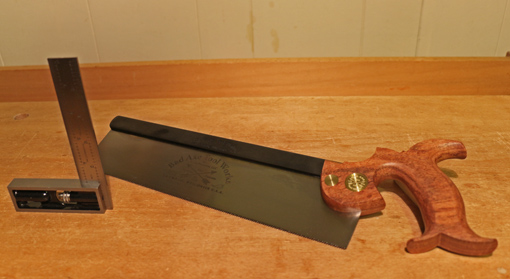
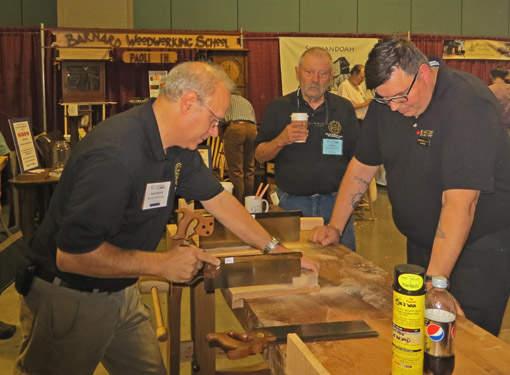
I spent much of the weekend hanging out with Mark Harrell of Bad Axe Tool Works, here demonstrating one of his superb backsaws. Looking on are Vic Tesolin of Lee Valley and Al Flink, a student of Mark’s who became my saw filing teacher for an afternoon. In the world of saws, BATW is playing chess while most are playing checkers.

IMG_0111_edited-2


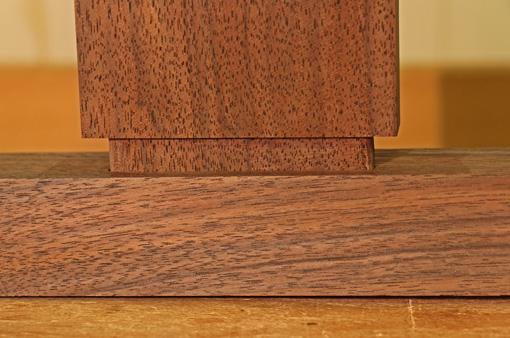
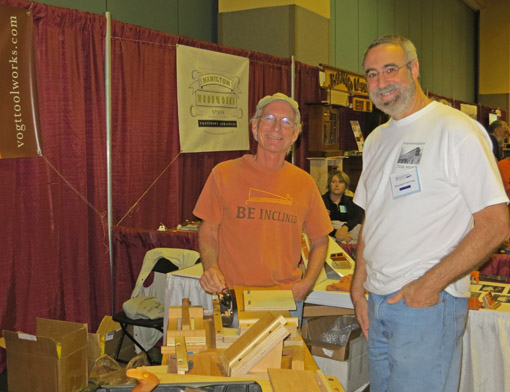
The same goes for shooting boards and Vogt Tool Works. Tico has added to his line of inclined shooting boards with models designed specifically for new shooting planes available from Lee Valley and Lie-Nielsen. If you don’t already own a Vogt shooting board, you owe it to yourself to check out Tico’s products.

IMG_0118_edited-2


When Matt Vanderlist talks, woodworkers listen.

IMG_0115_edited-2


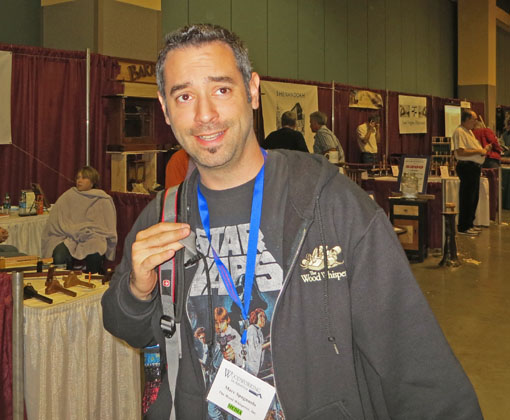
Speaking of great communicators, I asked Marc Spagnuolo to look as cool as possible for this photo. Yes, I know, that’s like asking Kareem Abdul Jabbar to look tall. The Wood Whisperer met my request with his ready sense of humor.

IMG_0117_edited-2


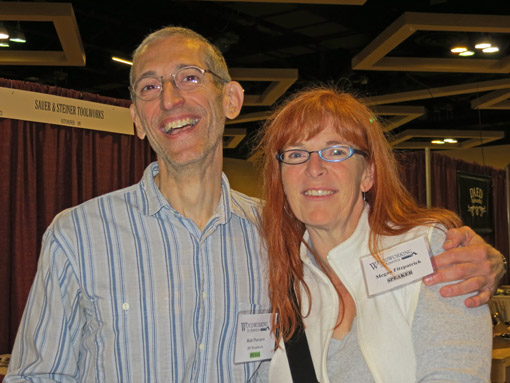
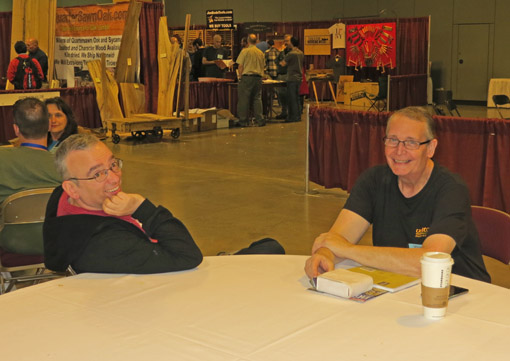
Popular Woodworking magazine Editor Megan Fitzpatrick and I, your devoted scribe, made a deal, or so I thought, to look as sappy as possible for this shot. Megan, no doubt quickly bringing to mind some Shakespearean plot, opted to appear quite levelheaded, while I succeeded rather spectacularly with the original plan – don’t you think?

IMG_0120_edited-2


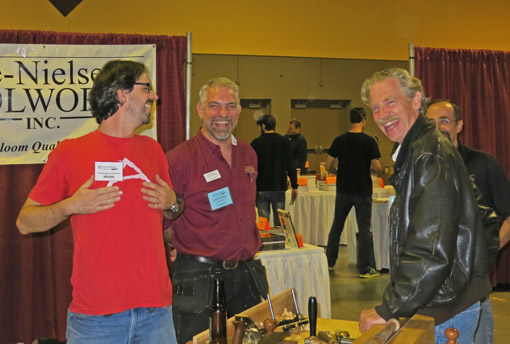
I will not reveal what Chris Schwarz did moments before this shot, but only say that he switched the anatomical focus of his jocularity from his customary posterior to anterior just in time for the photo. (No, he’s not adjusting the square on his shirt.) Can you tell that Deneb Puchalski and Tom Lie-Nielsen are covering for Chris with forced laughter?

Seriously, it is hard to appreciate the beauty of the Lost Art Press books until you handle them in person. The same is so for the grace and functionality of Lie-Nielsen tools.

IMG_0124_edited-2


Recognize the guy in the middle?

IMG_0125_edited-2


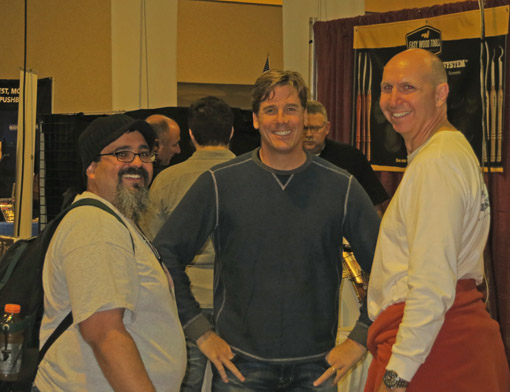
Ron Hock of Hock Tools has done so much for woodworkers for many years.

IMG_0119_edited-2


Woodworkers are similarly grateful for the contributions of Joel Moskowitz of Tools for Working Wood and Gramercy Tools, here chatting with Fred West.

IMG_0123_edited-2

It was wonderful to be around so many people who love what they do, in this case, woodworking. The joy was palpable and contagious, while the learning flowed naturally. The direct link between action and result inherent in the craft of woodworking punishes pretension, so the down-to-earth nature endemic among woodworkers comes as no surprise.

I am grateful for the many conversations I was able to have with sincere, masterful makers. Some that I especially savored, such as with Mark Harrell of Bad Axe Tool Works, and Robin Lee of Lee Valley Tools, were alone worth the airfare. Thank you also to the many people whom I met who kindly mentioned their appreciation of my writings.

Special thanks to the Popular Woodworking crew for putting on a wonderful event!

Category: Resources  | One Comment
Author:
• Thursday, October 17th, 2013

IMG_1039_edited-2

This will start a few posts here on sawing tenons by hand, but first let’s first ponder the mortise and tenon joint in general. A joint that has been used successfully for thousands of years certainly deserves some thought.

What accounts for the joint’s legendary strength? Imagine trying to snap an “L”-shaped M&T construction. The mechanical lock of the tenon shoulders meeting the wood surface around the mouth of the mortise effectively transfers the imposed stress to the glued surfaces of the tenon cheeks against the mortise walls.

The stress on the glued surfaces, in turn, is a shear stress – and we know how wonderfully glued wood surfaces resist shear stress. Voila: a strong joint!

In fact, rarely will a reasonably made M&T joint itself fail. Rather, it is the wood around the joint that is more likely to give way.

Looking at the mortise and tenon strength tests detailed in Fine Woodworking magazine issue#203 (February 2009), we can see that it is almost always the wood around the mortise that failed, even when the tenon itself was too weak to hold up. In the real world, I cannot recall seeing any decently made tenon break, but I have seen the wood around the mortise fail.

I also observe that the only real danger to a tenon pulling out in a properly made joint is from the all-powerful forces of hygroscopic wood movement conflict. This may produce some gapping at the shoulder line, especially in injudiciously designed joints.

In most woodworking instruction, much attention is paid to proportioning the thickness of the tenon with respect to the thickness of the rail. Recommendations are typically that the tenon should be 1/3 – 1/2 as thick as the rail itself.

Yet, knowing from where the M&T derives its strength and how it is capable of failing, it behooves us to look at the proportions of the joint as a whole:

  • Especially consider the robustness of the wood surrounding the mortise.
  • Consider the area of shear-stress glue surface – the tenon cheeks.
  • Consider the nature of the dimensional conflict within the joint. The corollary here is that glues with a bit of give, like PVAs, have an advantage.

One more possible consideration is the lever arm force exerted on the stile (mortise member) by the tenon. In the FW article, look at how the humble stub-tenon and biscuit joints failed: the stile split along the grain near the end of the tenon depth. That’s a lot harder to do with a deeper tenon where the leverage works out to be not as lopsided, and the tenon engages more peri-mortise wood, not to mention the direct value of the greater glue surface area.

I hope, readers, you are not now expecting me to delineate a set of rules for proportioning a good M&T joint. Sorry, there are simply too many construction situations and circumstances. However, thinking clearly about what is going on in the joint and the considerations listed above should bring you to good joint designs. Furthermore, frankly, there is a good amount of slack here – even non-ideal but more-or-less reasonably designed M&Ts will hold up.

But don’t make a sturdy 3/8″ thick tenon to sit in a mortise with a 1/8″ outside wall!

Coming up: sawing tenons by hand, starting with sensible joint layout.

Category: Techniques  | 2 Comments
Author:
• Saturday, September 28th, 2013

WIAimage.php

Take a look at two lists: the Speakers and the Toolmakers who will be at WIA.

Every woodworker can learn plenty from that bunch. In fact, we can probably learn just by breathing the air at WIA. I’m only half kidding: seeing Mary May in person carving oak leaves, and hearing Silas Kopf discuss where design ideas come from, to cite just a couple of examples among the classes, are sure to elevate my skills and confidence.

Browsing the toolmakers’ booths is going to be fun – handling and trying out fantastic tools cannot be done online. Yes, this is dangerous territory, especially if your credit card is handy, but as a woodworker, isn’t that just the kind of living on the edge that you crave?

Exchanging ideas about tool design with these outstanding makers will be just as enjoyable. My first mission will be a reconnaissance op to the Bad Axe Tool Works bunker and Col. (Ret.) Mark Harrell.

Heartwood readers, I cannot think of any better or more enjoyable way to improve your woodworking skills, knowledge, and perspective than to visit WIA and hang out with lots of people who share our passion for the craft. I hope to see you there!

Category: Resources  | Comments off
Author:
• Saturday, September 21st, 2013

img_1021_edited-2

There are places available in the class I will be presenting tomorrow, Sunday, September 22, 2013, at the Woodcraft in Walpole, MA, 10:00 AM – 3:00 PM on “Fundamentals of Hand Plane Selection, Setup, and Use.” The location is about 15 miles southeast of Boston, two miles north on Route 1 from Gillette Stadium.

The presentation will be in a clear, logical, at-the-workbench manner, much as topics are presented here on Heartwood. It will include plenty of guided hands-on, as well as demonstration and discussion. Beginners as well as experienced woodworkers will benefit from the class, which will include bevel-down and bevel-up options and tuning. Bring a plane or two. DVR the 1:00 PM Pats game and beat the Route 1 traffic going in and going home.

Please see the Woodcraft website for directions and details.

Other upcoming classes I will be teaching:

  • How To Make and Use Mortise and Tenon Joinery on Saturday, November 2, 2013, 10:00 AM – 3:00 PM.
  • Choosing and Using Hand Saws – Western and Japanese on Thursday, November 14, 2013, 6:00 PM – 9:00 PM.
  • Fundamentals of Hand Plane Selection, Setup, and Use on Sunday, December 15, 10:00 AM – 3:00 PM.

If you are in the area, and especially if you like reading the Heartwood blog, come on over – we’ll have a blast.

Category: Resources  | Comments off
Author:
• Thursday, September 19th, 2013

IMG_1038_edited-2

The previous post discussed the creative destruction that I optimistically think contributed to my development as a woodworker. Thus, probably slower and with more angst than necessary, I think I’ve learned a few things worth sharing. Surely, readers, you have many points to add, but here are some key factors that come to mind that I believe contribute to a successful woodworking project, which, for me, is one that brings the “quiet joy” of which Krenov spoke.

  • Plot a smart order of construction steps. Don’t back yourself into corners that make succeeding steps more difficult than they need be. Think and think ahead.
  • Recognize appropriate tolerances in stock preparation, joinery, tool tuning, and so forth. Know where you must be very close and where you have some room. We all recognize the damage caused by sloppiness, but compulsive attempts at unnecessary perfection waste energy when building.
  • Know where the critical junctures are in the process. Some steps are make-or-break, so bear down on these.
  • Likewise, be cognizant of the major pitfalls. Usually, they are apparent only if you stop and think.
  • When possible, work in a self-correcting manner. For example, it is often a waste of time trying to get two surfaces to meet right off, and easier to plane small excesses flush as a final step.
  • There are many small touches that cannot be shown in the shop drawing, such as how ends and edges are softened. These decisions properly come along as the work progresses, but they must be consistent with your style and the design concept, and so you must maintain aesthetic awareness as you build.
  • Choose finishes as part of the design, not as an afterthought when the piece is assembled. Experiment on scrap to find a finish that supports the design concept.
  • It is nice to challenge yourself, but not to the point where you cannot maintain reasonable composure as you build. That’s no fun, and the piece will probably show it!

In marked contrast to the disappointment that can sometimes come from trying to make fine things, it can be exhilarating to work in control, in the flow, and in the moment, making something that you dearly want to be.

Here are best wishes as you pursue your path to the joy of woodworking.

Category: Techniques  | 5 Comments
Author:
• Wednesday, September 11th, 2013

IMG_0798_edited-3

Two projects, a small table and a wall cabinet, now distant memories from 25-30 years ago, occupied a considerable amount of my attention as I endeavored to advance my woodworking skills. They were moderately complex pieces. The table involved blind and through mortise and tenons, and curved legs. The cabinet involved multiple frame-and-panels, doors, drawers, partitions, and lots of dovetails.

The designs were pretty good, the wood selection was very good, and there was a decent amount of good workmanship including lots of clean joinery. Unfortunately, I eventually got stuck with some poor choices in several areas: coordinating the alignment of certain components, assembling parts with work left to be done that was then impossible to do well, delayed decisions on some joinery strategies, and poor selections for pre-finishing the panels in the cabinet.

I could not bring myself to finish these projects. Both lingered, partly assembled, in the shop for a long time because I also could not bring myself to destroy them. Yet, eventually, I did destroy both of them.

Why? It was not a matter of imperfections; all projects have those. It was because I knew these pieces would never have that fundamental rightness that produces joy. Further effort would be drudgery. My consolations were that I learned, and time would better be spent on work with real promise.

This sort of failure can come from a faulty or misunderstood concept, though not in these cases. Rather, in each, I did not understand a path to successfully putting all the aspects together to complete the piece, even though I successfully executed many individual tasks such as joinery. My craftsmanship, while pretty good in many respects, was naive. I could not put it all together, figuratively and literally.

This is the hardest aspect of a woodworking project – all the elements of design and execution must come together. One must map a clear, controlled path to achieve this. This path is ultimately based on a clear vision of a good design concept, and the insightful craftsmanship to carry out that vision.

I guess it is true of any endeavor, work or play – such as jobs, sports, and arts. It’s one thing to learn the components but quite another to put them together and make it flow. With woodworking, however, you see it all before you. There is no hiding, and you know it.

Next: So, what did I learn?

Category: Ideas  | Comments off
Author:
• Monday, August 26th, 2013

IMG_0829_edited-2

This is the best screwdriver I have ever used. Made by Spec Tools, the Overdriver Pro has been in service in my shop for 23 years.

Similar to many drivers, the magnetic shaft accepts 1/4″ hex bits, which makes it a versatile space and money saver, and it has a ratchet mechanism to reduce hand fatigue and speed the work, though this one is exceptionally smooth and quiet. There is room to store several bits inside the handle.

What makes this tool unique and great is its patented 4:1 on-demand gear ratio. When you want low speed with high torque, use it like a regular driver with a 1:1 gear. When you want high speed with low torque, use your second hand to grip the large collar at the top of the shaft to actuate the 4:1 mechanism, making it easy to exceed 400 RPM. The smaller collar at the base of the handle reverses the ratchet direction.

None of this would matter if it was flimsily built, but this tool is very well made and tough. It has seen plenty of use in all sorts of DIY work in addition to the woodshop. The handle is hard plastic that gives a surprisingly good grip and is very durable, but can be a little rough in sweaty hands. There is no lock setting on the ratchet mechanism, which I would sometimes find convenient when making a final torque adjustment on a screw and want to back off a little.

The model pictured above has been replaced by the OD-2001 – same tool, different color. It and the RGO-5412, which has a friendlier looking handle containing some firm rubber, are the company’s pro model straight drivers. They cost more but are worth it.

This screwdriver does not seem to be sold by many stores so I thought readers would like to know about it. Spec Tools is located in eastern Massachusetts, and you can order from their site.

This review is unsolicited and uncompensated.

Addendum: I would like readers to know that after I posted this review, the nice people at Spec Tools sent me a package of a few tools, which they insisted I keep with no expectations on their part. I did not solicit, hope for, or at all anticipate this, nor did I subsequently change the content of the post. It is not why I wrote the review. Therefore, I have kept the tools.

Author:
• Saturday, August 24th, 2013

IMG_0831_edited-2

Woodworkers estimate a 90° angle all the time in their work.

For example, as you follow the line when rip sawing by hand, you estimate by eye and feel the position of the saw square to the surface of the board.  Similarly, the initial placement of the tenon saw in the vertical plane, as the cut begins, is done by estimation. When chopping the baseline of dovetails, you estimate a 90° angle for the chisel, even if you then choose to slightly deviate from it to undercut.

I wondered, how accurate can we be with this kind of estimation? After doing some simple trials with a magnetic angle gauge, my conclusion is: amazingly accurate.

I placed the gauge in a position out of my view on the sawplate of my Bad Axe hybrid dovetail/small tenon saw, an exquisitely balanced, multi-purpose backsaw. I placed the saw, as if to start a cut, on a board’s straight edge, which was exactly parallel to the workbench surface. When I sensed the saw was vertically square to the wood, I asked an assistant to read the gauge.

Initially, the weight of the gauge on the right side of the saw tended to confuse me (a woodworking Heisenberg Uncertainty Principle?) but I was able to recalibrate my senses after several trials. As long as I paid attention to my senses of sight and feel, not allowing unnecessary thought to interfere, I was usually within 0.5° of 90°, despite the hindrance of the heavy gauge. I feel sure I could be even more consistent without the annoyance of the test gauge.

A 0.5° error would cause a deviation of only 0.009″ over the length of a 1 inch cut. A 0.25° angular error corresponds to a 0.004″ deviation – the thickness of a sheet of copy paper.

Of course, the initial estimation is validated or corrected as you saw, following the layout line on the face of the work piece. However, well begun is half done, and even as the sawing proceeds, I believe that a lot of ease in accuracy can come from retaining the sense of the saw’s initial placement.

The ability to estimate square is enhanced by awareness of peripheral vision references, close and far, such as the edges of the work piece, the horizontal top of the workbench, the vertical wall behind the bench, and even the front and back edges of the bench being parallel to the wall behind it. It is equally important to feel the balance of the saw in your hand.

Intuitively estimating square is one way of speeding up woodworking and getting into a working rhythm. I have not found it helpful to employ tricks such as observing the reflection of the work piece edges in the sawplate to determine perpendicularity. In addition to being unnecessary, it requires too much distracting shifting of the eyes and head.

Other experiments can be tried, such as crosscutting a board square by eye, or drilling a hole. The accuracy of the results may surprise you.

This is not a case against proper layout lines, and certainly it is not for setting up a jointer fence. The point is that in the course of our woodworking, we are routinely estimating square, and we can be pretty darn good at it.

Developing trust in your senses is one of the joys of craftsmanship!

Category: Techniques  | Comments off