Archive for ◊ May, 2019 ◊

Author:
• Friday, May 31st, 2019
scraper sharpening vise

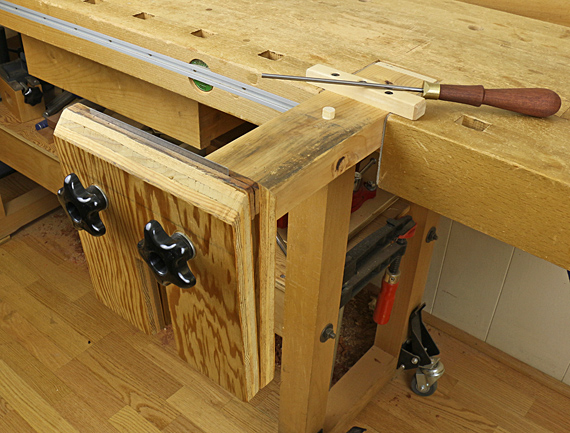
I built this as a saw-sharpening vise long ago from directions on page 16 of the 1979 book Tage Frid Teaches Woodworking – Joinery: Tools and Techniques. After considerable modification, it has long since become my dedicated scraper-sharpening vise

In its original form, the vise was designed to secure the saw blade by the vise itself being clamped into the front vise of the workbench. I made the long notch in the lower part of the jaws to clear the vise screw but it is no longer functional. Now instead, the jaws are tightened by the two star knobs at the ends of carriage bolts. 

The 8″ jaws are faced with hardwood, which allowed me to tune their apposition, including planing a slight camber along the length. The angle at the top of the jaws provides clearance for tools and hands. The jaws grip just fine without a leather lining, which would tend to grab and accumulate metal filings. 

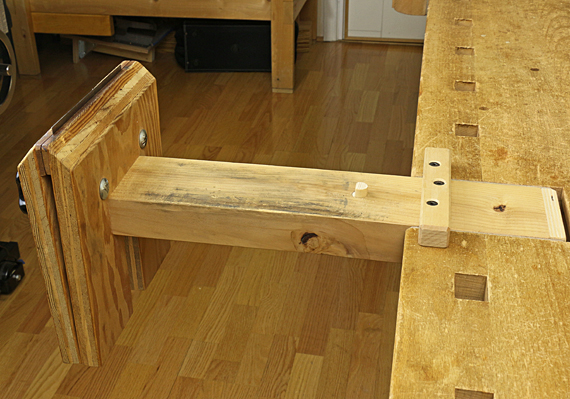
What makes my design really different is the vise is lag-screwed into the end of a 14″ length of 2×4. At the other end of the 2×4 you can see the L-shaped cleat that hooks under the steel plate of the tail vise. Along with the top cleat that contacts the bench surface, this makes the whole setup rock solid when the tail vise is tightened. 

scraper sharpening vise

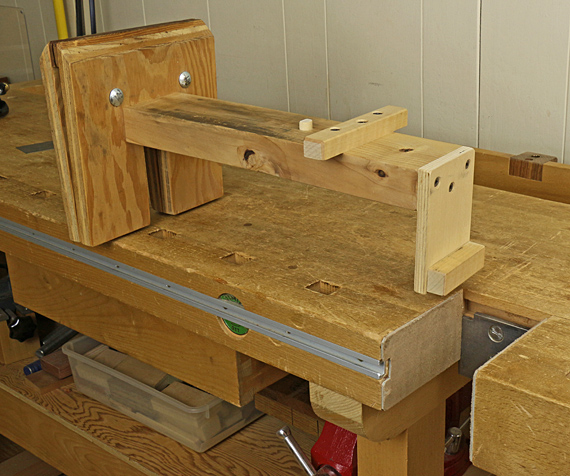
The 2×4 extension piece serves as a handy platform for diamond stones, and for running the burnisher along the side of the scraper. The removable dog acts as a stop. The extension also keeps the vise well away from the workbench to prevent metal filings from defiling it. 

scraper sharpening

Of course, the vise is systematized with my method for sharpening scrapers. I do all of the work on the edges of the scraper – filing, diamond stoning, and burnishing – with the scraper clamped in this vise. I’ll save the details of that for another post but here I’ll say that scraper sharpening is easy, and I highly recommend a polished carbide burnisher.

Category: Tools and Shop  | Comments off
Author:
• Monday, May 27th, 2019
jig for Veritas honing guide

Like many woodworkers, I have a mixed view of honing guides. After many years of using a modified freehand technique involving simple shop-made angle setting blocks, I now use the Veritas Mk.II guide for much of my honing. Maybe it’s because I have more blades, maybe it’s a matter of less patience, but I do like to try to refine my systems and this is where I am now.

The main advantage of a mechanical honing guide is in reliably and accurately returning to a secondary bevel formed in the previous sharpening or within the same sharpening session. This comes at the price of more complexity in the system. Moreover, the versatility of the Veritas Mk.II makes it more complex than most other guides.

My attempt to simplify use of the Mk.II involves setting the extension of the blade from the front of the jig, which is one determinant of the honing angle. To register the extension (and square the blade to the jig), the MkII uses an attachment to the main guide that you have to slide on and tighten. Then you bring the edge of the blade up to a metal stop on the attachment. Once you have tightened the blade in place, the attachment is removed and you can commence honing. 

Veritas Mk.II honing guide

The registration stop on the attachment is set in one of a dozen locations, each with a dimple to maintain repeatability. Each location of the stop allows several different honing angles depending on three possible settings of the clamping head on the roller base and four possible adjustments of the roller itself. The specific angles are in a table provided with the tool. 

Veritas honing guide angle registration

Ugh! But it’s not as bad as perhaps I’ve made it sound. In any case, 90% of my honing (and probably yours) can be accomplished with just two blade extension settings, specifically, the “H” and “I” extension lengths, which can render honing angles from 30° to 47.2°. (See Veritas’ instructions.) So, instead of fiddling with the attachment device, I use the simple wooden extension stop shown in the top photo. The little shim produces the “J” setting, which covers most of the other 10% of the angles I use. 

jig for Veritas honing guide

I find this wooden stop to be faster than the Veritas attachment, and just as repeatable. It does take a little practice to coordinate the stop, blade, and Mk.II in your hands. Another advantage of the wooden stop is in avoiding metal near the edge of the blade, particularly if you have to repeat the setting in the same session for a partially sharpened blade that you want to work on further. It also works with the narrow blade clamp, which is especially helpful for Japanese chisels.

With this simple shop-made jig, I can enjoy the advantages of the excellent Veritas tool while avoiding some of its complexity. 

Addendum 12/8/19: The letter designations, H, I, and J (referred to above) for the dimple positions on the Veritas blade registration jig that is used with the MkII honing guide are no longer used in the current version of their instructions, copyright 2018. In the original instructions, copyright 2011, which I have, they use letters to refer to the dimples in the jig. H is the 20-30-40° hole as labeled on the jig, I is the 45° hole, and J is the 35° hole. The blade registration jig and the honing guide have not changed, so the rest of the above remains applicable.

Category: Tools and Shop  | 3 Comments