Archive for ◊ October, 2025 ◊

Author:
• Monday, October 27th, 2025

I have had these small sayings posted in the shop for a long time. I look at them often for their help.

The one from the late Sam Maloof, above, is on the door of my drafting setup. I really need that advice!

In the photo below, it is from the late James Krenov. It is pinned to the top of the tack board just above the workbench where I mostly attach the design drawings for the current project. It is simple, clear, and certainly should not be forgotten.

Shown below, on the other side of the tack board, is a sentence from The Book of  Wisdom in the Old Testament of the Bible. It is a simple way of lifting the significance of wood. Yes, good old wood!

So, there are some ideas you may wish to use. Of course, you surely have your own sayings or bits of advice that would help you in your shop. If you have not already, I suggest posting some.

I also have a few other postings in my shop which I will share in time. They all help keep my mind and hands going strongly: woodworking!

Category: Ideas  | 2 Comments
Author:
• Monday, October 20th, 2025

Here is one more thing to add to a manufactured device for sharpening. The previous post explains the issue: for sharpening plane irons that have a slightly curved edge, which is most of them, a subtle curve needs to be added to the roller. (This does not apply to nearly all chisels.)

I have two Woodcraft rollers. One is used as is – for sharpening straight edges. (Photo is below.) The other roller is very slightly curved across its width. (Carefully note the photo above.) It was not manufactured that way but was easily done in the shop.

The roller itself is 1/2” wide. Working out the math and using it in practice, reveals that the roller needs to be ground just about .003” on each 1/4” half of the wheel. In other words, from zero at the center point to a maximum curve of .003” shorter at each far side edge. 

An electric motor-rotating wheel can do this. Be careful and keep fingers away from the wheel! (The safety decision is solely up to you.)

Note that you are making a curved angle on each side, not a straight-edge angle. It is easy to do.

This adds a comfortably controllable ability for angling the plane edge on the flat stone. This is far better than trying to alternately angle onto just the outside corners of a regular flat wheel guide. 

This subtly angled wheel will work for almost all of the plane blades. As I have mentioned in the previous post: nearly all manufacturers neglect this important factor. They could simply supply two replaceable wheels or two frame-wheel combinations. (Again, Lee Valley/Veritas is the only manufacturer that I know of that builds in the curvature in one of their wheels. I do not care for their expensive system but I do suggest taking a look online for your choice.)

With all of this said now, I will still say that I do the vast majority of sharpening by the total hand-holding method discussed three posts ago. But now you have options!

Sharpening is a must for good woodworking but not hard to do with the right equipment and skills!

Author:
• Wednesday, October 15th, 2025

Perhaps you use, or have at least tried, the sharpening method by hand discussed in the previous two posts. In any case, here is another approach that involves a straightforward angle holder. 

The woodworking tool (plane iron, chisel, etc.) is inserted into the holding guide. The pair is placed onto the angle gage, the tool is slid to match the angle number line or face, say 32°, and the holding bolt is tightened. Position the holder’s wheel on the sharpening stone and, back and forth, off you go sharpening. Easy overall. 

Notice my own lines for 27.5° and 32.5°.

There are several different designs for the holding guide. The one I use is from Woodcraft. It has a single, central, 1/2” wide wheel and can accommodate tools from 1/8” to 2 3/4” wide. Simple as can be.

Play with Amazon and you can find many varieties. Some are like Woodcraft’s. One has a wheel more than 3” wide. Some use pairs of wheels, and some include two pairs of different widths. Some use a single pair of wheels which can be set on the inside or outside width of the tool griper. Woodpecker’s model is like this. Lie-Nielsen and Lee Valley make varieties that include sharpening angled blades. There is quite a creative selection. 

For chisels, these work well for their straight edges. However, for most plane blades, the edge is importantly, slightly curved. This is most of our sharpening work. I easily manage this with the practical system described in the previous two posts.

Can managing the slightly curved edges be done with the tool systems described here? With a 1/2” single, central wheel as on the Woodcraft model, you can very slightly tilt and role on the right corner (then left) to varying degrees. With subtle, variable tilting and rolling, you can produce a decent curve. Not my choice, but it can be done.

It would be helpful if manufacturers simply made an extra, replaceable wheel with a subtle curve built into it. Even better: two extra wheels with slightly different curves.

Credit to Lee Valley/Veritas for the curved edge roller in their system, though I do not prefer it in some other respects, mostly based on complication.

Well, I hope this and the previous two articles help with your direction on hand sharpening. And you know that you cannot do excellent woodworking without really sharp tools!

Category: Techniques  | 2 Comments
Author:
• Monday, October 06th, 2025

Here are the angle gauges that I use for the method discussed in the previous post. 

The size for all is about 4 1/2” long, 1 1/2” wide, and 1/2” thick  and made from cherry or African mahogany. They about 10 to 20 years old. 

The sharpening angle goes back about 1” for all the angle gauge sizes. Therefore, its height varies based on the angle. Height is about 1/2” for the 25° gauge but 1 3/32” for the 48° gauge. 

Overall, these give working consistency except for the angle itself.

These are easiest to make with the table saw using straight, square, level wood. Please work cautiously! You make the method but work from long pieces so your hands are nowhere near the blade and pushing path. Make no chance of slipping on the angle holding setup. 

I have a spaced holder for them to stay neat and handy. As mentioned in the previous post, I do not suggest going by my nerdy 1/2° amounts for 27 1/2 and 32 1/2. It does not matter. 27° and 32° would be just fine, or whatever else you might prefer. 

Looking at the photo carefully, you can note that I measured the actual angle in each gauge. It is off a bit. That does not matter. I am using the same gauges each time sharpening. 

They will last a very long time.

Next post: to discuss an angle holding gauge which I do use, though as I mentioned in the previous post, just a minority of the time.

Author:
• Saturday, October 04th, 2025

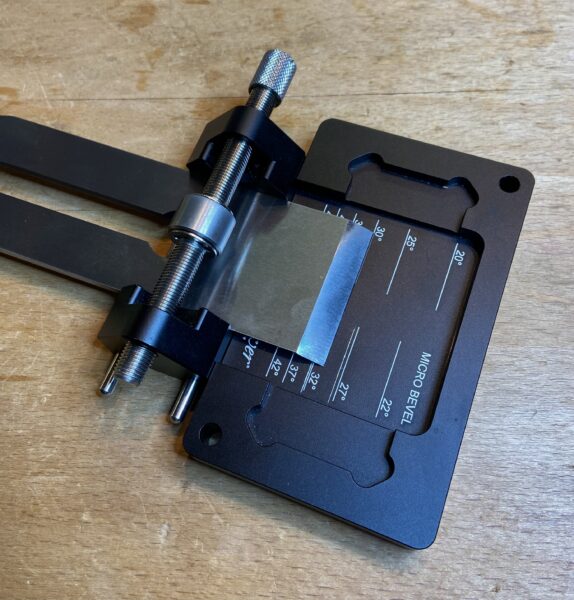
When we hand sharpen a tool, such as a chisel or plane blade, it must be accurately and consistently held at the desired angle to the stone. Most woodworkers and most teachings use an angle holder.

With some exceptions such as tiny or odd blades, I generally do not. I do have a metal gauge that I use sometimes, and that will be covered in a future post here. I have also tried others in the past, and wrote about some, but I do not use those anymore. 

Let me explain what I do. Perhaps you want to give it a try if you do not do it already. 

The steps:

1. Use a very flat stone with just a little water – not a big puddle.

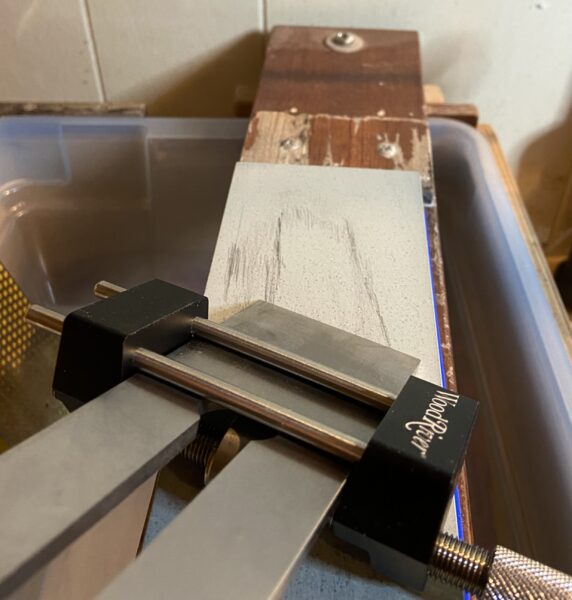
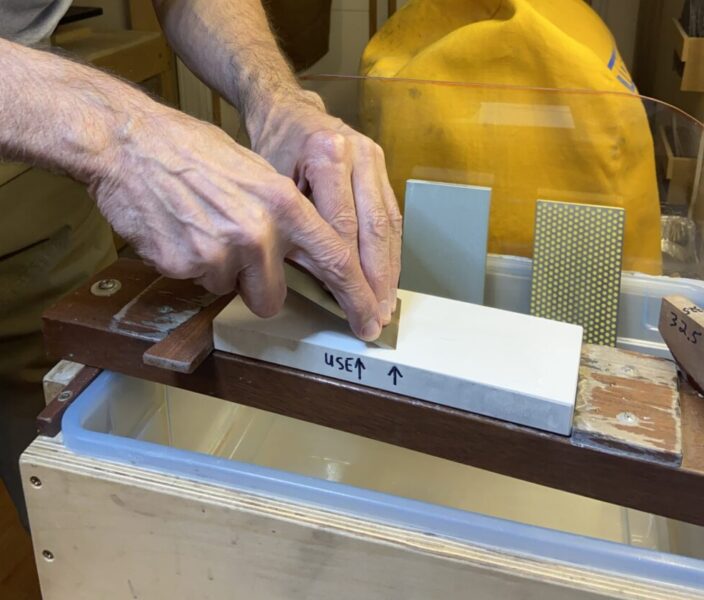
2. The wooden angle gauge is placed on the stone with the left hand. With the right hand, the tool edge is angled firmly into the slot. (See below.)

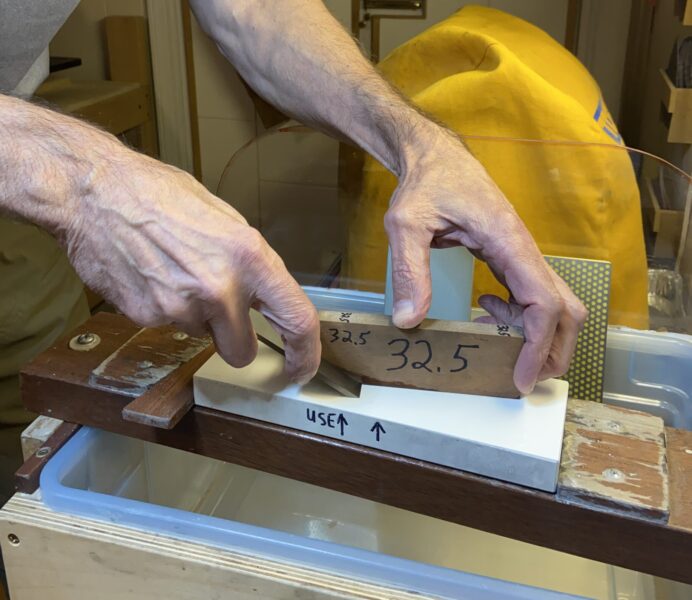
3. The left hand puts aside the gauge and then works with the right hand to hold the tool angle to the stone. Lock the angle in your hands! (See the picture at the top of this post.) You will be surprised how accurate and consistent you can be after just a little practice. Test yourself.

4. Now cut back and forth for small distances. I usually go only about a couple inches, even less, on the fine stones, while more on the medium and course stones. You must hold the angle steadily over the distance. With some tools, longer feels better.

Most of the cutting occurs on the push rather than the pull.

Some folks like going in a circular back and forth motion. That works too.

Here is what you can sense:

Feel the angle with your hands with balanced, steady legs and body.

Hear the sound of cutting, especially forward. 

Sense the edge on the blade on the cutting stone. 

With all of these, you can sense slight differences with the correct angle compared with a decrease or increase. I do find all of these a bit easier with the finest stones compared with the coarser stones. If you think you may have changed the angle, recheck it with the wooden gauge. 

For practice, try intentionally increasing and decreasing the angle incorrectly. You can quite readily detect the differences in all those senses. Check yourself with the wooden angle gauge.  

All of these skills also apply to sharpening curved edges – done for almost all hand planes. Get used to working across through the curve. This is easier and steadier than using a griped-on, wheeled angle tool.

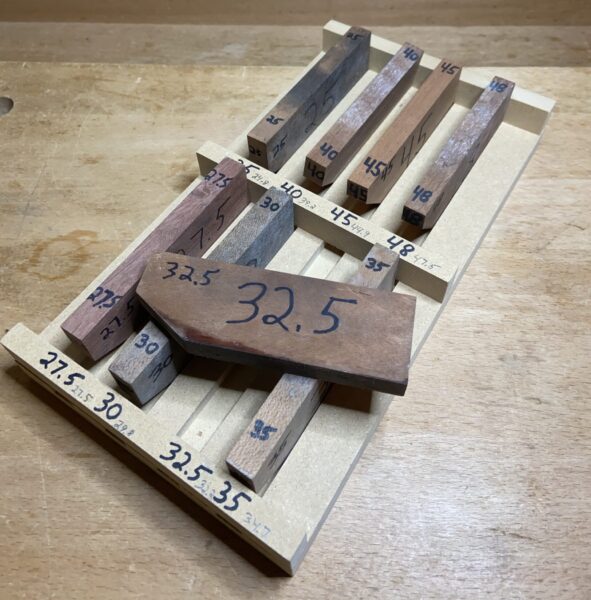
The most common angle I use is 32.5°. Why .5? For no good reason! I made the wooden gauges long ago and never changed them. It does not matter. Consistency does! 32 would be just fine.

I suggest giving this a try. It is faster than working with metal screw-on gauges. You might like it!

In the next post, I will show the wooden gauges. They are easy to make.

Category: Techniques  | Leave a Comment