Archive for ◊ September, 2025 ◊

Author:
• Wednesday, September 24th, 2025

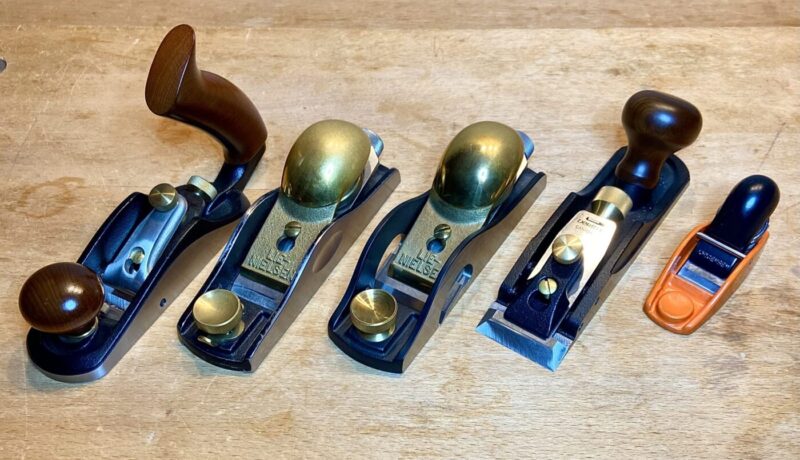
We turn to little planes when the regular big ones, such as the #4 smoothing, #5 jack, and #7 jointer will not do the job or are awkward. These five little planes are worth having in my shop. 

Left to right in the photo above:

1. Veritas Bevel-up #1. The blade bed is at 15°. The mouth is adjustable. I sharpen the PM-V11 steel blade at 27.5°/32.5°. The plane is 5 13/16” long, 1 25/32” wide. The blade is 1 7/32” wide, 1/10” thick. 

2. Lie-Nielsen #60 1/2 block plane, 12° blade bed, adjustable mouth. I sharpen the W1 blade (an early model) at 27.5°/32.5°. Plane 6 1/4” long, 1 3/4” wide. Blade 1 3/8” wide, 1/8” thick.  

3. Lie-Nielsen #60 1/2 rabbet block plane, 12° blade bed. I sharpen the A2 blade at 27.5°/32.5°. Plane 6 1/2” long, 1 3/4” wide. Blade 1 3/4” wide, 1/8” thick. 

4. Veritas Cabinetmaker’s Trimming plane, 15° blade bed. I sharpen the O1 blade at 25°/30°. Plane 6 1/2” long, 1 3/4” wide. Blade 1 3/4”+ wide, 1/8” thick. 

5. Jorgensen mini block plane #70700, 20° blade bed. I sharpen O1 blade at 25°/30°. Plane 3 1/2” long, 1 1/4” wide. Blade 7/8” wide, 1/8” thick.  

The #1 plane functions just like the larger planes but it is handily smaller. For example, it handles very well for smoothing a narrow part of a cabinet frame, even a long one. The handles allow you to hold it and move it just as well as a #4 smoother. I think it is nearly a must. I keep it just as well sharpened as the #4.

The regular block plane works well with one hand pushing in any direction and angle. I use it for practical fitting, trimming, and sizing parts. I think just about everyone has a regular block plane. 

The rabbet block plane is the same idea but you can cut to the side edges. So it can fit in length or side joints where it can often out do a chisel. Not essential, but very handy.

The trimming plane can save the day where it is too hard to consistently and accurately use a chisel. For example, where you need to clean up the width and length of a joined corner section. I do not pick it up too often but it saves the day when I need it!

Sure, for #3 and #4, you can often substitute a shoulder plane, edge plane, or others, but these block plane variants have advantages in holding and pushing. There are alternatives, but these have important roles. 

The mini block plane: yes, have it and you will quickly use it for all sorts of little tasks. It is incredibly well made – flat, excellent steel blade, easy to adjust well – for $18! You might even keep it in a pocket. 

Ok, if you want only two: bevel-up #1 and mini plane. Three? Ok, add the regular block plane. All five?! Ok, skip an expensive restaurant group outing or two. Hey, you’re a woodworker! These are like fingers in the hands and connections in the brain.

Category: Tools and Shop  | 6 Comments
Author:
• Thursday, September 18th, 2025

If you are going to put a lot of work into making a nice wooden small box, you might as well use fine quality hinges and possibly other products. 

So, let us go through options of hinges, lid stays, and locks. I will make recommendations. I will hold off discussion of feet, nobs, and latches.

Most woodworkers make a box, sooner or later. So here we go . . . 

Hinges

You can use regular style hinges, widely available in good quality, that allow you to open the box lid 180°. Since you usually want to stop the opening range at just over 90°, you would need to install a stay mechanism. I will get to that later.

I prefer to use a hinge pair that will itself stop the lid from opening further at slightly greater than 90°. The two best available options are from England. smartButt hinges have clever, elegant round knuckles that stop the opening at 93°. (See the photos at the top of this article and just below this paragraph.) (By the way, there are some shadow images in the top photo; not an imperfect fit!)

The other great option is smartHinges. (See the photo just below this paragraph.) These go on the side pieces of the lid and body of the box. These also stop the lid opening at 93°. You can easily and entirely use a router table to fit them. Note that the wood grains in the tops of the sides of the lid and the frame sides should go front to back. This is to avoid tiny short grain at the outer edges of the hinges.

The two excellent types of hinges are available from the great box maker Andrew Crawford at smartboxmaker.com. 

Also nice, but without the same elegance of Crawford’s hinges, are stop hinges (photo just below) and side rail hinges from Brusso (brusso.com).  

Brusso also sells quadrant hinges. I have an example of this type (not Brusso’s) in the photo just below. These also control the lid opening but I think are harder to install than the options mentioned above. 

Separate lid stays on the side

Ok, if you nevertheless use hinges that do not themselves fix the lid open, you will probably need a lid stay on the side. There are numerous choices but I think Brusso’s lid stay is your best option. 

You can also use a string made of metal beads, cloth fiber, etc. This is a bit floppy and not my choice. 

(Photo just below.)

Locks

This is not strong security in your wooden box but is a nice image you might like. Again, I recommend the fine smartLock. Lee Valley has a good variety though less exquisite. (Photos below.) Don’t loose the key! 

Brusso has a nice button latch for the box front, though not a lock.  

So there is a quick summary of box parts that you can install. You are going to go through careful, detailed work that you want to make really nice, so install excellent parts to refine your work. 

Enjoy!

Author:
• Tuesday, September 09th, 2025

These small pieces have been cut and labeled from readily available sheets. Having had them for many years, they get lots of use. They are a quick way to assess small measurements without having to stare and dwell over minute ruler values, or evaluate confusing visual input.

The product is TTC PSS5A 14 Piece Plastic Shim Stock Assortment – 5” x 20” Color Coded Sheets.

(Note that I also put a few thicker wooden examples in the upper photo.)

Some practical examples:

You can slide a shim under a straight edge or square to check how much a piece is flat or out of square. Then, you quickly translate the .004” gap to a few fine strokes with the plane.

Similarly, you can assess the sole of a new plane, or a worn wooden plane sole. 

How much gap of the tenon walls with the sides of the mortise? How far off square is a machine blade?

How much edge of a door frame do I need to plane away? (Or, how much did I goof up?)

Assess the amount of a sharpened curve (or accuracy of straightness) in a plane blade. Get the amount of the appearance. You can remember the appearance visually but also keep in mind the numerical amount for future sharpening.

Evaluate the flatness, or an appropriate curve, of a hand plane. Below: checking the desired inward curve of the sole of a Yoshihiro Yamamoto plane.

There are many other uses! The basic idea is numerically evaluating with the shim stock and relating it to the direct visual assessment. You are adding to your perceptive ability in your work.

Added: 

The fine reader points out (see comments) the less expensive stainless metal gauge sets available. I have long had similar ones (see photo below). Yes, they too are effective and handy, though I do not use them nearly as much. Somehow, I like the separate, colored, multiple in every size, and multi-reproducibility in every size for the plastic ones.

Still, you might like the $7 metal ones instead of the $45 plastic set for your purposes. Amazon, of course.

Category: Tools and Shop  | 4 Comments