Author:
• Saturday, February 09th, 2013

IMG_0897_edited-2

Here are more morsels of shopology from the “sawdust and shavings of my shop” that I hope will be helpful for readers.

1. Recognize the difference between efficient rhythm and dulling repetition. Finding the sweet spot can improve the quality, speed, and enjoyment of your work.

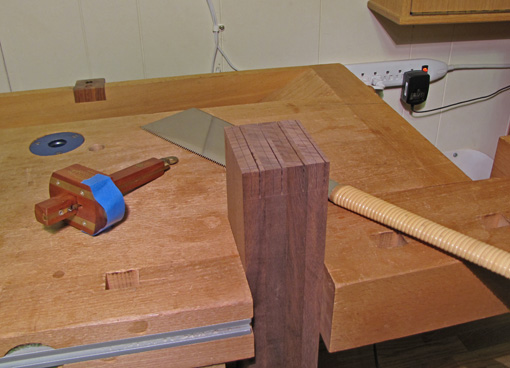
For example, in the above photo, sawing the cheeks for four tenons in a bunch put me in a nice sawing groove, accurate and fairly fast. After four more sets for the other ends, I was ready to move on to other tasks. Immediately doing likewise for another set of rails, would probably have put me over the threshold of monotony, and induced careless inaccuracies.

2. It is helpful to have a separate sharpening station, however modest, so you do not have to clear space on your bench for sharpening gear and the mess that sharpening can create. A dedicated station will also encourage timely attention to edges.

3. Milling rough lumber to finished thickness in one session can be risky, especially if there is substantial thickness or distortion that must be removed. If there is any doubt at all, it is safer to mill to near the final thickness, watch the wood for a few days, then, when it is convincingly settled, go to the final thickness. Then joint the edges and square the ends.

4. Keep router collets clean at all times. A slipped router bit is not fun. I use cotton-tip swabs before putting the router away after use. And clean the pitch off the bits before putting them away. I like CMT 2050 cleaner for that.

5. Be cognizant of the “zoom power” that you are working in. There is a larger margin for error for joints and edges in a basic pine bookcase than in a small, fine walnut jewelry box. Working at the wrong zoom power can create undue stress in the building bookcase, and obtrusive sloppiness in the box. Be practical.

6. Move and adjust the light to where you need it. Just do it. Then resume working.

7. There is almost always a smarter and less smart order to do things in building a project. Without going too crazy, take some time to think about the planned outcomes of processes and what can commonly go wrong. Then plan a course.

8. Without reinventing the wheel, it pays to once in a while rethink common procedures, constructions, and tool setups. Without a doubt, there is always more to learn, and I want to put at least some of it to use in my shop.

Happy woodworking, dear readers.

Category: Tools and Shop  | Tags:  | 6 Comments
Author:
• Wednesday, January 30th, 2013

In a recent post on the Fine Woodworking website, FW Senior Editor Matt Kenney questioned if employing jigs and shortcuts to achieve excellent results constitutes “cheating” at woodworking. His emphatic answer is that the result, not the method, is what matters. He encourages each woodworker to unapologetically find the methods that work best for him to produce the furniture of his desire.

By and large, I agree with Matt. Judging from the numerous comments on the post, this question concerns many woodworkers.

But it got me thinking, is there cheating  of another sort in woodworking? I believe the answer is yes, there is.

Cheating in woodworking is pretending that what you made is better than you know it to be, or that it meets your standard when you know it really does not.

Honest craftsmanship, at whatever level, is a result consistent with an intention. It is not necessarily a precisely realized prediction of each procedure, or of each element of the design, but at least the concept, the core idea, of the piece should be successfully expressed. That, after all, was your purpose in building it.

Now, there is always some unpredictability, and thus risk, involved in craftwork because until the piece is completed, its full impact cannot be felt. In other words, despite all of a craftsman’s designing and workmanship, he never can fully grasp what he has gotten himself into until the piece is done and stands there before him.

You may have chosen to make a simple functional bookcase or a high-class cabinet. The piece may have involved a novel design that you were not sure would “work,” or may have pushed the limits of your skills.

In all cases, there is a reckoning that comes when the work is done.

Is the piece within the range of what you intended? Has your concept – your core idea – been expressed? If so, was it a good idea in the first place? And the workmanship: is it of such level to carry that expression? Put simply, did you make what you really wanted to?

I know if I did or did not. It’s not an absolute judgment, but there surely is a discernible threshold – an overall truth about the piece. Cheating in woodworking would be to kid myself about that.

Fortunately, there is no need to cheat. Just get a pencil, more wood, and sharpen your tools, including the one on your shoulders, and get back to work.

Category: Ideas  | 9 Comments
Author:
• Sunday, January 27th, 2013

Projects featuring live edge wood can be fun and liberating as the gifts of nature guide the woodworker’s design. Though preferences vary in managing live edge boards, I like to remove all of the bark down to the sapwood surface, retaining and exposing the wonderful natural undulations of the wood.

Live, or “natural,” edge boards may have been dried with all of the bark on, or after most of it was removed. During the growing season, the cambium layer is fragile, making the bark easier to shear off. Either way, my goal is to remove all remaining bark without damaging the natural contours of the wood.

The walnut board shown here was dried with all of its bark so I began by removing the bulk of it with a bowsaw. A drawknife may also work well. This is not a job for a bandsaw or jig saw because you want the maneuverability and feel of a hand tool. In the soft inner bark, the saw almost feels like it is going through Styrofoam; the harder resistance of wood is a sign of going too far. To save work later, I get as close as I safely can to the wood, intermittently checking both sides of the board. It is easier to work with the board held vertically, if possible.

The next step is to use abrasives. Dico Nyalox brushes used in an electric hand drill work ideally. They are aggressive enough to remove remaining bark but not enough to reshape the wood. In most cases, an 80-grit (grey) flap brush is a good start, followed by the orange 120-grit. I brace the drill against my body and wear a dust mask.

Next, I use the less aggressive cup brushes, which, as I ramble the drill along the edge, act almost like a random orbit sander. The 80 and 120-grit cup brushes, followed by a light pass with a blue 240-grit flap brush, finish the job.

 The photo below shows the result I like: cleaned up, but ruggedly natural.

The edges of curly wood require special caution. The coarser flap brushes seem to impact the peaks of the bumpy, wavy edge to gouge tiny horizontal grooves that are difficult to remove. Depending on the species, I’ve found it better to work mostly with the cup brushes for curly wood. The photo below shows the edge of curly big leaf maple in a finished piece.

Notice the rasps and sandpaper in the photo showing the tools. “Natural” is nice, but occasionally I’ll “improve” on nature with a little cosmetic surgery using a coping saw, rasps, sandpaper, and maybe even fillers to alter a shape or defect that I don’t like, and to get the look I want. That’s part of the fun.

Category: Wood  | Comments off
Author:
• Sunday, January 20th, 2013

The Lie-Nielsen bronze #4 has for years been one of my favorite tools in the shop, but is now even better with an aftermarket tote and front knob made by Bill Rittner. Now, this is not a situation like I have previously described with the Veritas totes. The L-N OEM tote is very good. The upgrade, however, is in another category: heavenly.

It may be hard for readers to understand my effusiveness about a shaped piece of wood without being able to reach into the above photo and pick up the plane, so I recommend visiting Bill’s website and reading about his tool making background and how he has refined plane handles. In working with Bill last year evaluating some prototypes, I was amazed at the level of refinement to which he has brought this work.

As demonstrated in the photo below, the tote does not have any flat on its side. (Check your planes’ totes.) The cross section is actually elliptical, which fills the hand satisfyingly.  The fit and finish are superb. If you enjoy and appreciate the nuanced work of a sophisticated craftsman, this is a luxury that is well worth it. Really, I find myself eager to use the plane just so I can hold it.

As I have mentioned in several other tool recommendations on this blog, this review is unsolicited and uncompensated. I just like to support craftsmen making honest offerings of great products.

Author:
• Monday, January 14th, 2013

The Veritas flat and round metal spokeshaves are excellent tools that have performed well for several years in my shop. However, I greatly dislike the handles on these tools as supplied by Veritas. I will explain. 

The OEM handles are round in cross section, and rather small. This makes it difficult to control the spokeshave in the most critical aspect – its rotational pitch on the long axis of the tool with respect to the wood surface. This means how you tip the spokeshave to effectively engage the blade into wood. The smallish round handles make it hard to find and maintain proper positioning. The tool tends to rotate unless it is gripped tightly, leading to undue fatigue.

This is true even if you place your fingertips on the body of the spokeshave, as many woodworkers prefer. The fingertips are fine tuners, while stability and power comes from the body of the hand against the handles.

Fortunately, the Veritas design facilitates installing user-made replacements, which I did soon after I bought the tools, using hardware available from Veritas.

I made my handles larger and, most importantly, flatter – vaguely like a chubby beaver tail or an elongated cactus branch. I can feel and maintain the registration of the spokeshave against the wood better than with the OEM handles. My handles originally were longer but I shortened them, so now I can tuck the rounded end against the outer part of my palm.

The flatter handles are a tricky to install because you want them to attach in a specific orientation, unlike the round-cross section OEM handles. One end of the hanger bolt used to attach the handle goes into the tool body with machine threads. Coarse wood threads on the other end go into the wooden handle. The wood threads must enter just right amount into the handle so it will be in the desired position when the machine threads are tightened into the body. There are right hand threads on both sides of the body, and therefore they tighten in opposite directions as they face each other.

I eventually got it right after trial and error. Making the two faces of the handle symmetrical doubles the opportunities to align the two handles.

Perhaps a tang with machine threads on one end that attach to the body would make it easier to align user-made handles that are not round in cross section. I wonder if Veritas would consider such an accessory.

I made the handles from cherry. I like a woody, not slick, feel to tool handles so I applied a single coat of oil-varnish.

As always, woodworkers will have their personal preferences in these matters of the hand and the tool, but here I have explained the reasons for my preferences. Now the Veritas spokeshaves are just right in my hands!

Category: Tools and Shop  | 5 Comments
Author:
• Sunday, December 30th, 2012

Even skillfully made, sound joinery may have occasional small gaps. These will probably summon little or no notice from people who view and appreciate the piece, but nonetheless disturb the vanity (oops, I mean genuine pride in craftsmanship) of the maker. The wood itself may also have small defects. As long as these imperfections are few and small they are not likely to disrupt the overall aesthetic impact of the work. Still, we want them to disappear.

This discussion deals with fine gaps, not craters, canyons, dents, or seriously mashed wood fibers. Keep in mind too, that you’re in trouble if you have to rely on fillers because your joinery is just plain sloppy, especially if its structural strength is compromised by poor technique.

Let’s look at various situations. (Caution: purists and fantasy woodworkers should stop reading here.) Where end grain and side grain surfaces adjoin, such as in dovetails, fillers can do a good job of hiding small gaps. The same is true where side grain surface meet along an irregular border, such as in artistic inlay. However, even small amounts of filler can be noticeable where the eye expects an unbroken linear border between side grain surfaces, especially if the grain directions are perpendicular to each other such as in a flush-fit tenon shoulder. It is much better to detect and correct that sort of problem after dry fitting. Finally, some problems are probably best just left alone.

Here are some materials that have worked well for me. Readers, no doubt you have your favorites.

Timbermate, made in Australia, is the best premade filler I have found. It is ready to use, dries fast without shrinking, and takes stains and colorants in its wet or dry state. It is a water-based formula available in 13 colors plus a white tint base. An 8-ounce container is probably a lifetime supply for me. No worries, mate.

Of course, there is also the old sanding dust mixture routine. Most wood glues, such as Titebond III, make a good base. Titebond No-Run No-Drip produces a thick, fast-drying paste using less dust, and can make a lighter color paste. Zinsser Seal Coat dewaxed blond shellac makes a thin paste that dries very quickly. I find epoxy is too messy, and CA glues are quick but less controllable. Experiment.

Sand up a small pile of dust from a piece of scrap and mix in some glue or shellac. Use a file or fine rasp for coarser dust or if the possibility of grit in the paste is a problem. The key is to regulate the color and texture of the paste based on the glue or shellac, the tool used and thus the fineness of the dust, the species of wood used to produce the dust (which may not be the same as the project wood), the finish to be applied, and the anticipated long-term change in the color of the project wood.

For application tools, try toothpicks, tapered craft sticks, bamboo skewers, and so forth. I usually break the stick to produce a sharper end. Wax modeler’s spatulas, available from Lee Valley, are nice for precise work, though they superficially blacken Timbermate with continued contact. For removing excess paste and leveling the surface, I like to use a mini card scraper.

Wax filler sticks, available in lots of shades, are useful for quick touch up work after the finish has been applied. They have the advantage of color matching to finished work, but keep in mind that many woods darken over time.

I guess we can feel better recognizing that there is some art to covering up imperfections.

Category: Techniques  | 2 Comments
Author:
• Sunday, December 16th, 2012

Finishing off dovetails, through tenons, and joint pegs often involves crosscutting projections of wood flush with the surface. Here I will discuss a few common ways to do this, each with its own set of problems, and present a simple solution that does not require a dedicated saw. Hint: the trick is hidden in the photo above.

The flush cut saw is one approach. This is a specialized saw with no set (see photos below) on either side, most commonly with a Japanese-style crosscut tooth pattern. A portion of the very thin and flexible saw plate can be laid flat and pressed against the wood while the handle end is raised to grasp. If it is initially prepared for use by stoning away the minute burr from the manufacturer’s sharpening, it leaves a perfectly smooth surface, with virtually no cleanup paring required.

No set:

However, not surprisingly, this type of saw has a strong tendency to bind, even 1/2″ or less into the cut. For a through tenon, you can avoid binding by making multiple approaches at the projecting wood from different sides, but this is usually not possible with dovetails.

Veritas addresses the binding problem with their flush cut saw, which has set, but only on the upper side. Binding is eliminated, but the saw inevitably tracks away from the surface, leaving a significant amount of wood remaining to pare, especially in wider cuts. I find this annoying, and also do not like the lack of control when sawing. The set could be reduced but with a concomitant tendency to increase binding.

Here’s the simple solution using an ordinary flexible backless saw with a normal set. A Japanese crosscut kataba saw such as the Gyokucho 05 model works very well. It is very straight with very consistent set.

First, determine the amount of set. I used dial calipers. The 05 saw is .028″ thick at the teeth and .020″ on the plate, which means the set is .004″ on each side. Feeler gauges or trial-and-error could also be used.

Apply strips of blue tape on one side of the saw to slightly exceed the set. I used 3M #2080 tape, which is .003″ thick. I applied two layers, .006″, to build .002″ above the set. Enough of the saw plate is covered to give a reliable registration of the taped surface against the wood, while enough of the saw is free of tape to permit a useful depth of cut, about 3/4″ in this case.

Flex the saw against the work, taking care to apply light pressure with your fingers on only the taped portion (see photo at top). Saw with a gentle pull stroke and avoid pressure on the return stroke. Here’s what you get:

  • No binding, since the set can do its job.
  • No drifting, since the set works on both sides of the kerf.
  • It’s fast because it is a normal saw functioning in a normal manner of cutting.
  • There are no scratches on the work.
  • No specialized saw is required! Remove the tape when you’re done; it leaves no adhesive residue.
  • The amount of residual wood is miniscule. In theory, in my setup, it is .002″, but in practice it is less, barely a thou, and disappears with an extremely light pass with a paring chisel. In the photo below, taken before any paring, the oak peg on the right was sawn with a flush cut saw, the one on the left with the taped 05 saw.

One alternative is to position paper on the wood enough away from the projection to give clearance for the saw teeth. This may work but the paper can slide (and you may not see that), and if you press on an unsupported area of the saw, you can drive the side of the teeth into the wood. Another alternative, good for some situations, is to simply put tape on the wood, positioned clear of the saw teeth, but that is usually more trouble than preparing the saw with tape.

An awkward method is to put a card or paper under the saw, right up to the projecting wood. The problems are that the teeth scrape the card, and the elevation of the teeth above the surface will be inconsistent as you proceed. With thick card, the residual projection becomes too large and inconsistent.

Another option is to tediously rig a router, maybe using a flush trim bit for corner work, bring 22,000 screaming RPMs down upon your carefully-cut and almost-finished joinery, and say a prayer. You can if you want.

Category: Techniques  | 2 Comments
Author:
• Friday, December 14th, 2012

Planes, bats, birds, and bees: they all fly. The object is to get there.

In this segment, the final installment in the series, let’s look at some different but very effective plane designs that you may want to consider.

Japanese planes make use of a very thick blade tightly nested, bevel down, in a dense oak body (“dai”). Most of these are bedded at 40-42°, with very few higher than 45°, even for denser hardwoods. Does this contradict what we know about bed angles for Western metal planes? No, because other factors are involved.

The superb results possible with these planes are achieved first and foremost with blades that can be sharpened to phenomenal edges. The blades are a lamination of very hard, high-quality steel worked by masterful makers, and a soft iron backing. A heavy chipbreaker, also laminated, meets the main blade with great precision.

The sole is prepared so it contacts the work only at the toe and just in front of the blade. This makes the plane hug the wood through the stroke. The geometry of the throat is strategically designed to shepherd the shaving off the wood and through the plane. The resiliency of the dai buries vibration. Along with numerous other subtle refinements in design and preparation, these seemingly simple planes can produce beautiful results even though they are nominally just a bevel-down blade at 45°.

For years I used Japanese planes for smoothing before selling them away while transitioning to only Western planes to simplify my tool world. Though fussy to set up and maintain, I miss them sometimes.

Terry Gordon, in the land down under, takes a different approach in his wooden planes. Before my second tool purge, I used his very effective smoother, and, admittedly, I miss it too. He uses a 6mm thick blade which is bedded bevel down at 60°, without a chipbreaker, in a body of dense Aussie hardwood. They resemble Chinese planes.

Wait, how can this work, isn’t a chipbreaker essential? Once again, other factors change the game. The synergy of this high attack angle, a heavy blade held snugly in a dense body, plus a tight mouth, allows the plane to manage difficult figured woods.

Now at some point, it just is not worth trying to finish plane some woods in some situations. The factors to take into account include:

1. The wood! This is not just based on the species, but should be an assessment of what a particular board is telling you. Cherry could be a docile pushover or the curly cherry from hell.

2. The finish to be applied, oil or film. For example, the moderately open grain of walnut finished with oil will look better crisply planed, while the tight texture of properly sanded maple is fine under three coats of polyurethane. Experiment.

3. Where the wood is in the piece. Finishing planing a curly maple panel is a different matter than struggling to do the same with a curvy leg in the same wood. As another example, sanding is not likely a good way to fit drawers.

Thus, consider the other options. Scraping can almost always be employed to save a lot of sanding by using the scraper plane and/or hand scrapers, straight and curved. Set up and technique for the scraper plane can be found in this three post series: 1, 2, and 3.

I have two random orbit sanders in my shop and plenty of sandpaper. While I do not relish the work of sanding, I will do what is necessary to get the results I want for a particular piece in a particular wood.

That’s what it’s all about. It all flies.

Category: Techniques  | Tags:  | Comments off