I made this handy sandpaper cutter many years ago but have not until now fully described it here. This post lays out the details if you would like to build your own. I make no claims to originality for this but I have not seen one incorporating all of these features.
By the way, cutting sandpaper with a scissors will quickly destroy the blades, and creasing and tearing sandpaper is slow and awkward especially in coarse grits.
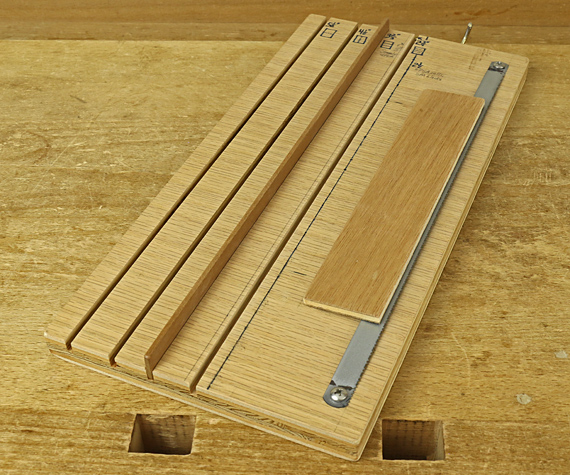
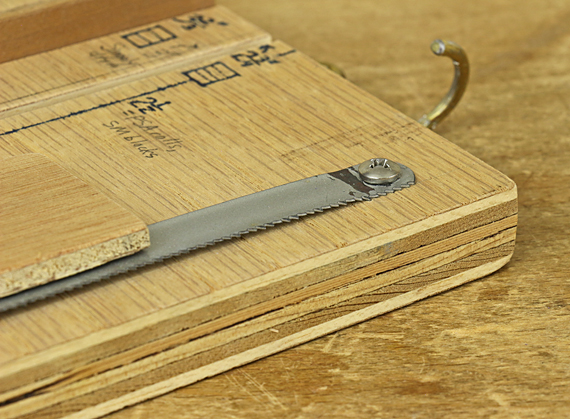
The base is 3/4″ plywood, 13 1/2″ x 6 5/8″. The cutter is a 12″ 14-tpi hacksaw blade. Use a pliers and metal vise to make a small L-shaped kink along the length just inside each end hole to give the blade a slight lift that will make it easier to slip the sandpaper underneath.
Secure it with pan head screws parallel to the edge of the base, then carefully make marks to indicate the location of the teeth. Remove the blade. Draw a line at the marks. It too should be parallel to the edge of the base.
Use cyanoacrylate glue to attach a 1/4″ plywood handle to the hacksaw blade. This makes it much easier to give the blade teeth good purchase on the sandpaper, which gives a straighter, faster, and cleaner cut.
Use the table saw (alternatively, a router or hand tools) to make 1/8″ grooves, 5/16″ deep, at strategic locations, to house a snug fitting 11/16″-wide slat. [Tip: rip the slat from the edge of a board. On most boards, this will produce a slight bow in the cutoff, which will help it stay in the grooves without being an overly tight fit in thickness.]
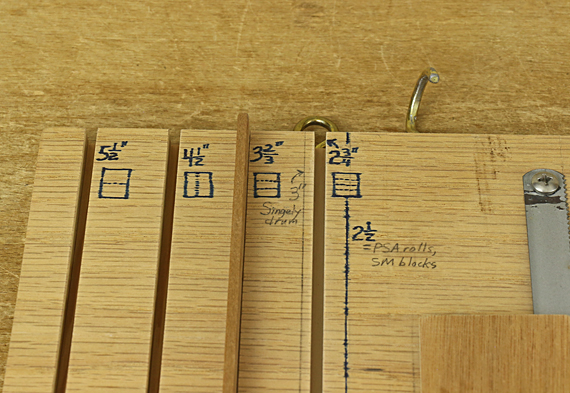
The key measurements are from the teeth of the cutter to the near edge of the grooves/wall of the slat. Below are the dimensions I use, based on standard 11″ x 9″ sandpaper sheets. I drew little visual aids on the base.
5 1/2″ = half of the length
4 1/2″ = half of the width
3 2/3″ = 1/3 of the length – This produces strips for the cork blocks that I use.
2 3/4″ = 1/4 of the length – This produces strips for Preppin’ Weapon sanding blocks.
The line (no groove because there is no room) at 3″ is for my Singely sanding drum. The line for 2 1/2″ strips is for some of my shopmade cork sanding blocks and is the same as PSA sandpaper rolls.
Reattach the cutter. I added an eye hook for hanging and a larger hook to easily grab the jig from its storage location low down on the wall near my bench.
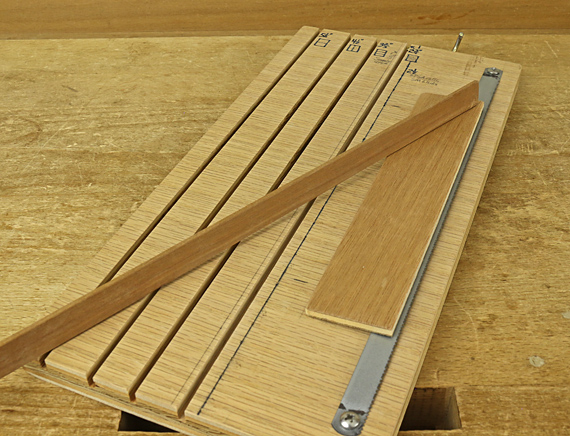
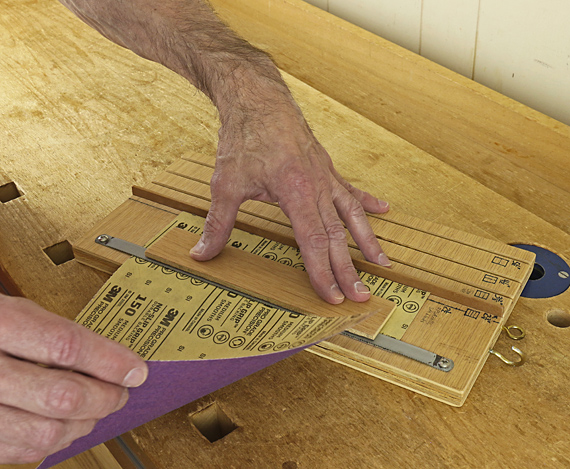
To use this nifty jig, slide the sanding sheet, grit side down, under the cutter and against the slat, which is placed in the desired groove. [For the infrequently used dimensions marked with a line only, just bring the edge of the sheet to the line.] Hold the blade down using the handle as shown, and tear. The job goes very quickly.
This is an easy jig to make and I think you’ll enjoy the ease with which it handles an otherwise annoying job.
