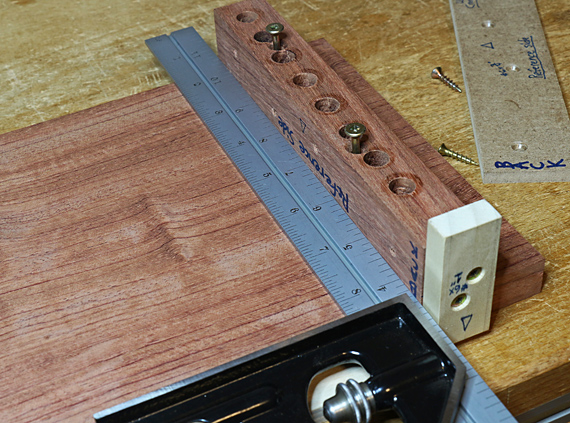
Continuing with the carcase dowel joint, shown above is the reference face of the jig being squared to the inside of the carcase. This is the same reference face of the jig to which the side piece was attached as the jig was screwed into place on the end grain workpiece. (See the photo in the previous post.)
The jig’s end cleat references the placement to correspond with the end grain workpiece. Note that the end cleat should be a bit narrower than the jig itself to avoid interfering with the placement of the square, as seen above. I usually prefer to clamp the jig to the side grain workpiece and recheck it for square before screwing it down.
Keep track of your references. You can see why I label the jig so much. In this build, the reference face of the jig corresponds to the inside faces of both workpieces.
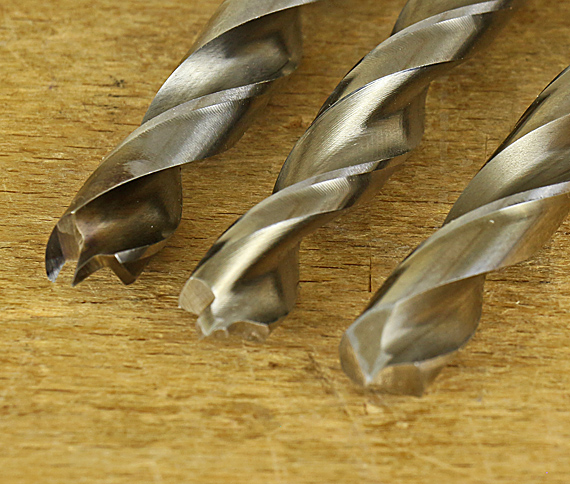
I drill all the holes with a portable power drill. I find no need to use a drill press or, if I had one, a horizontal boring machine. The carefully made jig ensures accuracy.
Below, left, the brad point bit is for the cross grain holes but it is slow and tends to burn when drilling along the grain. For that, the DeWalt Pilot Point (middle) bit is my favorite. The standard twist bit on the right works well enough too. Check the actual diameters of the bits to keep the holes consistent.
I have never seen an oversized good quality bit in these categories; they all seem to be made with a one-sided tolerance toward the small side. I suppose this is because all drilling systems have at least some runout, and you can make small holes bigger but not big holes smaller.
Please don’t use masking tape as a depth stop when drilling these joints. One slip of the tape can ruin a lot of work. And it will happen. So, is there a good drill stop out there? Yes, but you have to make it. But it’s easy. Please see this post.
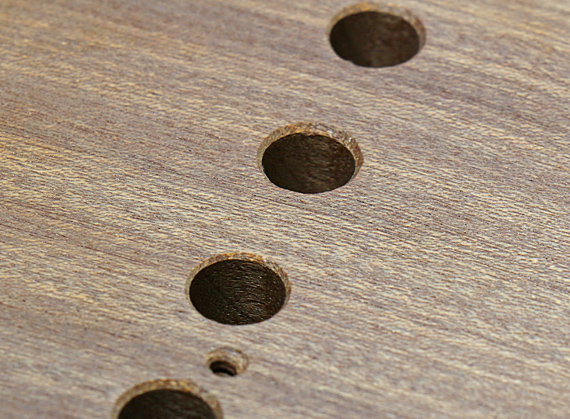
Add chamfers to all the holes – long grain and end grain. This will help with excess glue, and to prevent raised loose chips, which can prevent the joint from closing fully.

Next, we’ll look at dowels, gluing, and some joint design considerations.

Great series on this topic! I love this technique.
When I do it, I like to have the jig the same thickness as the part in which the end grain holes are drilled. When drilling the end grain, I position the part horizontally on my bench and clamp both it and the jig down to the bench at the interface between the two. I find it easier to drill horizontally than vertically. Because both parts are the same thickness the clamp holds both. I also use an end cleat as you describe.
To position the jig on the horizontal parts, I cut a board (typically a piece of plywood) to length to match the interior width dimension of the cabinet. I clamp it on the cabinet top (and then the bottom), centered (of course) and then I position the jig up against it at both ends for drilling. That ensures the placement is identical at the top and bottom.
I hope that all makes sense…
I have had this technique fail on one cabinet. It was shedua and the top warped such that the edges lifted, pulling out the dowels enough so my Krenov-style latch no longer worked. After a failed fix, I ended up screwing down the top at the edges, using trim-head screws and plugs. Fortunately the wood is dark and the plugs barely show.
Thanks for commenting, Carl.
Yea, your way to size the jig and drill the end grain piece makes sense, again showing that there’s more than one good way to do just about everything in woodworking.
I also like to use sized plywood pieces for registration in certain situations. It’s a solid way to lock in precise symmetry.
I guess all of us have used screws and plugs to get out of a jam at one time or another. Perfection only happens in magazine articles.
Rob
Thank you for the amount of details in this process (also). I am astonished that you use a portable power drill for drilling several times with the same jig. I did not risk that, but now I will give it a try.
Best regards
Bernd
Hi Bernd,
The jigs are quite durable in a tough wood such as bubinga and when used with reasonable care. The drill flutes really do not cut into the sides of the holes. Remember to check your bits with a 1/1000″ caliper (but as I mentioned, I’ve never seen one oversized), and roll them on a reference flat surface to make sure they are straight.
In fact, I have reused some of my jigs on more than one project with no loss of accuracy. I adapt a jig by making small changes such as not using a hole or two, or cutting it to a different length, or shimming the end cleat, etc.
Rob