Archive for the Category ◊ Tools and Shop ◊

Author:
• Saturday, January 12th, 2019
RP rasp

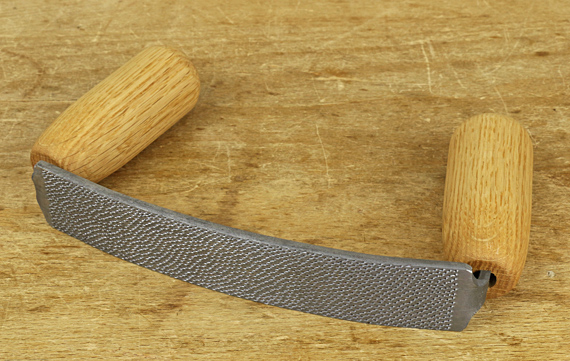
This unique rasp, handmade by Liogier in France, will allow you to deftly produce beautiful curves in your woodwork. 

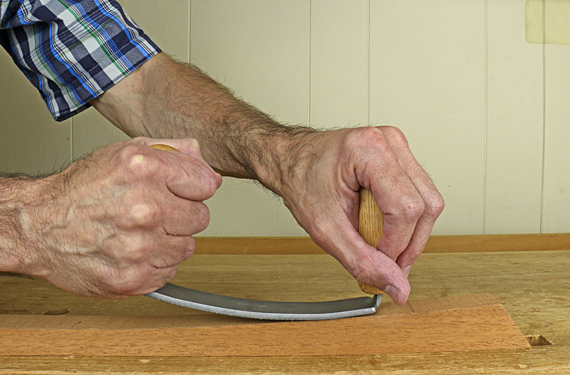
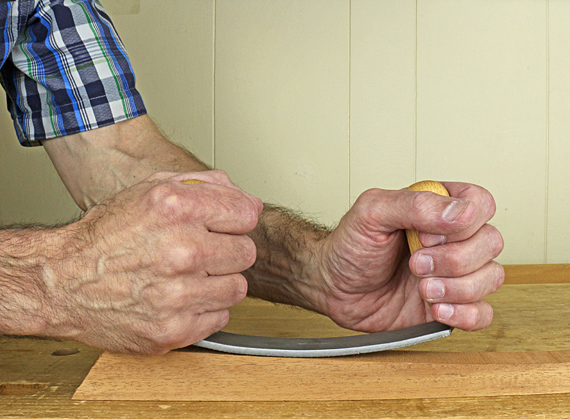
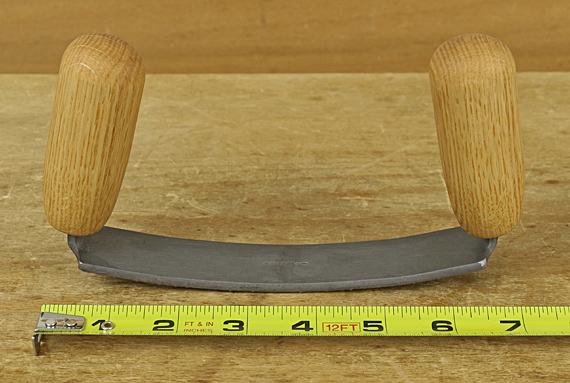
The stitched surface is flat across its 30mm (1 3/16″) width with a shallow convex curve (radius = 320mm) along its 160mm (6 1/4″) length. The robust hardwood handles at each end can be gripped from the sides or over the tops to give you power and control with an in-line push or pull stroke.

You will feel exquisite tactile feedback as you fair gradual curves such as refining bandsawn curves in a table leg or rail prior to final smoothing with a scraper or sandpaper. I suggest grain #10 or 11 for general furniture work.

RP rasp

After years of wishing such a tool existed, I designed this rasp in my shop using wooden and sandpaper mockups, and extrapolating from other rasps. I experimented with various curves, lengths, and widths for the cutting surface, and also put a lot of time into trying different positions and shapes for the handles. I presented the design to Noël Liogier who produced it with his legendary skill. The result: c’est manifique!

It is now available from the Liogier website for €58, currently $66.57.   

RP rasp by Liogier

You may find it helpful to visit the post I wrote a few years ago about available options in tools for working curves by hand, and the two posts about the process of fairing curves. There are two key points. First, distinguish between two different processes: shaping the curve and smoothing the surface. Second, when fairing (shaping) the curve, you need a tool that provides continuous tactile feedback of the developing curve. The tool must have sufficient rigidity and length to reduce aberrant bumps and troughs. 

This new rasp is far better for fairing curves than other options such as an adjustable float, Surform shaver, or diagonally pushing the convex side of a half-round rasp. It also provides better control and power than do curved ironing rasps for this task. Shorter tools such as a spokeshave or scraper are less reliable for fairing. I also think you will find this rasp more user friendly than a compass plane or other curved-sole planes. 

new Liogier curved rasp

Liogier is one of the two best-in-the-world makers of hand-stitched rasps, both in France; the other is Auriou. This video shows some of the incredible workmanship that goes into these tools. There is nothing quite like using a hand-stitched rasp. This new design adds to the venerable repertoire. 

If you do give this new rasp a try, I’d love to hear what you think of it.

Category: Product reviews, Tools and Shop  | Tags:  | 6 Comments
Author:
• Friday, December 21st, 2018
pinch rods

Accurate construction of most furniture assemblies – frames, carcasses, post-and-rail construction, and drawers – usually involves 90° angles. “Square” is a big part of woodworking. Parallelograms, we do not want. 

Will a square do the job? Yes, for verifying individual parts, but for most assemblies, the tool to use is pinch rods. Here are the reasons: 

  • They are more accurate.
  • You can work faster, and don’t need to remember numbers.
  • You will get a more intuitive sense of the magnitude and direction of the error.
  • Most important, you will see immediately how to correct it, especially during glue up. 

The idea is simple. You are comparing the length of the diagonals across the frame. If they are equal, you have a rectangle; if not, you have something else, such as a parallelogram. (Yes, the diagonals would still be equal in a symmetrical trapezoid, but you will not make that if you start with the opposite sides of the frame being equal, unless of course you want it ever so slightly that way in making a carcase to hold drawers.) 

I have been using this set of pinch rods for more than 20 years, which I made with collars manufactured by Veritas. I recommend these because they simplify construction, and the result is a lightweight, low profile tool that is quick and secure to clamp, and adjusts smoothly. 

Veritas supplies basic construction instructions but here are a few tips. You’ll want to build a set of rods, so keep in mind that the shortest length a pair of rods can measure is at least 1″ longer than the individual stick length, while the longest measurement will be about twice the stick length minus 3″. 

range of pinch rods

A 40° chisel-like business end works well, but contrary to Veritas’ instructions, I suggest orient the pair of sticks so the bevels face away from each other, toward the outside, as seen in the photo below. In use, the beveled side should always face the shorter side of the rectangular assembly. Thus, you will rotate the stick 180° along its length to measure the other diagonal. This allows the tool to manage even the narrowest rectangles. 

pinch rod ends

The storage position is shown in the photo below. The non-working blunt end protects the sharp-beveled working end. I prefer to apply the gentle accuracy of these wooden rods instead of metal ones on cleaned up work.

pinch rod ends

Nearly always, you will be measuring from the inside of the frame or carcass because the other parts of the assembly will interact with the inside surfaces and angles, not the outsides. 

For very large assemblies, a tape measure, perhaps with the special tip made by Veritas, or an ad hoc pair of rods, is more practical than having a giant special pair of rods. 

To make a parallelogram into a rectangle, there is a simple rule to remember: shorten the long diagonal. For dry assembly, this may mean tweaking the joints, such as trimming tenon shoulders in a frame or post-and-rail construction, or simply adjusting the positions of the clamps. During the crunch time of glue up, remember: angle the clamps to be slightly more along the long diagonal, as if you are trying to scrunch it shorter. I am always amazed at how little clamp adjustment is necessary to square up the assembly, especially using heavy clamp pressure. Don’t overdo it. 

Sure, you did a meticulous layout and cut great joints – dovetailed that drawer, mortise-and-tenoned that frame – but somehow when it all goes together the evil forces still manage to sneak in. Assess and correct it with pinch rods. 

You might even want to make a nifty rack to store them.

rack for pinch rods
Category: Tools and Shop  | 6 Comments
Author:
• Friday, August 24th, 2018

double-stick tape

Double-coated tape earns Shop Miracle status for its simplicity and problem-solving versatility.

I prefer SpecTape ST-555H 1″-wide (Woodcraft item #15D25). This is a tough cloth tape with strong adhesion, yet it removes cleanly. It has a stiff, smooth paper backing that is easy to remove. I have used other tapes with soft paper backings that were annoyingly difficult to remove.

Its top uses in my shop are:

  • Template work on the router table
  • Bandsawing legs with three-dimensional curves: For taping the waste back on to restore the layout lines, double-stick works much better than wrapping tape around the leg.
  • Mock-up designs: Lightweight parts can be rearranged easily.
  • Bandsawing curves in wide boards: Tape an extra squared board to the back of the work piece for stability.
  • Holding small/odd-shaped work on the bench

Here’s an efficient way to work with this tape. While applying the piece of tape to the wood, fold up a tiny corner to create a little “ear” of separated backing. Rub your fingernail over the main area of the backing paper to seal down the tape. Then grab the ear to pull away the backing.

Clear packing tape

This works well as a glue barrier. For example, I wrap tape on the tops and upper sides of the wooden support strips used for gluing up panels. The forms and clamping blocks for bent lamination work also get covered.

Oh, and of course this is essential equipment for returning that tool you bought that didn’t turn out to be as cool as it looked in the online catalog, or that, nope . . . ya just don’t need.

Cloth friction tape (rightmost in the photo)

I wrap, hockey style, my coping and fret saw handles with Ace Hardware black Cloth Friction Tape to greatly improve my grip and reduce hand fatigue. I also flat wrap some clamp handles such as the outer handle on wooden hand screws.

This stuff is grippy without being too rough on your hands, as can be anti-slip tapes. It can leave a bit of black residue on your hands when new, but not significantly as the wrapping inevitably gets sprinkled with wood dust. It does not leave sticky residue on your hands.

[3M Cloth Friction Tape appears similar but I have not used it. 3M 1755 Temflex Friction Tape is different – it’s coated on both sides.]

Silicone “X-Treme Tape” (Rockler) (second from the right in the photo)

This interesting stuff stretches a lot and bonds to itself without adhesive. It is useful for some dust collection fittings where it makes a nice tight seal. However, it really only sticks well to itself, and therefore needs contour on both parts of the fitting that it can tightly conform into, and so create a mechanical lock.

Author:
• Tuesday, August 21st, 2018

3M tapes

Funny that tape is even used in the woodshop where we sweat over joints, glues, and fasteners to keep things together. Nonetheless, a variety of tapes serve all sorts of duties, and it pays to be familiar with the options. From among 3M‘s numerous tapes, here are the ones I have found useful, working from left to right in the photo.

The workhorse is the #2093EL blue painter’s tape, rated “medium adhesion, 14-day removal,” very similar to the original #2090 but with Edge Lock (EL), designed to give cleaner paint lines for painters. This is handy stuff – as a drill bit depth indicator, marking the floor locations of machines, reminding myself not to reset a gauge, and on and on. For shim purposes, it measures .004″ thick by my calipers. 1″ width is versatile.

Second from left, #2080EL “low-medium adhesion, 60-day removal” is smoother and thinner at .003″. I like this one better for taping off areas to protect them from glue squeeze-out. It’s not a big difference for our purposes from #2093. The EL tapes do seem to lay down to a neater edge.

The green tapes are interesting. The thinner green roll is Scotch #233+, which 3M renamed to #401+. It has significantly greater adhesion than the blue tapes, and it is stretchy. It was developed for heavier-duty use such as conforming and holding to auto body contours. For woodworkers, it makes a great light-duty clamp in situations where regular clamps are awkward to arrange, such as gluing edge trim or small miters, especially with CA glue. It is much better in this regard than the blue tapes.

However, the green #2060 (fourth from the left) is more widely available than #401+, and can be found in home centers in a variety of widths. #2060 is practically as good as #401+: adhesion and tensile strength are nearly identical, and at 8% elongation before breaking, it almost as stretchy as 401+, which has 10% stretch. Both remove cleanly.

The beige tape on the right is #2040 Solvent Resistant tape. I use this infrequently to mask off an area from a solvent-based finish.

Surprisingly, the tensile strength of all of these tapes is about the same, from 24-27 lbs./inch of width.

So, let’s simplify. I suggest go to the orange palace and get a 1″ roll of #2093EL for general use, and a roll of 1 1/2″ #2060 for stronger adhesion and clamping. I covered the background info and the other options in case you need them.

Next: other tapes including . . . the Shop Miracle.

Author:
• Sunday, July 15th, 2018

my woodshop

Looking back at photos of my shop as it was 16 years ago (below), I was struck by the differences from now (above). For example, all of the major machines have been upgraded, and I had yet to install most of the shopmade workbench features that now seem essential. Just as interesting, however, is the persistence of effective shop systems. For example, my sharpening bench is essentially unchanged, even in its location alongside the workbench, despite the whole shop being in a different location.

Now to my advice: Let your shop evolve.

By all means, sure, take your best shot at the initial set up, using your resources of space, money, time, and knowledge. But don’t get seized with paralysis by analysis, especially from drooling over dream shops in magazines.

There is no dream shop. There’s your shop, and you need to set it up and start building things in it as soon as possible.

In time, it will become evident what works and what changes are needed, based on what you build, your style of working, and the available resources. At any time, it is impossible to think through every contingency. Better to get going, and let it evolve.

In this way, you will have something better than a dream shop. You will, with persistence and some luck, have a real shop – your shop – and it will be right for you because it will change with you.

My first “shop” after leaving the home of my youth, was a Workmate in a hallway, tools stored in cardboard boxes, and wood stored in a stairwell. Yet I built. Check out Fine Woodworking #237 (Tools and Shops, Winter 2014) for the layout of my humble shop many years later. Of course, however, some features have evolved since then. The photo here at the top is more recent.

We’re all, always, setting up shop – because we woodworkers love to build things.

Category: Tools and Shop  | 6 Comments
Author:
• Sunday, April 22nd, 2018

shop space

I think we would all welcome more shop space but realistically most of us contend with making better use of the space we have. Here’s another tip for that.

For combined machine and hand tool woodworking, shop space is usually governed primarily by the major machines, and then by wood storage, and the workbench. For the table saw, bandsaw, jointer/planer, and router table the required space includes not only the machine itself but, even more, the ranges of the infeed and outfeed. Manipulating these ranges can produce more functional shop space.

Coordinating the different heights of the machine tables is one trick to help. I covered that in a previous post. However, sometimes that can be difficult, so think also of the angle of the tables. Tiny differences there can pay off.

This is what you have to do when your shop is only 200 square feet.

During a recent bandsaw tune-up, I re-shimmed the table on the trunnion assembly. Oops, that made the bandsaw table just at the same height as the nearby table saw top. There was no infeed clearance for using the bandsaw in its usual location.

shop space

No problem. A pair of wooden shims, only about 1mm thick, placed on one side of the bandsaw base, tilted the machine enough (less than 0.2°!) so that the infeeding wood safely clears the table saw, plus some allowance for bowed boards. In the photo at the top, the straightedge is flat on the bandsaw table in the right of the photo, but notice in the left of the photo that it clears the table saw surface.

The only interference that this arrangement causes with table saw work is very wide ripping, on the order of 24″, which I rarely do, but all my machines are on wheel bases, so they can be moved to allow those jobs too.

Category: Tools and Shop  | 8 Comments
Author:
• Friday, February 16th, 2018

3M sandpaper

Sanding doesn’t get a lot of respect in the woodworking world, perhaps because it is a rather boring job, and hand planing seems, by contrast, so refined. Nonetheless, sanding is an important step in building many projects, so it pays to take advantage of technological advancements.

3M’s Pro Grade Precision sanding sheets seem to cut faster than any others that I have tried. I can really sense the sharpness of the “proprietary, precision-shaped ceramic mineral” abrasive biting the wood. Of course, this is not a controlled test, but it is enough to make me reach for these sheets first. 3M’s labeling is a bit confusing – this product is an upgrade from their “Pro Grade” paper, which uses aluminum oxide abrasive.

I had reported earlier that I didn’t find the grippy backing of 3M’s sanding sheets particularly helpful, but my experience since then has shown me different. The “No-Slip Grip” backing does grip rectangular cork blocks better than regular paper backing, and makes sanding easier. Even better, it holds very well in the slots of the shop-made, all-cork curved blocks that have become a staple among my tools for curved work. This backing is also significantly more durable than paper backing.

I continue to find 3M’s remarkable Ultra Flexible Sanding Sheets (on the left in the photo above) to be wonderful for working detailed curves. The durability of the film backing and the grit itself far exceed that of paper-backed sanding sheets for this work. They are available in 100, 150, 220, and 320-grit, and in 4 1/2″-wide, 7″-long sheets and 10 1/2-foot rolls.

3M sanding sponges

I previously reported that I hadn’t found any sanding sponges to be useful. I’m still not a big fan, but 3M’s Pro Grade Precision “ultra flexible, dust channeling” sponges are pretty good for smoothing in some sculptural work. An important distinction, sanding sponges do not afford the tactile control, nor do they have the moxie of rasps for shaping. They also break down too fast for their cost. Their main advantage is they are easy to hold as you smoosh them over irregular shapes. Of the two types shown, the larger diamond pattern has been more durable.

You can find all of these products at home center stores. As usual, I relate only my direct shop experience with tools, unsolicited and uncompensated. I just want to help you make things.

Category: Tools and Shop  | Tags:  | One Comment
Author:
• Sunday, February 11th, 2018

brass plane iron adjustment hammer

This modified brass hammer is superb for adjusting plane blades. It shares the functional advantages of a small Japanese octagonal steel hammer, but the brass is kinder to blades.

I created the quasi-octagonal shape from the original cylindrical head of a Grace USA 8-ounce brass hammer using an 80-grit belt on the Ridgid oscillating vertical belt sander. There was no need to remove the head from the handle. I dressed the corners with a mill file, and then finished everywhere with a medium-grit SandFlex block.

I crowned one face (shown) for use on the body of a wooden plane. I left the other face flat. A tiny engraved circle on each side of the hammer indicates the crowned face.

The flat sides allow better access and contact of the hammer face to parts such as wooden wedges, the sides of a plane blade, and the chipbreaker of a Japanese plane. The small diagonally-oriented sides permit access to small blades in tight areas such as in a small shoulder plane.

I like this hammer better than any of the cylindrical or square hammers sold for the same purpose. It also retains its general use when a lightweight, soft-metal hammer is needed. You can find the Grace hammer for less than $20.

The modified brass hammer is shown below, along with a steel Japanese hammer.

plane iron adjustment hammers

Category: Tools and Shop  | 2 Comments